Showing posts with label bicycle crunch. Show all posts

Monday, 26 January 2015

Complete Core BOSU® Workout

The BOSU® Balance Trainer, now a staple in nearly every fitness facility, has been around for nearly 15 years. While the product can be easily integrated into all areas of fitness, core remains the number one use for this popular piece of equipment. The unique design and unstable surface enables you to work your core in a variety of positions with comfort and appropriate challenge. Whether you’re looking for exercises to add at the end of a cardio class or you’re in need of a full core workout, the following 5 exercises will help you strengthen from the inside out.
Each exercise has start and finish photos, along with a brief description. For additional set-up and progression or regression suggestions, follow the link provided. Additional core exercises are available on the BOSU YouTube Channel.
Double Crunch
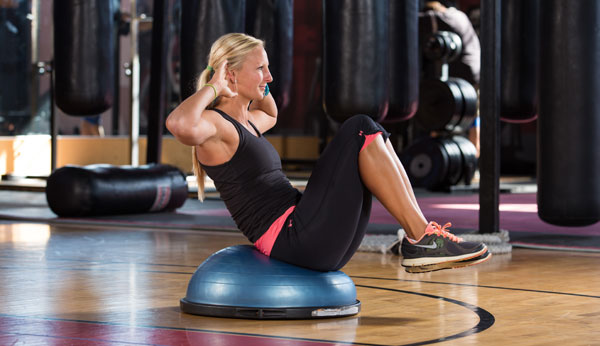
double bosu crunch
Position the small of your back in the center of the dome. Find balance with your feet off the floor, in line with the knees. The knees should be bent to 90 degrees and positioned over the hips. With hands behind the head and neck in neutral, begin by extending the lumbar spine slightly. Then, slowly flex the trunk to bring hips off the dome, slightly, and chest toward legs. Pause at the top, then slowly lower back to the starting position. To regress the exercise, perform the upper crunch with feet off the floor or on the floor. Perform 10-15 repetitions.
Lateral Balance
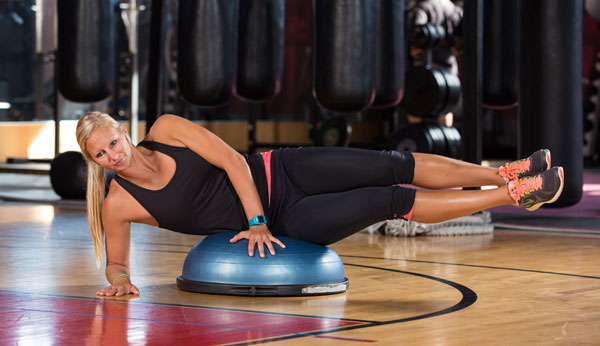
lateral bosu balance
Position your waist on the top of the dome and the forearm on the floor (elbow aligned with the shoulder). The other hand can be on the front of the dome for support as you lift both legs until they are parallel to the floor. Once you find your balance, begin to challenge it by removing the bottom arm from the floor and then the top. Hold the balanced position for 10-20 seconds. Lower and return to balance position for 2 additional repetitions.
BOSU® Supine Bicycle
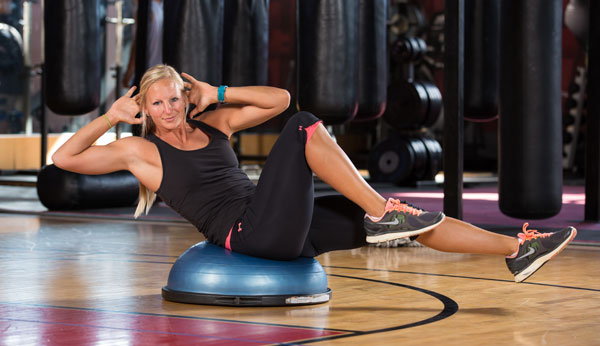
bosu supine bicycle
Position the small of your back in the center of the dome. Find balance with your feet off the floor, in line with the knees. The knees should be bent to 90 degrees and positioned over the hips. With hands behind the head and neck in neutral, begin by flexing the spine slightly and holding the ”curl” position. Begin alternating the legs in a small bicycling motion. As you become comfortable with the leg movement, add trunk rotation toward the bent knee. Explore with range of motion to increase the challenge. Perform 10 rotations to each side.
Prone Tuck & Extend
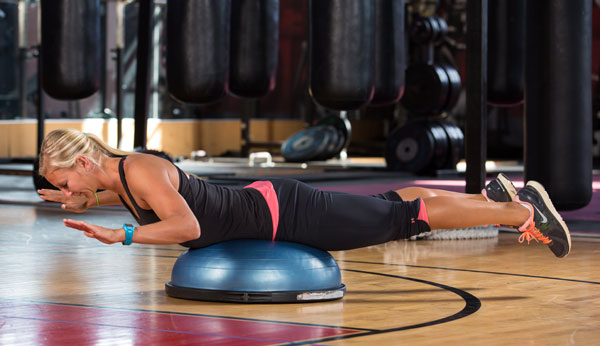
prone tuck and extend
Begin prone with stomach centered on the dome. Relax over the dome (forearms, knees and lower legs resting on the floor). Slowly extend the spine and hips until the body is parallel to the floor. Then, as you find balance, experiment with lifting the body and legs higher than parallel. Hold the balanced position for 10-20 seconds. Lower and return to balance position for 3-5 additional repetitions.
V-Sit with Trunk Rotation
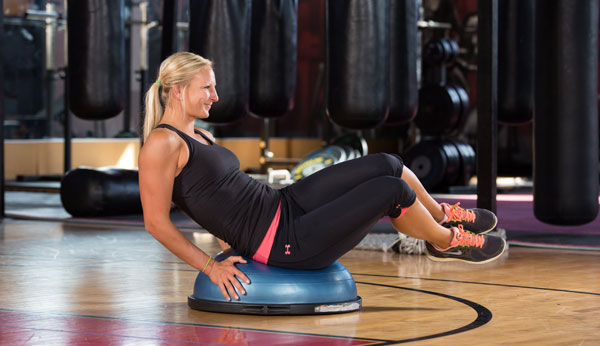
v-sit with trunk rotation
Center hips on top of the dome. With hands on the sides of the dome for balance, bend knees and place toes lightly on the floor in front of you. Lean back slightly while maintaining neutral posture and begin to lift the feet off the floor to come into V-sit balance. Begin the rotation by tilting the legs to one side and the torso to the other. Then, reverse. Perform 10 rotations to each side. You can also perform the rotation with one foot lifted or both feet on the floor.
Of course, these exercises merely scratch the surface of core-focused exercises that can be performed using the BOSU® Balance Trainer. This workout was adapted from the BOSU® Complete System. Learn more about BOSU Complete. BOSU also offers an app to create 15-, 30- and 60-minute workouts. Visit the iTunes App Store or Google Play, or click here for more information. Or join BOSU at a live training to learn more about adding BOSU to your programming.

 Source Shannon Fable, 2013 IDEA and 2006 ACE Instructor of the Year

Monday, 19 January 2015

Why Killer Ab Workouts Won't Get You Ripped

One of the biggest misconceptions among gym-goers is that killer ab workouts are an important component of gut-wrenching exercise. Television is littered with infomercials that claim their "new" version of the infamous ab-blaster will shred your midsection, giving you washboard abs. The truth of the matter is that performing an extraneous number of crunches won't get you ripped. Conventional wisdom points toward intense bouts of abdominal exercise as being the answer to helping you gain the flashy six-pack you so often see in the movies, but cardiovascular exercise must be performed to burn the excess layer of fat engulfing your midsection.

iStock_000026719054Small.jpg


Understanding the Benefits of Cardiovascular Activity
It's important to realize your abs are exercised during most workout activities. It's true that abdominal exercise specifically targets the muscles in your midsection, but other forms of exercise force the same muscles to contract, fueling strength development. A decent number of gym-goers will do whatever it takes to avoid engaging intense bouts of cardio, but these modes of exercise will help you achieve your goal of attaining a trimmer midsection much faster than any other form of exercise. Cardio activity will also help you burn fat. You don't necessarily need to run five miles per day on a treadmill to shred excess body fat. Other cardiovascular exercises, such as swimming, can help you reach your goal.

Benefits of Killer Ab Workouts
Killer ab workouts won't get you ripped, but that doesn't mean they're not beneficial. Maintaining a strong midsection is important for fitness longevity. Believe it or not, you use your abs in practically every aspect of your everyday life. From sitting in a desk chair at the office to walking down the street for a cup of coffee, you are constantly using your abdominal muscles. Intense ab exercise demands frequent repetition of various movements that strengthen the core muscles. Execution of killer ab workouts can improve your posture and enable you to better perform other types of exercise, such as running and weightlifting. However, a 2011 study conducted by the Department of Kinesiology and Health Education at Southern Illinois University proves that repeated ab exercise has minimal effect on reducing the presence of subcutaneous fatty tissues in the body.

Selecting the Most Effective Ab Exercises
You don't need to dial an 800-number or spend an hour on an exercise mat doing crunches to strengthen your abdominal muscles. Strengthening your abs requires proper execution of a variety of different complex exercises, which can be performed either at home or at the gym. For effective results, try performing a four-exercise ab circuit that includes the pike walk, glute bridge with abduction, straight-arm side bridge and Hindu pushups. These exotic-sounding exercises will help build muscle in the core and back and also strengthen hip joints. To perform Hindu pushups, place your feet shoulder-width apart with your buttocks arched in the air. Move your head toward the ground while bending your elbows. Be sure to keep your legs straight as you lower your hips to the ground. Push up, lifting your head toward the starting position.

If you are seeking a more advanced workout check out TRX and some of the fantastic Core Strengthening and Shredding work outs form anywhere TRX Workout for beginners


Source John Shea Fitness Articles

Friday, 9 January 2015

Two Underrated Exercises You Should Be Doing

There’s a constant focus on what is new, flashy and trendy. And, to a certain extent, that’s fine. But in pursuing the new, the cutting-edge and the fresh, we can sometimes overlook the basics. As the summer schedule winds down and we transition to the slightly more stable fall, you may find your clients have a renewed focus on fitness. Here are a couple of old-school movements to train some fundamental movements well.
Bicycle Crunch
I remember doing these in gym class in elementary and middle school. All we did was lie on our backs and jerk our shoulders rapidly from side-to-side while kicking—more like flailing—the legs in and out, all at a pace that was way too fast. There wasn’t much ab work going on and we didn’t get tired until we did them for a long time.
Here’s the modern, updated version of the Bicycle Crunch from my book, Abs Revealed.

 There’s a constant focus on what is new, flashy and trendy. And, to a certain extent, that’s fine. But in pursuing the new, the cutting-edge and the fresh, we can sometimes overlook the basics. As the summer schedule winds down and we transition to the slightly more stable fall, you may find your clients have a renewed focus on fitness. Here are a couple of old-school movements to train some fundamental movements well. Bicycle Crunch I remember doing these in gym class in elementary and middle school. All we did was lie on our backs and jerk our shoulders rapidly from side-to-side while kicking—more like flailing—the legs in and out, all at a pace that was way too fast. There wasn’t much ab work going on and we didn’t get tired until we did them for a long time. Here’s the modern, updated version of the Bicycle Crunch from my book, Abs Revealed. With this modern, updated version, you move more slowly and perform spinal flexion with rotation. And, no, your spine will not explode if you do crunches. The anti-crunch dogma is overblown, to say the least. Crunches are far from the most amazing exercise ever invented, but they have their place. (For more info on this topic, see the ACE articles When Pigs Crunch and Get Off the Pendulum.) Adding these to your routine will target all of the abdominal muscles effectively so, unlike the old-school version of this exercise, you don’t need a ton of reps to get tired. Glute Bridge Keep reading, gentlemen. The glutes are perhaps one of the most important muscles in the body to train. All of my clients get glute work—female and male, young and old. The glutes are sometimes described as the brain of the lower body because they control everything that happens in your legs. Here are the basics of how to do a Glute Bridge from the ACE Exercise Library: Glute Bridge I’m taking you beyond the basics to make sure the glutes are the muscles actually doing the work on this exercise. Over the years, I’ve had many people perform a glute bridge and inform me that they feel it in their hamstrings, low back and sometimes even the quads—everywhere but the glutes. If the glutes cannot create the desired movement, other muscles will jump in and take over to create what is expected. In this case, I’ve found this systematic, thoughtful 4-step approach to performing the exercise to be very effective. Once this is mastered and your client begins to “feel” it in the glutes, the more fluid, standard technique can be used effectively. Steps: Posterior pelvic tilt (A helpful cue I have used is “Move your belly button toward your chin and your butt toward your heels.”) Lift butt off the floor Lift low back off the floor Lift middle back off the floor At the top, position the hips slightly higher than the line connecting the shoulders and knees. This provides more glute action because it adds hip hyperextension. To return, just reverse the steps, 4-3-2-1. Quick cues are “Tilt – Butt lift – Low back lift – Mid back lift.” Another factor here can be the reciprocal inhibition caused by tight hip flexors. The solution is to perform static stretching for the hip flexors immediately before performing the glute bridge. Here’s the most effective way to stretch the hip flexors:
 

  Some have stated, incorrectly, that static stretching should not be done before strength training because it temporarily weakens muscles. Once again, extreme viewpoints are wrong. In this case, some weakening of an overactive muscle group is precisely what we want as it allows more neural drive to the glutes (rather than neural inhibition if we do not address potential hip-flexor hypertonicity prior to glute strengthening). Wrap-Up New ideas are great, but what has come before can often be effective if we know how to effectively use them and how to do the basics well. Fitness need not be dazzling to be effective. Effective exercises make the results dazzling. With this modern, updated version, you move more slowly and perform spinal flexion with rotation. And, no, your spine will not explode if you do crunches. The anti-crunch dogma is overblown, to say the least. Crunches are far from the most amazing exercise ever invented, but they have their place. 
Adding these to your routine will target all of the abdominal muscles effectively so, unlike the old-school version of this exercise, you don’t need a ton of reps to get tired.
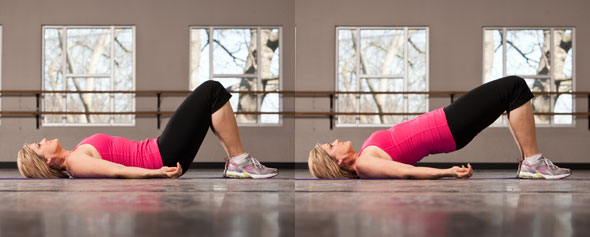
Glute Bridge

Keep reading, gentlemen. The glutes are perhaps one of the most important muscles in the body to train. All of my clients get glute work—female and male, young and old. The glutes are sometimes described as the brain of the lower body because they control everything that happens in your legs. Here are the basics of how to do a Glute Bridge from the ACE Exercise Library
Glute Bridge
I’m taking you beyond the basics to make sure the glutes are the muscles actually doing the work on this exercise.
Over the years, I’ve had many people perform a glute bridge and inform me that they feel it in their hamstrings, low back and sometimes even the quads—everywhere but the glutes. If the glutes cannot create the desired movement, other muscles will jump in and take over to create what is expected.
In this case, I’ve found this systematic, thoughtful 4-step approach to performing the exercise to be very effective. Once this is mastered and your client begins to “feel” it in the glutes, the more fluid, standard technique can be used effectively.
Steps:
  1. Posterior pelvic tilt (A helpful cue I have used is “Move your belly button toward your chin and your butt toward your heels.”)
  2. Lift butt off the floor
  3. Lift low back off the floor
  4. Lift middle back off the floor
At the top, position the hips slightly higher than the line connecting the shoulders and knees. This provides more glute action because it adds hip hyperextension. To return, just reverse the steps, 4-3-2-1. Quick cues are “Tilt – Butt lift – Low back lift – Mid back lift.”
Another factor here can be the reciprocal inhibition caused by tight hip flexors. The solution is to perform static stretching for the hip flexors immediately before performing the glute bridge. Here’s the most effective way to stretch the hip flexors: http://www.youtube.com/watch?v=zqH8Rmeu1fs
Some have stated, incorrectly, that static stretching should not be done before strength training because it temporarily weakens muscles. Once again, extreme viewpoints are wrong. In this case, some weakening of an overactive muscle group is precisely what we want as it allows more neural drive to the glutes (rather than neural inhibition if we do not address potential hip-flexor hypertonicity prior to glute strengthening).

Wrap-Up
New ideas are great, but what has come before can often be effective if we know how to effectively use them and how to do the basics well. Fitness need not be dazzling to be effective. Effective exercises make the results dazzling.

Source Jonathan Ross Jonathan’s “800 pounds of parents” inspired his fitness career as a two-time Personal Trainer of the Year Award-Winner (ACE and IDEA)