Showing posts with label Core. Show all posts

Friday, 19 February 2016

Fitness Programs for Women: Four Essential Tips

Fitness programs for women are often wrought with bad advice and pseudoscience. It's no wonder that so many fitness programs for women utterly fail! There's plenty of great information out there, but it can be impossible to find amidst the gimmicks, fad diets, and ineffective workout routines. If you're looking for fitness programs for women that really work, try using the four following tips.

1. Lift Heavy Weights
Plenty of women make their way into the weight room now and again, but most are afraid that they'll get "bulky" if they lift too heavy. That's nonsense! It takes male bodybuilders years of dedicated effort to pack on muscle mass, and they've got testosterone and tons of food on their side. Not only will you not get "too big" by lifting challenging weights - you'll actually look better.
Lifts like squats, bench presses, deadlifts, and other heavy movements are great for stimulating your metabolism and packing on a little bit of lean mass. Whether or not you realize it, that's really what you want! The right amount of muscle gives you a lean, fit look that you simply can't achieve with cardio alone. Challenging yourself in the gym will also cause you to burn more calories, which means you get to eat more and still lose weight.
2. Low Fat is NOT Healthy!
Some nutritionists are still stuck in the 1980s' low-fat craze, but avoiding dietary fat is NOT going to get you the results you want. In fact, most "low-fat" products like crackers, pretzels, and other grain-based products will make it nearly impossible to get lean! They make your blood sugar levels skyrocket, which in turn causes your body to secrete tons of insulin - a hormone which actually makes your body store even more fat. If you're trying to get lean, ditch most of your carbs and eat plenty of olive oil, avocados, nuts, and even some red meat.
3. Ease Up on the Cardio
If you're going to start lifting heavy weights (which you should!), then you're also going to need to ease up on all of that cardio you're probably doing. Slaving away on a treadmill or elliptical is simply not necessary, and it eats up way too much of your time. It's great to do a few short sessions per week for your cardiovascular health, but hours upon hours of monotonous movement aren't going to help you lose fat.
However, there is a much better type of cardio for optimal fat loss: interval training! On a track, treadmill, elliptical, or exercise bike, simply alternate short bursts of all-out sprinting with longer bouts of active rest. For example, you might do eight rounds of fifteen-second sprints and forty-five second "jogs" on an elliptical machine. The whole thing will be over in under ten minutes, but the intensity of the workout will cause your body to burn more fat all day long.
4. Don't Under-eat
One of the worst things you can do in fitness programs for women is to eat too little. Your body is an adaptive machine, and it will respond to severe calorie restriction by slowing its metabolism way down. Have you ever noticed how lethargic, tired, and cold you get when you don't eat enough? Those are sure signs that your body is burning less fuel!
That's not to say that you shouldn't cut calories at all - your body does need a reason to use its fat stores for energy instead of your food. The key is to eat just little enough that you can burn fat while avoiding hunger. Focus first on the right food choices, and then start counting calories if you truly need to. Overall, it's best to take it slow and steady with your fitness programs for women and focus on losing no more than a pound per week.

Friday, 18 December 2015

Perfect Your Form

Do a better squat, perform a better lunge, and fix your flawed technique

Lunges

What You Do Wrong:
You lean forward, causing your front heel to rise.

1/ "Narrow your starting stance," says Gray Cook, author of Athletic Body in Balance. The closer your feet are, the harder your core has to work to stabilize your body.

2/ "As you do the lunge, focus on moving your torso only up and down, not pushing it forward," says Craig Rasmussen, a fitness coach at Results Fitness in Santa Clarita, California. This keeps your weight balanced evenly through your front foot, allowing you to press into the floor with your heel, which tones more lower-body muscle.

Squats

What You Do Wrong:
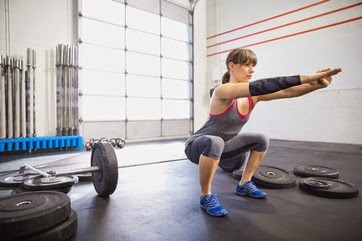
You start the movement by bending your knees.

1/ As you squat, imagine you're sitting down into a chair, rather than forward on top of your knees. Push your hips back first instead of beginning by bending your knees, which puts more stress on your joints, says Dan John, a strength coach in Burlingame, California.

2/ Women tend to lean forward on their toes, but they should sit back into their heels. Try this fix: Pretend that you're standing on a paper towel, says Charlie Weingroff, lead physical therapist for the U.S. Marine Corps Special Operations Command at Camp Lejeune, North Carolina. "Then imagine trying to rip the towel apart by pressing your feet onto the floor and outward." This activates your glutes, which helps you use heavier weights and break through plateaus.

Straight-Leg Deadlifts

What You Do Wrong:
You round your lower back as you bend over.

1/ "When bending down, act as if you are holding a tray of drinks and need to close the door behind you with your backside," says Alwyn Cosgrove, co-owner of Results Fitness. This helps you push your hips back instead of rounding your lower back—a form blunder that puts you at risk for back problems.

2/ It's easy to put too much space between the weight and your body as you move up and down. Pretend you're shaving your legs with the bar or dumbbells, suggests Kaitlyn Weiss, a certified strength and conditioning specialist in Southern California. The farther the weights are from your body, the more strain on your back, which limits the work of your hamstrings and glutes.

Rows and Pullups

What You Do Wrong:
You ignore the muscles that draw back your shoulder blades.

1/ "Before you start the exercise, create as much space as you can between your ears and shoulders," says Rasmussen. Pull your shoulder blades down and back, which will ensure you work the intended middle- and upper-back muscles.

2/ "As you row the weights, stick out your chest," says Mike Boyle, owner of Mike Boyle Strength and Conditioning in Woburn, Massachusetts. This allows you to better retract your shoulder blades, which will lead to better results.

3/ "Imagine an orange between your shoulder blades," says Nick Grantham, owner of Smart Fitness in the U.K. "As you pull the weights or your body up, 'squeeze the juice out of it' by bringing your shoulder blades together."

Source

Tuesday, 8 December 2015

The Advantages, Disadvantages, and Exercises on a Fitness Ball

The Advantages, Disadvantages, and Exercises on a Fitness Ball

Most people dream of getting into shape, losing weight, and exercising more. It can mean signing up at local gyms. However, many fitness enthusiasts prefer to purchase home fitness equipment that can be effective for them. They can take the benefits of a total workout while at homes and within flexible times. 

One of the best options to consider is buying a fitness ball. It is the time for you to experience a unique workout at home. There are various reasons why this equipment has become very popular. In fact, it is utilized by most physical therapists to treat their patients from back pains.

 
A fitness ball having a diameter of about 55 to 85 centimeter is made of elastic rubber. It is utilized in exercise and physical therapy. There are various names for a fitness ball such as exercise ball, Pilate's ball, gym ball, therapy ball, balance ball, body ball, yoga ball, sports ball, and Swiss ball.

The major benefit of a fitness ball exercise is enabling the body to respond to the ball's instability while keeping the balance and engaging more muscles as well. Keep in mind that the muscles are strengthened upon struggling to maintain the balance. The core muscles of the body, back muscles, and abdominal muscles are the target of the fitness ball programs of exercises.

Exercises done on a fitness ball will never bore you. In fact it can challenge your stamina, patience, perseverance and, self-discipline. This is the true form of exercising, working the entire core muscles to achieve the best results.

A fitness ball is effective because of its rounded shape. It can create instability to induce your core body muscles to work. Compared to floor crunching, the muscles that are only working are the upper abs, but when you do the crunching on a fitness ball, the core muscles including abs muscles, back muscles, pelvic muscles, and hip muscles are working together in helping you stay on the ball.

Try doing a few pushups using a fitness ball, your hands on the floor and your feet on the fitness ball or vice versa. This exercise gives more stability when the feet are spread apart and tougher when the feet are put closely together.


 Although a fitness ball provides many advantages, there are also some pitfalls especially if overused. Strength coaches revealed that it can cause injury and approximately 70 percent of fitness ball exercises are considered worthless.  Nevertheless, it is still prescribed by some therapists in treating patients with back pain.

Incorporating a fitness ball in your fitness program can mean surpassing all the difficult levels involved during the exercise. Each requires support from your stomach muscles and back to help in keeping the trunk muscles firm. More often, a fitness ball is good for people who have lower back pain. Other uses include developing overall strength and control of the body's core muscles, increasing the strength of back and abdominal muscles, learning proper posture and body mechanics when lifting objects, and increasing mobility of the lower back.

Damian@FitnHealthy

Monday, 26 October 2015

7 TRX Plank Variations for a Stronger Core

The word “core” is thrown around so often in today’s movement classes, it’s almost lost all meaning. The core doesn’t mean just your abdominals or the front of the body. It means the entire trunk, front and back, including the hips. 
The goal in this series of exercises is to help train and create core stiffness, which means the muscles of the core adequately support the spine. Dr. Stuart McGill, a leading back and spine researcher, puts it this way: “Core stiffness is essential for injury prevention. Core stiffness is essential for performance enhancement. Core stiffness is not optimized in body-building exercises. Core stiffness requires dedicated training.”
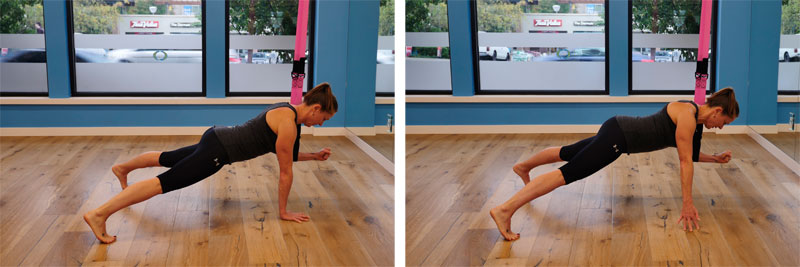
The plank is one of the best ways to train for core stiffness. Be sure your clients have mastered the basic plank, whether from their feet or knees, before moving on to the following variations featuring the TRX Suspension Trainer. 

TRX Rotational Ward


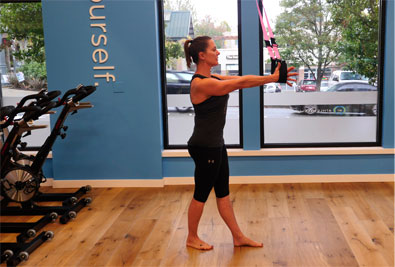
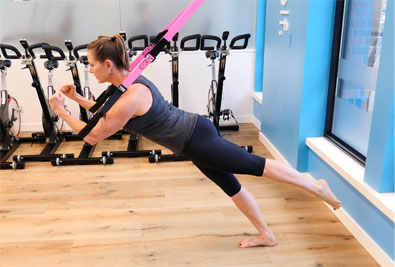
Adjust the Suspension Trainer (ST) to fully lengthened and stand with the right side of the body to the anchor. With the arms extended from the chest and the hands inside of the foot cradles, line the elbows up to the anchor point. Stand in an offset position, with the right leg in front of the left. Build the plank by corkscrewing the shoulders, feeling the lats engage. Push down into the floor for full lower-body engagement, and squeeze the legs together. With the shoulders packed, pull the ST taught, keeping tension throughout the body and the ST. Keep the eyes on the horizon, and be mindful if form begins to suffer. Remind your client that he or she has to stay intentional on the plank position. This becomes a game changer for each exercise.

TRX Plank (hands or forearms)


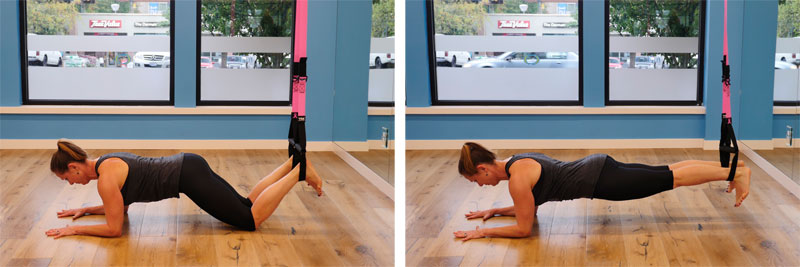
Adjust the ST to mid-calf. Face away from the anchor, place the toes in the foot cradles and assume a table-top position with the hands under the shoulders. Corkscrew the shoulders until a solid packing is felt around the shoulder girdle. Keeping the torso rigid, press the feet into the foot cradles and lift up into a plank position. Keep the feet flexed and the glutes, legs, torso and shoulders fully engaged. Hold the plank for 8 to 10 seconds. Continue as long as a perfect plank can be maintained. Rest and repeat, if desired.

TRX Side Plank (hands or forearms)


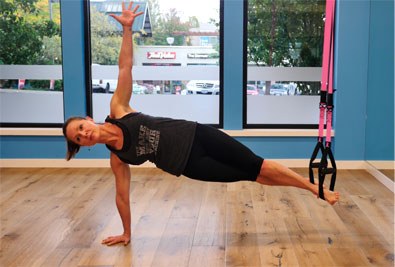
Adjust the ST to mid-calf and lie on one side with the hip in line with the anchor. The leg closest to the anchor is right in front of the back leg. Place the elbow or hand under the shoulder. Corkscrew the shoulder to create a shoulder pack. Flex the feet and squeeze them together; lift up by pressing into the foot cradles. Look straight ahead and hold the plank for 8 to 10 seconds; rest, reset and lift back up. Continue as long as a perfect plank can be maintained. Rest and repeat while lying on the other side.

Side-angle Plank (opposite arm extended)


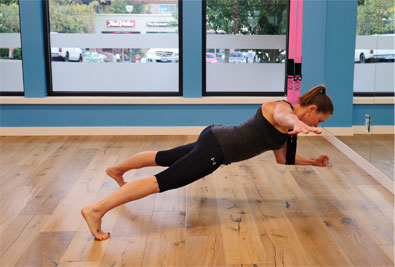
Adjust the ST to mid-calf and lie on the floor while facing the anchor point. Set the right forearm into both foot cradles. Use the left arm to help set up the plank and stabilize the position. Corkscrew the shoulders to pack and spread the legs a little wider than shoulder-width apart. Press down into the foot cradles; don’t allow the torso to rotate. Extend the left arm to shoulder height. Hold this plank while lifting and tapping the left arm to the floor. Repeat on the other side.

Forearm Plank (leg elevated)


Adjust the ST to fully lengthened and stand facing away from the anchor. Place the forearms into the foot cradles, keeping the elbows in line with the shoulders. Corkscrew the shoulders to create a pack, and keep the ribs pressing down toward the hips. Create a rigid torso and step toward the anchor to provide enough load to be challenged yet still maintain a perfect plank.

Single-Leg Plank with Alternating Elbow Tap


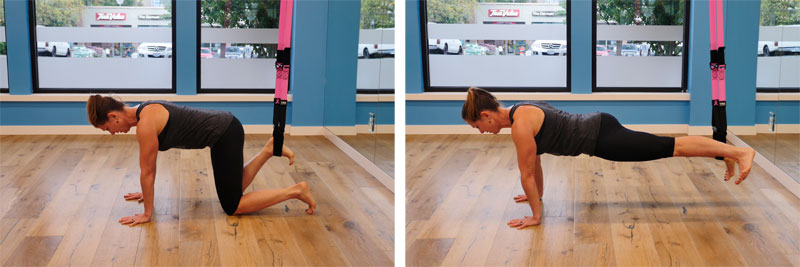
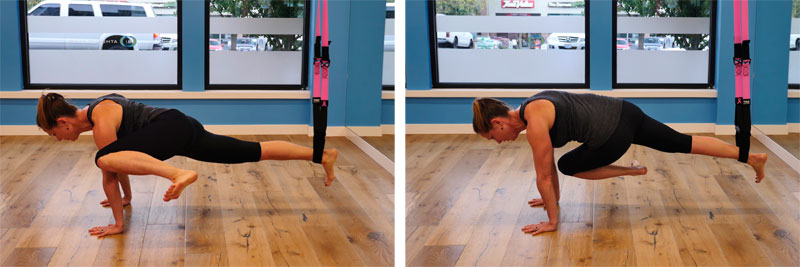
Adjust the ST to mid-calf. Face away from the anchor and lie on the floor with the hands beneath the shoulders; place the right foot in the foot cradle. Corkscrew the shoulders to pack them. From a table-top position, press down into the foot cradles and assume a plank position. Draw the right knee to the right elbow and hold for a beat. Keeping the knee high, rotate to the left elbow and hold a beat. Return to the right elbow.  Continue as long as a proper plank can be maintained and then repeat with the left knee.

TRX Handstand


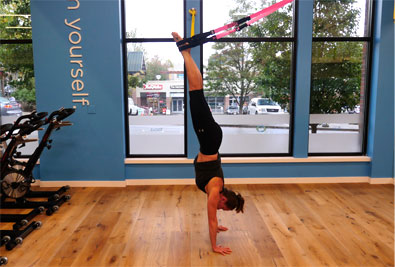
Adjust the ST to mid-calf and place the handles in single-handle mode. Stand facing away from the anchor and place the right foot in the foot cradles. Walk the hands away from the anchor until the ST is very taut. Continue walking back until the right leg is extended. Press the floor away, keep the shoulders set and lift the left leg to meet the right. While in this handstand position, think about keeping the shoulders away from the ears and tension in the core. Hold as long as a proper plank can be maintained and repeat with the other leg.

Source : ACE Elizabeth Andrews


Monday, 12 October 2015

6 Exercises for a Stronger Core

Your core consists of the muscles that stabilize the spine and hips, and includes all the muscles of the abdomen, back, glutes and upper legs. A strong core helps protect the entire midsection, and enhances both mobility and stability, which, in turn, improves movement efficiency and keeps the muscles functioning in coordination with one another. This, of course, helps improve balance, posture and strength.
A common misconception is that doing exercises while lying supine automatically increases core strength. While these exercises can help improve abdominal strength, the entire core must be challenged to help improve total-body function. A better approach is to use a variety of stances, such as single-leg, supine and prone, to incorporate a wide range of movements. Here are a few of the best exercises to challenge the entire core.

Glute Bridges


While many consider the abdominal muscles to be the most important for increasing stabilization, strong glutes are essential as well. Many injuries and faulty movement patterns are a result of underactive glutes and overactive quads and hip flexors. To combat this, activate and fire those glutes before workouts to make sure they are turned on and ready to work.
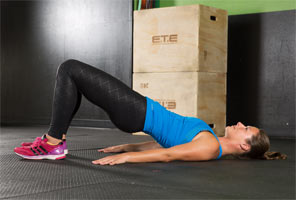
Lie supine on the floor with knees bent and both feet flat on the floor. Keep the head relaxed and slowly push through the heels to raise the hips as high as possible. The knees, hips and shoulders should be in one straight line. This exercise activates the glutes and hamstrings, and stretches the hip flexors, which are often overactive and tight. Hold the top position for three seconds and slowly lower. Do eight to 10 reps per side. To progress this exercise, try one leg at a time or place the feet on the round side of a BOSU.

Medicine Ball Single-leg Reach


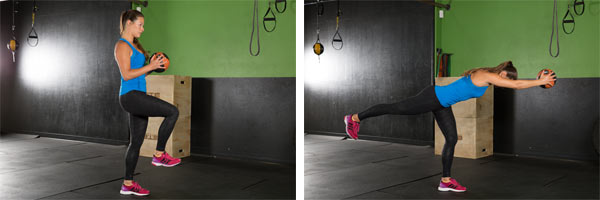
Disguised as a leg workout, this move is great for the glutes, hips, back and abs. Grab a 5- to 10-pound medicine ball and stand on the right leg. Slowly reach forward while hinging at the hips (not the back). Simultaneously lever the back leg out behind the body. Reach as far as possible—work toward bringing the arms, torso, and left leg horizontal to the floor. As the core gets stronger, increase the weight of the medicine ball. Perform two to three sets of eight to 10 repetitions per leg.

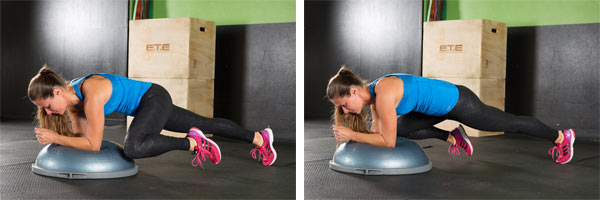
BOSU Plank Variations


Before attempting planks on the BOSU, make sure your client has impeccable plank form and can hold it for at least 30 seconds on the floor before attempting advanced variations. Planks are meant to strengthen the core, so if your client’s form wavers too much (back sinks, arches or bends), have him or her practice a little longer before advancing.
Start with the elbows on the round top of the BOSU. This creates an element of instability that must be controlled throughout the exercise. Perform a plank for 30 seconds. Begin adding small, alternating single-leg lifts, focusing on lifting the leg with the glutes and not shifting the hips at all. Next, try bringing one leg out about 45 degrees to the side, tapping the toe to the ground and returning to plank position. Perform five repetitions on each leg. Finally, try bringing the left knee out to the side, and tapping it to the BOSU just outside the left elbow. Repeat five times per leg. To regress these variations, perform them on the floor or on a flat bench before moving to the BOSU

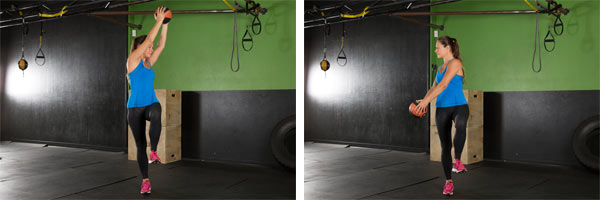
Medicine Ball Single-leg Woodchop


Grab a 5- to 10-pound medicine ball and stand on the right leg. Raise the medicine ball overhead, slightly over the left shoulder. Swing it down quickly, but with control, to the outside of the right leg. Try to keep the torso upright, with a constant slight bend in the right leg. Slowly bring it back up to starting position and repeat eight to 10 times. To regress this exercise, start on two legs and gradually progress to standing on one leg.

TRX Pike


Place the toes in the foot cradles and lie prone on the floor, ready to plank. Push up into a high plank on the hands, establishing perfect form. Keeping the legs straight, push the hips straight up into the air while simultaneously pulling the TRX toward the hands. Slowly lower back down to finish in plank position. Complete eight reps to start, gradually increasing to 15 reps as core strength improves. To regress this exercise, bend the knees to pull the TRX toward the hands.

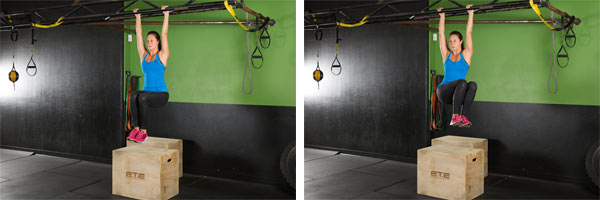
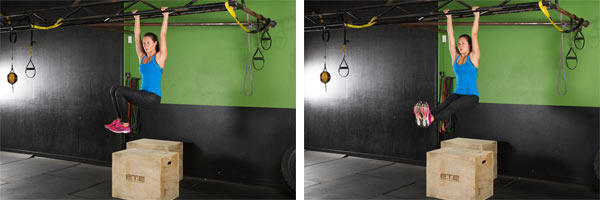
Hanging Leg Lowers


Exercises in which the legs are unsupported are a great way to work the deep abdominal muscles and the hip stabilizers. However, these exercises are not recommended for individuals with diagnosed lower-back pain.

If your client is a beginner, start this exercise using a Captain’s Chair. Once the client has developed a good strength base, progress to ab straps or hanging from the hands. Start with the knees bent, and lift them slowly as high possible, pulling the knees to the chest. Instead of focusing exclusively on the upward movement, think about the slow downward movement. Take about five seconds to slowly lower the legs back down to the starting position. This eccentrically works the deep abdominals, providing control and stabilization, while also preventing swinging. Repeat eight to 10 times. To progress this exercise, slightly twist the knees to the left and right to challenge the obliques. Additionally, try keeping the legs straight but only raise them as high as possible while maintaining straight knees. Again, focus on the slow lowering motion.

Source

Thursday, 17 September 2015

Balance Training and Co-ordination


The definition of Athletic Intelligence is - the organized thought process of an athlete to increase athletic qualities which can include: speed, agility, endurance, balance, rotation, and determination. Athletic Intelligence is not limited to those who are currently participating in Sporting events. Average Joes and Pro Athletes alike can strengthen their athletic intelligence to increase multiple athletic qualities. When someone mentions functional training, you start to think about lifting heavy, jumping high, and moving fast, but what about the mental aspect?

Here are 5 ways to Improve Athletic Intelligence from body to thought:

Promote Balance Training & Coordination – Balance and Coordination are the building blocks of Athletic Intelligence because of their ability to increase performance of multiple athletic qualities. There are simple, yet effective exercises that can be worked into any current workout programming to promote these foundational skills. To take it one mental step forward, think about how you are balance your outside the gym obligations with your working out schedule and your free time.

Building Better Body Awareness –Within each exercise or drill you perform, break down the movement into slow motion and observe your position and how your body is aligned. Ask yourself questions: Does this look/feel uncomfortable? Am I turning too much? Can I perform this move more effectively? This will help you begin to understand how your body functions. Taking things slower, not only can improve your posture and position but also give you a greater appreciation for lifting when you are able to move with greater ease and fluidity.


Non-Dominant Side Training – After observing your body, you may notice that you have a Dominant and a Non-Dominant Side. Elevating the less coordinated side of your body through Non-Dominant Side Training will not only strengthen the skills of that side, but will encourage symmetry within the body. Symmetry within the body will help overall communication and coordination with your thought and functions in the gym.

Strengthen Core Muscles – Powerful and explosive movements start with strong core muscles. Incorporating workout and training styles that focus on pelvic, hip, and abdominal muscles like the WeckMethod RMT Club will give you an added oomph in each speed and agility stride.

Think Like An Athlete – The moment you decide to improve physical abilities is when you should start thinking like an athlete. Getting your mindset into the idea that you can continue to increase skills is the first step to improving Athletic Intelligence. Just having the desire and drive and want to do better can create a power mental and physical reaction.


 Source


Friday, 21 August 2015

Doing the Perfect Pushup

If you've ever tried working out your chest, I bet you've done push-ups. Or, if you're an athlete, I bet you've done pushups during conditioning and practice. They are definitely one of the most widely used exercises, but they are totally underestimated. If you take your time to learn how to do push-ups correctly, it will make all the difference in your chest muscles. I'll go over some of the most important components of the "perfect pushup". 
 
The first thing to remember while doing pushups, is that form is EVERYTHING. If you have good form throughout the entire push-up, it will isolate your chest muscles much better and you'll get superb results. When you are doing a pushup, you need to have your arms shoulder-width apart, a straight back, tightended buttocks, and straight legs, with your toes holding up your legs. As you are moving up and down during the motion of the pushup, you must keep your back straight, DO NOT, let it dip and arch, which is the natural tendency because it makes the pushup easier. I see people "cheating" like this all the time when doing pushups, and they really are only cheating themselves outta stronger, better-looking chest muscles. 

Even though it makes it harder, keep everything straight as I mentioned as you SLOWLY drop down and push yourself back up with your chest muscles and tricep muscles. If you're doing it right, you'll feel a strong burning sensation in both muscle groups. Don't worry about that feeling and push through it, it is good for you; it's what you want to feel! Squeeze every once of burning sensation as you can, pinch your pectoral muscles (chest muscles) together at the climax of your push up. This reall works the pec muscles hard and that is what you're aiming for, because the more you tear them down, the bigger they'll build back up! 

 Keep going until you cannot lift yourself off the floor anymore. After that, rest for a little bit, maybe like 10 seconds, and then get yourself to the upper position. Now, ever so slowly, let yourself drop down to the floor again. Fight the drop the whole way down, keep your muscles as taut as possible. 

Your chest muscles are exhausted, so you will inevitably fall, but if you fight against it the whole way you will experience intense burning and stretching in your pecs. Don't worrry, that is what you want! Once you're flat on the floor again, simply lay there and rest. Now, only 2 more sets and you're done! If you do 3 sets a couple times a week, you'll notice vast gains within 2-3 weeks, I guarantee it! 

Damian@FitnHealthy

Tuesday, 4 August 2015

Flat Resistance Bands vs. Resistance Tubes ?

I have only ever used resistance tubes, so I was surprised to discover that there were flat versions as well, and not just flat but wide as well as narrow ones. This piqued my curiosity and I decided to investigate the subject. This article is the result of my research. 
 
   As a general rule, both types of band have pretty much the same function and are used for essentially the same things: They are both used to perform resistance and flexibility exercises in fitness and rehabilitative contexts, as they have been since the early 20th century. That being said, there are differences between the two, which are discussed in some detail below:

Flat Resistance Bands

Flat Resistance Bands range from about 1€ to more than 5 €wide and come strips of latex ranging from a few inches in length to over 5 feet long depending on the brand and the system. The wider bands are highly malleable, especially thinner, lighter ones. They come in closed loops or open strips of latex and are frequently the band of choice for Pilates exercises and for therapeutic applications, although they are not the only type of band used in those contexts. At the other end of the spectrum some manufacturers offer narrow flat band systems such as the 4€ wide looped bands offered by RTB, or the open ended 1€ wide and 6€ long flat band system by Dura-Band (99.99% latex-free), which is manufactured using a layering process.

Some users prefer the greater comfort and stability flat bands. Wide bands especially wrap more easily and more comfortably around the torso, limbs and feet when the body is being used as an anchor. Although handles may be available as accessories for these wider bands they are not necessary in many cases because they compress easily in the hand for a good grip with minimal slippage. This makes them uncomplicated to use and easy to store or transport.

Narrower bands fall s somewhere in between when it comes to comfort.. The narrower and thicker they are, the more they resemble tubes in this respect, however, all flat bands offer some degree of stability over their cylindrical counterparts: They don't roll and they tend to €grab€ on to surfaces better. 

Tubes:

Different Resistance Tubes are made using varying qualities of latex and manufacturing processes. It is important to consider the manufacturing process because cheaper tubes are not only made from inferior latex products but they are extruded in a single layer, making them less resistant than their high-quality counterparts. In addition the quality of the accessories and attachment mechanisms is generally commensurate with the quality of the band: a cheaper band usually means cheaper, more fragile components. Proponents of flat bands cite these weaknesses as further arguments against the use of tube bands, and with reason. The argument, however, is less convincing with high-end tubes.

The best quality tubes are made using a continuous dipping technology that deposits liquid latex in layers, each bonding to the next and creating a super strong and tear and puncture resistant tube. All tubes are hollow but the multi-layered versions have extremely thick walls layered in concentric circles around a hollow center of narrow diameter. Brands that offer multi-layered solutions include Elastitone, Bodylastics and Lifeline.

Anti-snap technology such as external sleeves (Elastitone) or woven chords at the center of the tubes (like Bodylastics' DGS technology) add another layer of safety, comfort and durability to the best tubes. At this level the argument that flat bands are superior because they are made of a solid, not hollow, material is rendered somewhat moot. Latex or other elastic material, if stretched beyond reason will snap eventually. The point is that no band, flat or tubular, should ever break with proper use and care. 


Depending on your personal strength and your intended use of the product you may do just fine with an extruded, single-layer product but in that case make sure you do your research and don't go for the cheapest option.

Like flat bands, tubes come in open-ended and looped but the systems are more mixed and matched and there are other options which I have not seen with bands:

Common types of resistance tubes:
Linear
Closed Loops
Figure-8
X-shaped Linear
Specialty Tubes padded for specific use ( ex: such as the c-band loop by Lifeline which comes with cushioned grips and a door attachment and works, according to lifeline, in all three planes of motion and can be used by individuals or in team based exercises )

Resistance Levels:

Although there is no standard color coding system both types of band ( flat or tubular) are generally color coded according to resistance level. The color code might be stated in relative terms (light, medium, heavy, extra heavy etc.) but good bands also come with corresponding weight equivalents. Keep in mind that that not all weight equivalents were created equal. If you really want to get a sense of a free-weight equivalent you might be disappointed. The problem is that manufacturers don't necessarily employ the same methods. That being said, good brands make take pains to provide accurate equivalents and provide information about how they arrived at their results. You will need to compare methods and decide for yourself ( these usually involve measuring resistance at some point of extension).

Accessories:

As a general rule there are more accessories for tubular bands. This probably stems from the fact that tubes can really be uncomfortable to use without some basic accessories like handles and padding. From there, additional more specialized accessories would have developed naturally. Moreover, it is also no doubt easier to attach accessories to narrower tubes than wide bands. These arguments are borne out by the fact that among flat bands it is the narrow systems, which share both some of the concerns and advantages of their tubular cousins, that seem to offer more comprehensive accessory lines. These can usually be purchased after the fact or as part of special kits put together by the manufacturer. Kits include a selection of bands and some accessories. The more comprehensive the kit the more expensive it is. There are beginner to advanced kits and sometimes sports-specific or other specialized packages are also available.

Accessories might include: handles; padding; wrist and ankle cuffs; waist, door, sports-specific and/or other attachments.

Some tubes like the Bodylastics system come with built in clips for quick changes between exercises. Another advantage with this high quality system is that several tubes can be attached in different combinations to achieve different levels of resistance. The new Dura-Band system made up of flat narrow bands also uses an innovative clip system and offers a number of accessories (for those with allergy concerns, this band has the advantage of also being virtually latex-free).

Latex-Free:

Latex sensitivity is a dangerous often life-threatening allergy for many people. Latex free tubing is available from some manufacturers but by and large your options are pretty limited. You may find more options with Flat Resistance Bands. Although I have not used it myself the Dura-Band system may be an excellent alternative as it shares many qualities with both flat bands and tubes and claims to be 99.998% latex free.

My own conclusion in the final analysis is that choosing between flat bands or tubes is a matter of personal preference. If you are looking for a super light weight uncomplicated comfortable solution to supplement your fitness routine, Pilates training or add some variety to your weight training, you might choose the wide flat bands ( ex: Thera-Band, Ailyo, etc). If you want a comprehensive, stand-alone system, to engage in sports-specific exercises, or you simply like to work with as many options as possible 
 
Damian@FitnHealthy

Wednesday, 15 July 2015

Kettle Bell Seated Shoulder Press


Clean a kettlebell to your shoulder. Clean the kettlebell to your shoulder by extending through the legs and hips as you pull the kettlebell towards your shoulder. Rotate your wrist as you do so, so that the palm faces inward. This will be your starting position. Look at the kettlebell and press it up and out until it is locked out overhead. Lower the kettlebell back to your shoulder under control and repeat. Make sure to contract your lat, butt, and stomach forcefully for added stability and strength.

Sunday, 5 July 2015

The Advantages, Disadvantages, and Exercises on a Fitness Ball

The Advantages, Disadvantages, and Exercises on a Fitness Ball

Most people dream of getting into shape, losing weight, and exercising more. It can mean signing up at local gyms. However, many fitness enthusiasts prefer to purchase home fitness equipment that can be effective for them. They can take the benefits of a total workout while at homes and within flexible times. 

One of the best options to consider is buying a fitness ball. It is the time for you to experience a unique workout at home. There are various reasons why this equipment has become very popular. In fact, it is utilized by most physical therapists to treat their patients from back pains.

A fitness ball having a diameter of about 55 to 85 centimeter is made of elastic rubber. It is utilized in exercise and physical therapy. There are various names for a fitness ball such as exercise ball, Pilate's ball, gym ball, therapy ball, balance ball, body ball, yoga ball, sports ball, and Swiss ball.

The major benefit of a fitness ball exercise is enabling the body to respond to the ball's instability while keeping the balance and engaging more muscles as well. Keep in mind that the muscles are strengthened upon struggling to maintain the balance. The core muscles of the body, back muscles, and abdominal muscles are the target of the fitness ball programs of exercises.


Exercises done on a fitness ball will never bore you. In fact it can challenge your stamina, patience, perseverance and, self-discipline. This is the true form of exercising, working the entire core muscles to achieve the best results.

A fitness ball is effective because of its rounded shape. It can create instability to induce your core body muscles to work. Compared to floor crunching, the muscles that are only working are the upper abs, but when you do the crunching on a fitness ball, the core muscles including abs muscles, back muscles, pelvic muscles, and hip muscles are working together in helping you stay on the ball.

Try doing a few pushups using a fitness ball, your hands on the floor and your feet on the fitness ball or vice versa. This exercise gives more stability when the feet are spread apart and tougher when the feet are put closely together.

Although a fitness ball provides many advantages, there are also some pitfalls especially if overused. Strength coaches revealed that it can cause injury and approximately 70 percent of fitness ball exercises are considered worthless.  Nevertheless, it is still prescribed by some therapists in treating patients with back pain.

Incorporating a fitness ball in your fitness program can mean surpassing all the difficult levels involved during the exercise. Each requires support from your stomach muscles and back to help in keeping the trunk muscles firm. More often, a fitness ball is good for people who have lower back pain. Other uses include developing overall strength and control of the body's core muscles, increasing the strength of back and abdominal muscles, learning proper posture and body mechanics when lifting objects, and increasing mobility of the lower back.

Damian@FitnHealthy

Sunday, 7 June 2015

Great Abs With Balance Ball!

Doing yoga on the ball can benefit anyone, including:

1. Yoga beginners. Moving into poses with the ball's support builds confidence and can help your muscles gradually stretch and strengthen as you improve your yoga routine.

2. People recovering from injuries. Some injuries create muscular weaknesses that make it difficult or painful to do yoga postures such as backbends or Warrior poses. A ball can ease you into a pose comfortably and with less risk for re-injury.
Doing yoga on the ball can benefit anyone, including:

1. Yoga beginners. Moving into poses with the ball's support builds confidence and can help your muscles gradually stretch and strengthen as you improve your yoga routine.

2. People recovering from injuries. Some injuries create muscular weaknesses that make it difficult or painful to do yoga postures such as backbends or Warrior poses. A ball can ease you into a pose comfortably and with less risk for re-injury.

Work Those Abs

Abdominal work is only part of the story. You may be surprised to learn that even more essential to your core stability than a set of six-pack abs are tiny muscles that run along the spine and support the body's joints. Normally we associate a strong body with the large muscle groups.

But, what really improves overall body fitness is the strength of these tiny muscles. They're the ones that keep you from falling, wrenching a disk in your back, or spraining your ankle when you slip on a patch of ice.

Elevated Pushups for Pecs, shoulders, triceps, and abs

How to do it: Place the front of your knees on the ball and your hands flat on the floor (your whole body should be parallel to the floor). Look down at the floor and lower your face to within a few inches of it, then push back up to the starting position.

The Balance/Swiss ball rolls around easily, so core strength and balance are required to keep it still. The challenge of keeping the ball still makes the ball an excellent tool to teach stability and rehabilitation. The simplest movement can become a huge challenge when you do it on the ball. Using a ball can give your workout a little more variety and extra challenge. You can try these exercises after your Pilates mat work.

Damian@ufitnhealthy


Tuesday, 2 June 2015

How to Improve Lower-body Mobility and Stability

This installment on how to improve stability and mobility throughout the body focuses on exercises for the lower body, including the hips, knees, ankles and feet. Remember from the first installment that it is important to develop stability and mobility prior to adding bigger movements, loading movements with external weight or increasing intensity with the use of plyometrics.
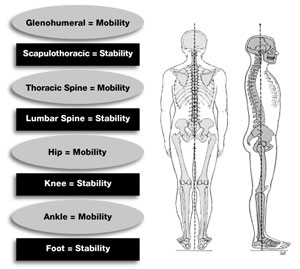
You might be wondering if either stability or mobility is more important. Should stability be developed before mobility, or vice versa? To answer that, let’s take a look at the figure below.

Notice that stability and mobility alternates as we move up the body. This figure indicates that the major joints complement each other in that one should create more stability while the next should include more mobility, and so on as we ascend the body.

If an area of the body that is meant to be more mobile, such as the hips for example, is lacking in mobility, the areas either above or below will be affected. So immobile hips may lead to the lumbar spine or knee having to compensate, which can cause injuries in these more stable joint areas.
The same is true for stability. If the knee lacks stability, the hip and ankle may have to compensate to help protect the area, which can lead to overcompensation, injury or imbalance.
Here are a few exercises that can help improve lower-body stability and mobility. If your client is a beginning exerciser, use these moves as his or her main workout, completing two to three sets of eight to 12 repetitions. For more advanced exercisers, use these moves as part of their warm-ups and complete one to two sets of fewer than 10 reps.

Mobility (hip/ankle)
Kneeling Glute Circles
Begin in a table-top position and bring one knee up off the ground, forward and then around in a circle. Practice drawing a circle both clockwise and counter clockwise with both legs. Do not allow the pelvis and trunk to shift; instead, move only from the hip joint.
Lunge With Elbow to Instep (Three Parts)
Glute Activation Lunges (Crossing Lunge)
Child’s Pose

Stability (foot/knee)
Inverted Flyers
Single-leg Glute Bridges
Lateral Lunges With Sliders
Put a slider under one foot and slowly slide that foot to the side, hinging the hips back while tracking the standing knee over the foot. Pull the sliding leg back up and repeat on the same side.
Mini-band Squat With Hip Abduction
Being in a squat position and place a mini-band around both legs just above the knee. Hold a squat position and externally rotate the hip by squeezing the glutes and moving the knee outward. Come back to the center and repeat on the other side.

 SOURCE : Jacqueline Crockford, MS, CSCS | ACE

Sunday, 24 May 2015

Why Medicine Ball Is So Popular With Athletes?

The other names for this ball are exercise ball, gym ball, stability ball, fitness ball, fit ball, therapy ball, balance ball or medicine ball. The exercises with this ball are known by different names as exercise ball exercises, fitnessball exercises, fitnessball workouts, medicine ball exercise, etc. The size and weight make the medicine ball the ideal piece of exercise equipment for people of all ages and fitness levels. 

Medicine balls are available in various weights and styles...

The other names for this ball are exercise ball, gym ball, stability ball, fitness ball, fit ball, therapy ball, balance ball or medicine ball. The exercises with this ball are known by different names as exercise ball exercises, fitnessball exercises, fitnessball workoutgs, medicine ball exercise, etc. The size and weight make the medicine ball the ideal piece of exercise equipment for people of all ages and fitness levels. 

Medicine balls are available in various weights and sizes, perfect for all ages and fitness levels.

The medicine ball is used to develop different forms of strength, such as, eccentric strength and concentric strength. Concentric strength is used when throwing a medicine ball, pushing a medicine ball or pressing a medicine ball. Eccentric strength is used to catch a medicine ball and slow it down.

These general medicine ball drills develop strength and power throughout the torso, laying the foundation for the future use of specific medicine ball drills. Likewise, bench-press strength advanced by 23 % for the weight-trained athletes but inched upward by just 9 per cent for medicine-ball users.


Weight training proved to be far superior to medicine ball workouts, both in terms of bench-press power and throwing speed. Weight-trained athletes upgraded their baseball throwing velocity by 4.1 per cent, while medicine-ball men enhanced throwing by a statistically insignificant 1.6 percent. Control individuals also failed to improve their throwing.

Many weight-training group work out twice a week, utilizing barbell bench press and barbell pullover exercises. For the first four weeks, weight trainers completed three sets of eight- to 10-repetition max exercise per workout for both the bench presses and barbell pullovers (in other words, they used weights which could be lifted only eight to 10 times per set). For the final four weeks, employ three sets of six- to eight-RM for each exercise. All weights were lifted in a slow, controlled manner - not explosively. Medicine-ball, weight-trained, and control athletes all participated in their regular baseball workouts during the eight-week period. After eight weeks, all athletes were tested for maximal baseball throwing velocity and bench-press strength.

When you activate your II-B fibers with this explosive medicine-ball workout, you'll see big gains in strength, size and speed. The medicine ball will help you achieve fitness that emphasizes not just strength, but also explosive power, core stability and split-second responses.


Damian@ufitnhealthy 

Monday, 4 May 2015

Dump Those Chairs and Sit on a Ball...

This applies to whether you are at  the office or working at home in the basement, these balance ball chairs are god-send  for your aching backs. Here are some of the benefits of using an exercise ball as  your chair.
 

1. Forces proper spine alignment. Because an  exercise ball is not stable, your body needs to try to balance itself on  it. The perfect spinal posture is coincidentally the easiest to balance  with. Thus,  your body will automatically try to align itself into the proper posture. This helps  improve your spinal health, and decrease back pains.


2. Causes you to frequently change positions. An exercise ball causes to you to change your  position often to balance.   Doing simple things such as turning to face the phone, will result in your  body assuming anew position. This helps reduce damage  caused by prolonged sitting  in the same position.

3. Quick workouts are always there. A great thing  about using this alternative to a chair, is that you can do  stretches or  mini-workouts whenever you want, without getting up. If you are ever stuck waiting for a minute or two,  you can  make productive use of that time with a quick workout or stretch. Since its convenient, you will  find yourself doing it more frequently, which will work wonders for your health.

4. Your sense of balance will be improved. This is expected. This is because you  continuously try not to fall, in effect, improving your balance and strengthening your  muscles. The result? An overall better balance, that can be  observed out of the  office.

5. Get that 6-pack abs you have always wanted. As you balance yourself while you are sitting on the ball, your abdominal  muscles are the ones working the hardest to maintain your balance. Thus, you are  essentially getting a low-key abdominal workout. This  might not sound like a big deal but when you count the hours you spend sitting at your  desk or in front of the computer, the numbers start to count. These hours pile up and before you  know it, you start developing that 6-pack abs.
6. It's great for the circulation. Sitting on  an exercise ball promotes good blood flow throughout your body for the whole day. A  desk chair on the other hand, reduces circulation to some parts of the body after  prolonged use.

7. You start feeling that energy boost. It's a fact that if you stay in just one  position for prolonged periods, it's guaranteed you will feel more exhausted by the  end of the day, as compared to constantly moving around and feeling more energetic as  a result. Using an exercise ball as a chair is a good way to ensure that  you will be energized by the end of your working day.

8. Burn up hundreds of  calories per day. The more you move, the more calories you  burn. Burning 350 calories per day allows you to lose one pound of  fat every two weeks. Even if you do not burn 350 a day, the least it will do is to help you keep  in shape.

9. Really cheap. These exercise balls, or balance ball chairs  will cost you from $10 for the ball to $80 for the ball and the chair that holds it.  Much cheaper than  buying an ergonomic chair, which can range anywhere from $100 to  $400 and up.

10. It's really a lot of fun! Who doesn’t like the idea of bouncing  around on an exercise ball all day. Exercise  balls are an  exciting alternative to chairs, and may just give that spark of fun to  your day.

Source Cyrill Exxonell

Thursday, 30 April 2015

Core Exercises - Why Are They Essential?

Core exercises are often misunderstood. Find out why you should do them, and why you need core strength and stability for any activity.

 Core exercises are vital in protecting your spine. Whether it's from everyday activities (e.g. lifting, twisting, bending) or sports performance, and crucially for you everything in-between.

Forget about linking core workouts with 6-pack abs. For those you need fat burning exercises. Get used to associating core exercises with your spine. That's how you'll get the best out of them.

Your core consists of your abs, back and pelvis. Why should you evenly strengthen all parts of your core?

Here are the 2 main reasons:

1) Avoid injury and back pain.. There are loads of reasons why we get back pain (see your doctor before any exercise for back pain). But most back pain is caused by muscle imbalances.

Weak lower back muscles and strong abdominals commonly lead to injuries. Combined with weak upper back muscles, you're prone to poor posture. Even worse if you're heavily overweight.

2) Improve your performance in ANY activity.. Your every movement is stabilised by the core muscles. No matter what sport or exercise you do, a strong core will give you that extra edge.

The stronger your core is, the better control you will have, meaning a higher quality and efficiency of that movement. Simply put, it'll be safer and easier to move your arms and legs faster and with more power. That equals better performance.

Core Exercises:

There are loads of exercises that work each part of your core separately. But to get started, do core exercises that work a combination of your abs, back and pelvis.

Your focus is on finding those deep core muscles, with subtle movements. Move on to more specific (and challenging) back and ab exercises, once you have control of these:

Deep Muscle Contraction..

Lie flat on your front and relax.
Keeping your back and hips still, lift your stomach up towards your back.
Focus your mind on the deep muscles.
When done correctly, this is a very small movement.
Hold for 5 seconds and relax.
Repeat 5 times.
Progress by holding it for longer each time, aim for 2 minutes or even longer.

Once you're used to this movement, practice it wherever you are (lying, sitting or standing). During everyday activities (e.g. standing in a queue), or even during other exercise (e.g. riding your bike).

That small movement is the basis of all your core exercises. Always focus on first contracting your deep core muscles, then initiating other exercise movements.

Plank..

Place your forearms flat on the floor and clasp your hands (create an upside down V-shape).
Lift your body so that your forearms and feet take the weight.
Focus your mind on the deep core muscles.
Aim for a straight line between your neck and ankles.
Hold for 5 seconds and relax.
Repeat 5 times.
Progress by holding it for longer each time, aim for 1 minute or even longer.
 
 Bridge..

Lie on your back, knees bent and feet flat on the floor, arms by your side.
Lift up your hips, let your shoulders and feet take the weight.
Aim to keep your feet below your knees, and a straight line from shoulders to knees.
Hold for 5 seconds and relax.
Repeat 5 times.
Progress by holding for longer each time, aim for 1 minute or even longer.

You'll feel the pressure in your lower back and bottom. Focus on working your whole core to keep your hips up. Never take the weight on your neck.

Core exercises are essential for everyone, of any age and any fitness level. There's no better prevention for back pain. Do a variation of general core exercises, and specific back and ab exercisesFind Article, and you'll really FEEL the difference

Monday, 27 April 2015

Introduction to the Balance Board

The balance board is a fitness piece of equipment that offers an efficient and enjoyable way to train your balance. It also improves your motor coordination skills, and it strengthens your core. Many people also practice on it because they feel calmer and more relaxed after a session.

Skiers and surfers used it first so they can practice their skills during the off-season. It is now used in therapeutic setting (knee rehabilitation, children with developmental disorders, proprioceptive training) and in fitness training. Athletes continue to take advantage of this fitness tool to improve their performance.


 You can easily acquire a balance board to exercise at home. It offers a fun way to strengthen your balance and your core. The difficulty depends on the type of board you are using. Some of them are very easy to practice on. Little kids and elderly people can use them safely. While other boards are much more challenging and require great skills.

There are 4 types of balance boards.
Rocker Boards
It improves static balance and is an easy way to start
Rocker-roller Boards
More challenging, they improve dynamic balance.
Wobble Boards

They offer a good comprise between the rocker boards (easy) and the other boards with un-attached fulcrums (the rocker-roller and the sphere-and-ring boards).
Sphere-and-ring Boards
The base is un-attached and the board can move in all direction making these types of balance boards the most challenging ones.
Balance boards can be very challenging causing falls, sprained joints, and sometime broken bones! So you need to take it gradually and start easily. Choosing the right balance board is the first step to a safe practice. Start with an attached board (rocker or wobble) as they are easier to use than the non-attached. Starting with easy exercises to gain confidence is important. 

Here are 4 movements you can start with:
1. Stand with both feet, and rock the board left to right, and front to back and have the edge touch the floor. Do it for 2 to 3 minutes.
2. Roll the board in a circle touching the edge on the floor. Do it for 2 minutes.
3. Balance the board trying to keep the edges off the floor as long as you can.
4. From exercise 4, squat slightly (45 degrees). Repeat 10 times.
These 4 basic movements will help you improve your balance, strengthen your core, and increase your stamina.
It also has been linked with less falls during old age.

Source Moutassem Hammour .Chir

Saturday, 11 April 2015

Are Two-a-Day Workouts Right for You?

 
 For many people, boys and young men around the country are likely suiting up for two separate football practices a day for a tradition known as “two-a-days.” There are three primary reasons for the two-practice-a-day tradition:
  • Practicing in the early morning and late afternoon is a way to beat the worst of the heat.
  • Two practices a day are required to get the athletes in game shape.
  • Athletes need the extra time and practice to learn and commit complicated plays to memory.
Two-a-day training programs are typically divided into two sessions, one focusing on technical training and the other focusing on tactical training. The first type of training session is referred to as technical training because it focuses on the technical conditioning needed for a specific sport. Technical training can be high intensity to improve overall fitness level and refine sport-specific skills. The second type of training session is referred to as tactical training because it is structured to teach the strategies and tactics that all players need to know to function successfully as a team. Tactical training is designed to be lower in intensity to allow players to learn the movements so they are eventually able to execute plays reflexively as a reaction without needing the time for conscious thought or cognitive processing.
Are two-a-days beneficial for you?
For people with specific fitness goals, could organizing your workouts into two training sessions a day provide any benefit? The answer, of course, depends on a number of variables. To determine whether two-a-day training might be right for your needs, ask yourself the following questions:
What is your existing fitness level?
What is your specific outcome or training goal?
What do you need to improve to be successful and achieve your goal?
And, most importantly, how much time can you dedicate to your workouts?
If your reason for exercising is to improve your general health or overall fitness level, then two-a-days might not be necessary. If the goal is to achieve a specific outcome (whether performance- or appearance-based), then working out twice a day might be the most effective way to achieve that goal.
Here are a few examples where organizing two-a-day workouts might be helpful for achieving a specific goal. Of course, there are a number of variables that would determine the specific training program, so keep in mind that this list is designed to simply provide a few ideas. 
The Olympic Weightlifting Lifts: The Snatch and the Clean and Jerk. Both of these exercises require a high degree of mobility and technical movement skill, as do a number of the kettlebell lifts. If you want to improve your technical skill for specific lifts, consider training for movement skill in the morning and the actual lifting, or specific strength training, in the afternoon. The morning sessions should be bodyweight only to focus on improving range of motion, mobility and dynamic flexibility, while the afternoon workout should focus on the high-intensity training required to improve strength and power.
Adding muscle mass or developing the definition required for a figure or body-building competition requires a high volume of training for both strength training to improve muscle size and low-to-moderate cardio training to burn fat. A two-a-day training schedule might feature body part-specific strength training in the morning to increase lean muscle and definition, combined with an afternoon session dedicated specifically to cardiovascular training for burning excess calories and unwanted fat.
Specific Strength- and Power-based Competitions (e.g., Powerlifting, Strongman or CrossFit). For people training for these types of competitions, two-a-day workouts could be organized into a morning session using external weights to focus on specific strength or power exercises that will be an integral component of the competition. The afternoon session could be focused on bodyweight exercises to improve core strength, mobility or explosive jumping power to support the work being done with the external resistance. 
Obstacle Course Races (e.g., Spartan Race or Tough Mudder). If your training goal is to participate in these races, you might want to split your workouts into morning runs that alternate between distance for aerobic endurance and sprinting for anaerobic strength and afternoon strength-training sessions to improve the muscular strength and coordination required for successfully overcoming the obstacles.
Marathons, Triathlons or Ultra-marathons. If your fitness goals include training for pure endurance races, it might be a good idea to split workouts into two sessions per day to increase the volume of training required for success. For endurance races, it might be necessary to focus on a specific cardiovascular endurance session in the morning for volume training and an afternoon weightlifting session to improve the strength endurance of the legs and core muscles, which can help improve running efficiency and stride rate.

Source Pete McCall MS Ace

Monday, 23 March 2015

Body Composition: Which Numbers Matter?

Over the years, my perspective on numbers and their value has changed with respect to health and the body. Before I knew much about exercise science or even heard of the words “body composition,” the only thing I knew about was weight. And that word was “scary.” Like many females, I avoided the scale at all costs. I went by the feel of my clothes, and I didn’t want to know any numbers (not that this is bad, trusting your clothes, but the intense fear of a number isn’t great). It was like a warning alarm would sound off if I stepped on to the scale. 
I don’t know where this fear came from or why I let it dictate my perception of my health and myself. As time went on, and I pursued education in health and exercise science, I began to learn how these numbers related to body composition. I also realized that weight is pretty much as useful as my mom having an iPhone. (She has a Galaxy and giving her my phone is like handing her a foreign object she has no idea what to do with it.) My point is this: Weight is just gravitational pull on the body, mass times gravity. What does this number really tell you about your body? As it turns out, not much. You have to know the make up of the weight for it to be helpful. 
Unfortunately, accurately measuring body composition is difficult and expensive. Although there are numerous, extensive definitions of body composition, it is basically the amount of fat mass vs. lean mass. Body composition is typically reported in a percentage of fat mass. Therefore, just stepping on a scale to attain a weight will not shed any insight into how much weight is lean body mass and how much weight is fat mass. Methods that provide fairly accurate body-composition analysis include the Dual X-ray Energy Absorptiometry (DEXA), Bod Pod and hydrostatic weighing. Typically, these machines are located at exercise science laboratories and hospitals and are fairly expensive. 
Fortunately, there are economically friendly tools for measuring body composition, such as skin folds and bioelectrical impedance analysis (BIA). Skin-fold calipers measure body fat by pinching visceral fat at specific anatomic locations, and those numbers are used in a formula to estimate total body-fat percentage. Unfortunately, it can be challenge to measure at the exact anatomical site, which can make the measurement less accurate. A downside to this is accuracy on selecting the position of the site. To help improve the validity of the measurements, three measurements are taken at each site and averaged to obtain a more accurate number. 
Bioelectrical impedance sends an electrical current through the body to determine body composition. Because lean mass contains more water, it takes the electrical current less time to travel through the body and assess composition. BIA is typically assessed through hand-held devices or scales. The accuracy of this measurement can be compromised by the individual’s hydration level, with dehydration causing an overestimation of body composition, and overhydration having the reverse effect. 
Unfortunately, not many of these measurements are conducted in clinical settings, so weight and body mass index (BMI) tend to be the default measurements. BMI is a measure of mass divided by height squared. This number can provide insight into a person’s general well-being in regards to weight; however, it still does not offer a true representation of a person’s body composition. 
Waist-to-hip ratio is another common measurement and is an efficient and effective tool for assessing health. Waist-to-hip ratio measures the circumference of the waist at the smallest point and compares it to the circumference of the hips at the widest point. The higher ratio indicates greater adipose tissue exists around the abdominal region, which can signal a greater risk for metabolic syndrome and associated illnesses. 
If you have access to finding out your true body composition by hydrostatic weighing, a DEXA or BodPod—go for it. If not, some of the other methods discussed earlier will work, but they may offer a less accurate picture of your true body composition. However, if you experience improvements in these numbers over time, you can feel confident that you are making progress in improving your health.  
Finally, guard against becoming obsessed with your weight. This number does not define you, nor does it say a whole lot about your health or your body composition.

Source : By Kelley Vargo / Ace

Saturday, 21 February 2015

Mastering the Muscle Up for CrossFit

Many athletes struggle greater to do the muscle up, than they do just about any other technique in CrossFit. While technique is the most valuable tool an athlete has at his disposal, the development of the muscles used in this workout will assist the athlete in exploding above the rings, and having the kinesthetic muscle awareness to maintain proper technique.

 Many workout regimens I have seen are ineffective while others are dangerous. Today we are going to break down some vital workouts that, when used effectively, can help you achieve a perfect muscle up.

#1: Strict Pull ups
In CrossFit, I feel we focus a little too much on our kipping pull-ups and butterfly pull-up and forget the pull-up we all did in P.E. in elementary school. The strict pull-up is foundational for the bar muscle up. This movement develops your latissimus dorsi, traps, supraspinatus, infraspinatus, teres minor and subscapularis which is vital for your strength and support for your rotator cuff. If you are unable to do a strict pull up, there are a number of exercises you can play with to develop this critical movement.
  • Negative pull-ups (start at the top and lower yourself slowly)
  • Ring Rows
  • Pendlay Rows
  • Isometric Pull up hold
  • Gymnastic Rings Archers
# 2: Develop your Core Strength
In addition to isometric lifts and explosive power, a strong core is vital to this. Abdominal isometric holds, like L-holds and hollow holds accompanied with explosive core work like pike-ups and GHD situps will strengthen the explosive muscles needed in the abdomen that you will need to get the pop your hips need for a muscle up.
#3: Chest to Bar
The next drill you should perfect in your quest to mastering the muscle up, is developing a strong chest-to-bar. For this drill I want you to focus less on stringing chest-to-bar pull-ups together, while instead trying to bring your hips and legs parallel to the floor and pulling the bar to your rectus abdominus. This will involve a dramatic back swing followed by an explosive kip.
If you can master this skill and can learn to pull that bar to your abs, you are just one step away from flicking your elbows to the air, and finishing your muscle-up.
You will also need to develop a strong hollow and a strong arch on the ground which will develop kinesthetic muscle memory.
#4: Learning the transition from False Grip to Ring Dip Position.
As stated earlier, technique drills are vital to this workout. While this articles scope is more focused on the muscle development needed to do a muscle up, there is one particular technique that simply must be practiced before one should try a ring dip from below.
For a proper technique video on the drill I'm discussing, check out Jason Khalipa's technique video


Practicing this transition will prepare you for the "flick" of the elbows to the sky you will need to master before attempting your muscle ups.
Philip Gephardt is a professional fighter and owner/founder of Factum CrossFit and MMA in Utah. Phil was a nationally ranked wrestler before switching sports and focusing on a professional mixed martial arts career turned gym owner
 
Souce  : Philip Gephardt / Ezine