Showing posts with label Strenght Training. Show all posts

Saturday, 17 January 2015

How To Do A Box Jump (without face planting) Plus Advanced Box Jump Variations

It's not easy to try new movements or equipment in the gym, which I personally know. But when amazing strength and hardcore improvements become more important than obeying your comfort zone, then I can help instruct you. Box jumps are an explosive movement that trains your fast twitch muscles, give you phenomenal speed training and will make you feel POWERFUL ! Also, the equipment you need is almost as available in the gym as the 2-pound dumbbells. There the plyometric box is, just sitting there with a quirky grin, waiting for you to jump on it.


How-To Do Box Jumps
  1. Decide on the height of the box you will jump on. If you are lacking courage, start with a shorter box. In Crossfit, 20" is a standard height for girls and 24" for guys. Be brave.
  2. Face the box and mentally tell it what is going to happen. (I am going to jump on you Mo-Fo!)
  3. Stand about 12" away from the box (or where ever feels warm and coziest for you) 
  4. Start with step-ups. This is to warm up your hips and teach you the height of the box. Just alternate each leg stepping up to standing with both legs. Jump or step down. Do 5-10 on each side. 
  5. Jump on it like you mean it. When you feel ready, bend your knees a little and explode up to jump on that box! You will have so much fun, you will want to use the box at every workout, promise
  6. When jumping down, listen up! Your achilles tendon will NOT want you to jump up and down quickly. You want to extend your hips at the top of the box and then jump/step down to avoid an injury of monumental proportions.
As a useful tip! Remember that box jumps have the potential to put you in a face plant and or scrape/cut your shins if you don't make the jump. In fact, my good friend Adam had to get stitches from an failed box jump landing. Two things to avoiding this happening is to mentally focus on each jump, don't let your mind wander. When your mind wonders away from the task at hand, it makes you sloppy. And no one wants to cringe as you perform sloppy box jumps. The second is to know when your legs are jello. Shaking legs do not make for good box jumps. Push yourself but don't overdo it.


Advanced Box Jump Variations:
 Once you get the basic box jump movement down, and want more explosive movements, try these:

  1. Box jump overs. You don't jump onto the box at all, instead you jump over it like a frog (a really large, mean, burly frog).
  2. Burpee box jumps. Do a burpee but instead of clapping your hands at the end of the burpee, you jump up onto the box 
  3. Side jumps on the box. Face sideways to the box, with your right leg close, then jump to the right and land on the box. Switch sides and do your left. This requires some coordination and a little faith.

Inspiration for box jump variations?


 Source : Steph Kinzer GrassFed Strength 

Thursday, 15 January 2015

30-minute Ultimate Sandbag Workout

Struggle to find time to train? 

When life gets busy, the first thing many people drop is their workout. “I don’t have time. I’m too busy.” Many people believe that unless they have an hour to work out they might as well just skip their workout and wait until they have time. The irony.
Long-time fitness pro and educator Elizabeth Andrews blows this argument out of the water with a full-body workout using a 25-40 pound Ultimate Sandbag Power Bag


Takes less than 30 minutes. Using Ultimate Sandbags (USB) not only humbles you, they also challenge your strength, stability, balance and mobility, while stressing the neuromuscular system and working the muscles in all planes of motion. In other words, you get a lot of bang for your buck! And you know what that means: Efficiency, with a high metabolic demand. A win-win!
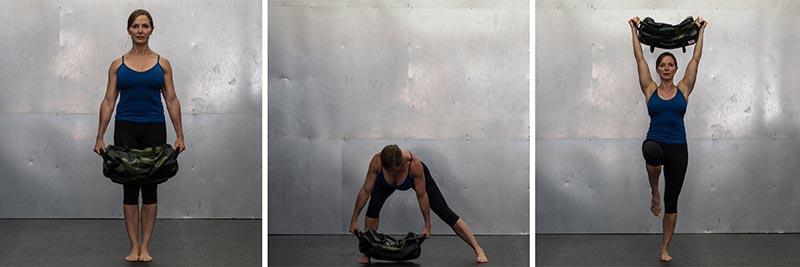
Lateral Lunge to Overhead Press With Single Leg Balance (10/8/6/4 ladder concept)
Lateral Lunge to Overhead Press With Single Leg Balance
Grab the outside handles and deadlift the USB to the tall position. With both feet facing forward, step to one side and assume a lunge position, keeping the spine tall, shoulders packed and squared (pulling shoulder blades are pulled down and back, using the lats to help stabilize), and the lower tail bone down toward ground. Press off the floor to return to the starting position, cleaning the bag as you move through the pattern. From the starting position, press the bag overhead to extension, bringing one leg up at the same time; hold and balance for one beat. With complete control, lower the bag and leg at the same time. Repeat the pattern on the opposite side. In this sequence, the ladder concept of 10/8/6/4 will be applied. In this case, you’ll start with 10 on the right side, then 10 on the left side. You’ll then completely 8 on each side, then 6 on each side and so on until the ladder is complete.
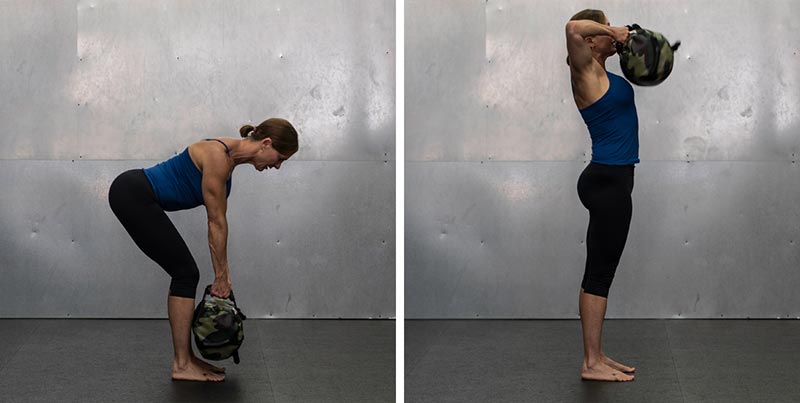
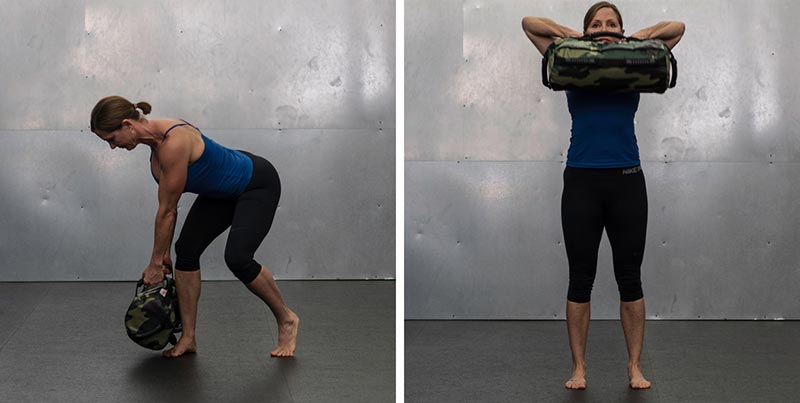
High Pull (30 seconds)
High pull
Grab the neutral handles and begin in a deadlift position, hips hinging back behind the heels and the core braced. Explode from the hips, trying to “jump” the USB to chest height, with elbows pointing to the sky. Keep the chest lifted and the core braced, being careful not to flex the back. The bag should stay close to the body throughout entire movement.
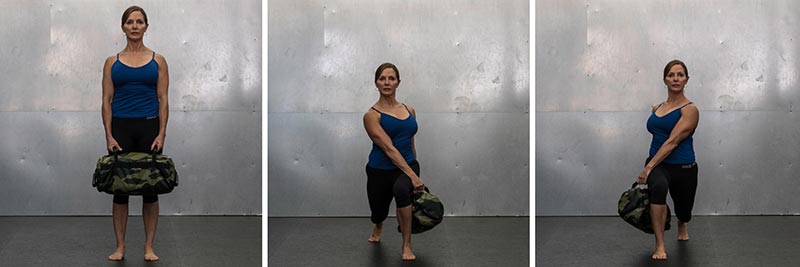
Rotational Lunge With Hold at Bottom (8-10 reps on each side)
Rotational Lunge With Hold at Bottom
Grab the neutral handles and stand with the shoulders packed and arms hang­ing freely. Look straight ahead as you step back in a direct line of hip, pressing the ball of the foot into the ground. At the same time, rotate the USB over the front side of the lead leg. Keep the arms hanging—don’t pull on the USB. Slowly lower the back leg and hover the knee right above the ground. Keep the core braced and hold for 15 seconds. Keep the spine tall, the shoul­ders packed and eyes forward. Prevent yourself from leaning forward at the hips by engaging the glutes on the rear leg, which will help increase your stability. Push off the rear leg and bring the USB back to center, maintaining control throughout the full movement. Do eight to 10 repetitions on one leg and then repeat on the opposite leg.
High Pull (30 seconds)
High pull
Repeat the movement described above.
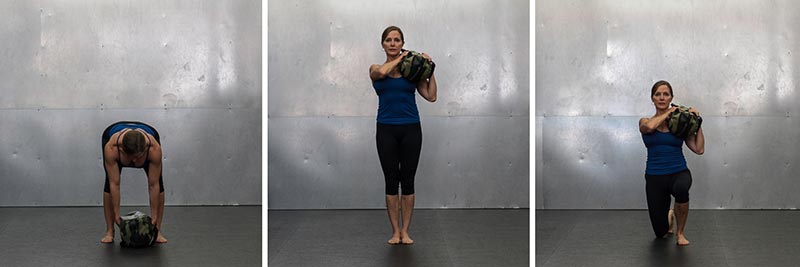
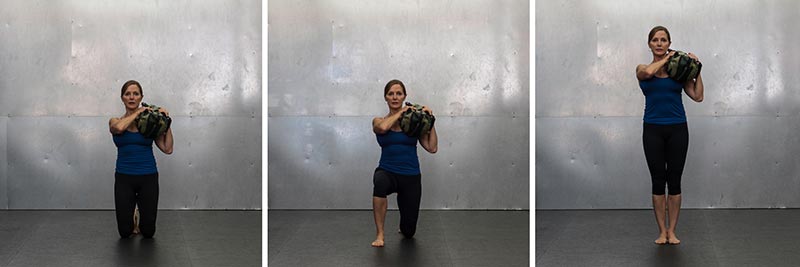
Up/Downs Shouldering the Bag With Alternating Legs (6/4/2 ladder concept)
Up/Downs Shouldering the Bag With Alternating Legs
Clean the bag to the right shoulder. Step back with the same leg and drop the knee to the floor. Step back with the left leg, tucking the toes under, to a tall kneeling  position. Step up from the floor with the right leg and complete the pattern with the left leg. Repeat the pattern on the opposite side. Use the ladder concept of 6/4/2 …six on one side, six on the other side then move to four on one side, four on the other and so on until the ladder is complete.
Rotational High Pull (30 seconds)
Rotational High Pull
Grab the neutral handles and begin in the deadlift position, hips hinging back behind the heels and the core braced. Rotate the right foot internally and lower the bag to about knee height. Next, explode through the left hip, finishing through the middle as you extend, and then to the other side and back. Keep the back tall, loading the hip through the movement as you maintain a braced core.

Source By Elizabeth Andrews /Ace 

Sunday, 28 December 2014

Is Suspension Training Effective?

What is suspension training?

If you’re tired of the same old machines, barbells and dumbbells, there are different ways to challenge your body to burn fat and build muscle.

Remember, the best kind of exercise and diet program is the one that you are most likely to stick to. Sustainability is key to long-term lifestyle changes. You don’t want to get ripped for the summer and then go back to having a one-pack in the winter, do you?

Why not stay shredded all year round if you can? Or even if your goal isn’t to get lean, who doesn’t want to be healthy and live longer?

For some, lifting weights is the only way to go and that’s fine because in some ways, lifting weights is superior for muscle building. However, that’s not the only way to build muscle. In fact, there are other approaches that could be used as an all-around fat-burning and muscle-building protocol. This is where suspension training comes in.

Suspension training takes body weight exercises to a whole new level and shows that more equipment isn’t necessarily better. Originally developed by a former Navy SEAL, suspension training is a form of resistance exercise that purports to develop strength, balance, flexibility, and joint stability simultaneously. How do they get so much workout for so little equipment?

Suspension training does this by using a variety of multi-planar, compound movements, while having you “suspended” by a band that hangs from above. Instead of needing an entire gym, the suspension training bands are small and mobile.

Need to workout on a vacation? You can just pop the bands into your suitcase and go. The low technology, high intensity nature of suspension training makes it a favorite of some fitness enthusiasts.

Right now, suspension training is gaining in popularity. With fitness fanatics getting bored with the same old strength training and stability ball exercises, suspension training offers a workout that is both new and invigorating. Suspension training workout groups are popping up all over the country, and are quickly growing in size. Chances are, if you walk into any gym in America, you’ll see a pair of yellow colored bands hanging down from above.

The term suspension training refers to a different approach to strength training that makes use of a system of bands or ropes and webbing called a suspension trainer. This allows the user to work with his/her own body weight.

Functional Training

Suspension Training is also a form of functional training, which is a classification of training that involves performing activities similar to those performed in daily life. By practicing these activities, we can better perform our daily activities more easily and without injuries. With suspension training, you utilize your body weight for resistance. This makes it convenient for those who travel often and want to keep fit on the go, as well as those who have limited space in their homes. If you cannot devote a large space to your gym equipment, Suspension Training requires little to no setup and can be dismantled before and after use with ease.
As briefly mentioned above, suspension training is efficient because it engages several muscle groups at the same time. Think whole body movements for maximum calorie burn. Whole body movements are guaranteed to get your heart rate going, which will help with fat-burning and cardiovascular health. It may be difficult for some people to attain the same heart rate when doing a split-type workout routine because when you are only working one muscle group, your body isn’t working as intensely. So while that may be conducive to your muscle-building goals, it may not be as good for your fat-burning goals, unlike with Suspension Training.

Is Suspension Training Effective – Suspension Training Exercises

The exercises for suspension training are not necessarily all that new, it’s just the way you do them. For instance, check out the following exercises. The lunge and press are both staples of the modern gym, but with suspension training, you are adding another level of difficulty.

Lower Body Suspension Training Exercise

Let’s say you want to work out your lower body. Suspension training offers a lot of options, but let’s stick with a reverse single-leg lunge. While holding onto the bands at a 45-degree angle, keep your right foot solidly on the ground as you extend your left leg back, bending your right thigh parallel to the ground. Keep your left foot from touching the ground if you want to increase the difficulty. This lunge will work out your hamstrings, quads and supporting muscles in your legs. It will also work out your core, as you are required to use your core muscles to maintain stability.

Upper-Body Suspension Training Exercise

How about the upper-body? Try the suspended chest press. Place your hands in the straps and lower your body to a 45-degree angle. Then, just like you’re doing a pushup lower your body down and then back up. In this exercise, you will work out your chest, and once again, your core will be worked out. You can also lower the straps down enough, stick your feet in them and do elevated push-ups. The amount of core strength and stability to execute this exercise will make you think regular push-ups are for wimps.

Single Leg Squat

The Single Leg Squat is a great way to add resistance to your legs without increasing the overall load with weights. Those who have difficulty performing back squats because of a weak back would benefit from this exercises. The front squat, which also works out the legs, activates more core muscles and upper back muscles, but many find that they have to increase the weight in order for it to be more effective. This is troublesome for those with pre-existing disabilities or previous injuries, especially back injuries because you have to support the bar on your back during a squat. With a Single Leg Squat, you have the benefits for muscle-building in the legs without the heavy weights and barbells, and it becomes a great full body workout.

Place your elbows parallel to your shoulders, and with tension on the bands, center your right leg on the anchor point. Mark this spot on the floor as a guide if you have trouble sticking to the same spot. Place the opposite heel on the ground to assist your right leg which is the working leg. Lower your hips down and backwards, allowing the knee of your left leg, which is the assisting leg, to bend. The majority of the weight should be in your working leg, but still some weight to transfer to the assisting leg for balance, or as needed. Drive through your heels and stand tall. Repeat the movement with your left leg.

Common errors include: a rounded back, over arched back, knees going past the toes, knees buckling inward/outward and not pushing with the heels.

Bulgarian Split Squats


Bulgarian Split Squats are very similar to lunges, except your back foot is elevated. This helps with overall symmetry, and helps make sure that you are working both sides independently and equally. Sometimes bodybuilders work hard only to find that once they are shredded and have peeled all the body fat off, that they have several muscle imbalances that impact their physiques.

Bulgarian Split Squats are like lunges, except the back leg is elevated and placed inside the handle of the training band, while the front leg is in a forward lunge position. Have a wide enough stride that will allow you to go reasonably low, but not too wide that your hip flexors start to hurt. Experiment with different stances because everybody is different, and you want to figure out which is best for you and your body type. Those with longer legs can afford a wider stride, while those with shorter legs may not have to go as low to feel the burn and the stretch in the legs.

This is arguably one of the most popular core exercises in Suspension Training because it works out the whole core, including the lower back, among other muscle groups. This movement is almost impossible to mess up, so long as you don’t over arch your back and you keep a tight core throughout the movement for better muscle engagement.

Start by assuming plank position. Place your feet in the handles or the foot cradles with your knees on the floor and your hands outstretched in front of your shoulders. From plank position, hinge at the hips and drive your butt up while keeping the torso straight.

TRX straps at Mid Length

Start in plank position—place your feet in the foot cradles, your knees on floor, and your hands under your shoulders. Lower your chest to just above the ground. Keeping your ears, shoulders, hips, knees, ankles in alignment, push back up to plank position then immediately hinge at hips. Drive your butt up while keeping your torso straight. Keep your body tight and engaged and lower back down to a plank position. Try to keep your legs straight and hinge at the hips, not at the back.

Equipment

Rings

Rings are rather challenging and may require some time to learn, especially if you are a formerly sedentary individual with little to no strength. Training with rings requires a strong upper body especially, not to mention a firm grip as well. Rings are better suited for upper body exercises, though you can place your feet in the rings if you wished. However, there are other equipment that could make lower body suspension training easier.


One of the pitfalls of using rings is the lack of versatility. Like I mentioned earlier, it’s more for upper body because lower body movements are rather limited.

Suspension Trainers


Suspension Trainers are like resistance bands. They are composed of handles, a stretchable band, door anchors and ankle straps if needed. TRX bands are almost synonymous with Suspension Training, but keep it mind that you are also paying for the name and the branding.

http://www.amazon.com/gp/product/B00AFENHNI/ref=as_li_tl?ie=UTF8&camp=1789&creative=9325&creativeASIN=B00AFENHNI&linkCode=as2&tag=fitnhea00-20&linkId=ZAGLYJRNZKYLEHFH
TRX
TRX bands are incredibly versatile and are built well. The signature black and yellow color are trademarks of the brand, so be mindful of those things when considering which brand to purchase. It’s a little pricier than the alternatives, but owners of the TRX bands have also mentioned that it’s a little overpriced given when you get, but that the quality more than makes up for it.
Currently, the TRX home set is priced at around $200.00.


    • Jungle Gym Suspension Training

Jungle Gym
The Jungle Gym suspension training set is also similar to TRX bands, but they retail for a fraction of the cost. Also, instead of the black and yellow trademark, the Jungle Gym brand is decked out in black and red. The package includes: one 16 feet of high-density suspension straps with patented two-way steel buckles.
Currently, the Jungle Gym suspension training set is priced at around $40.00.

Is Suspension Training for Beginners
This rigorous exercise system might not be for beginners, however. Some sports scientists have pointed out that people without strong core stability or with weak joint integrity might be prone to injury from suspension training. This can be especially true if there is a history of joint or back injuries. The constant demands that make suspension training effective can be the limiting factor for people starting the exercise.
However, that doesn’t mean that beginners can’t start building up to suspension training. Start by doing regular strength training with an eye towards suspension training. Need to gain strength in the core? Try some plank positions to begin developing those muscles. When you think you are ready to take on the straps, start by keeping your body at a shallower angle. This will allow you to build up the steeper angles that will put more pressure on your joints.  And of course, when starting any exercise program, make sure you check with your doctor.
Benefits of Suspension Training
  • Increases your core strength
When you say “core”, you are referring to the four muscle groups surrounding the organs of our lower torso. The ab muscles strengthen out lower back. Improving core strength will also have a direct impact on your posture.
  • Improves your balance and coordination
Because you are literally suspended, you make use of more stabilizer muscles, and more muscles recruited translates to great gains in balance and coordination. Whenever we perform intense workout routines, we gain mass, strength, endurance, stability and eventually, enviable abs.
  • Back to basics with bodyweight exercises
Bodyweight exercise routines are efficient and easy to do. They are perfect for travelling without any equipment at all. Body weight exercises are adapted to our own bodies, so it can be safer, more portable and less expensive to keep up.
Suspension Training Program / Course
If you’ve already got a set of suspension training straps in the post or you’re looking to buy some, you’ll probably need some guidance on the best way to burn fat. Suspension Revolution 2.0 by Dan Long might be able to help you. Suspension Revolution 2.0 is a workout program designed to help you burn fat.

Is Suspension Training Effective?
Advocates of suspension training point out that during any suspension training exercise, you can’t help but to engage your core to steady yourself. They compare suspension training to doing “yoga on ropes.” This makes the trainee use every muscle in their body, maximizing the time spent exercising. When you try it for the first time, you’ll know exactly what they mean. A simple 10 minutes of suspension training can leave one sore the next day. This also means that instead of using isolated muscles, suspension training uses a variety of muscles together, creating effective movement patterns.

Rigorous research into the effectiveness of suspension training has yet to be conducted. But if testimonials count for anything, suspension training is very effective.
Any exercise that can simultaneously exercise the core along with the direct muscle being worked has to be worth its weight.
There are still some concerns about whether or not suspension exercises are functionally effective, i.e. whether it helps you out in everyday life. But this is can be a complaint of many exercises. For example, when do you have to run for two miles in everyday life? Unless you live in Africa, never. And regardless, if an exercise is fun and gets you excited about going to the gym, then we should consider it effective.

Source FatLossClassroom.com / TRX.com 

Saturday, 20 December 2014

WOD Welder Hands as Rx Cream - For Daily Conditioning


All natural ingredients hydrate your hands like no water based lotions can, and help them recover from the toughest WODs. The formula contains Lanolin, which holds and attracts moisture to the skin while still allowing it to breath. Plus beeswax, and age-old natural antibacterial which helps with cell regeneration. Aloe Butter is an anti-inflammatory, natural pain reliever, and a skin soother, and Shea Butter helps skin to regenerate quickly. Peppermint and Eucalyptus essential oils smell great and are naturally antibacterial. Keep a stick in your gym bag, in your car, on your nightstand, and apply frequently. You will see hydrated hands with smoother calluses, and less ripping and shredding. Your hands may even look presentable for a change.
Already have rips? Wash skin and apply Solid Salve liberally, and often. With Wod Welder Salve, you will see healing start within 24 hours. Use it and get back to your workout more quickly
Ingredients: Olive Oil, Beeswax, Lanolin, Shea Butter, Aloe Butter, Peppermint and Eucalyptus Essential Oils

Check out my other post on CrossFit handcare

Get W.O.D welder here


http://www.wodwelder.com/collections/all/products/hands-as-rx-cream-for-daily-conditioning


Source : w.o.d.welder Home http://bit.ly/wodwelderhome


Thursday, 11 December 2014

Get Results With Ropes

I’m always interested in learning about the latest fitness tools available. I try to keep an open mind and experiment with equipment before I pass judgement or consider adding it into my programming for my clients.
At the end of the day, we have plenty of options to get the job done. Grab a bar and some plates and you could accomplish most of your fitness-related goals. Grab a kettlebell and start swinging and you’ll see improvements. Or simply take yourself to the local park for sprints, pushups and pull-ups, and you’d be doing more than most.
One tool that has passed the test and is now a staple in my fitness toolbox is the heavy rope. Over the past couple years, they have increased in popularity and are now found in fitness facilities on a more consistent basis. Can you get a complete workout in with just the rope? Absolutely. All you need is your body, a little room and some motivation, and you’ll be good to go. With a little instruction, the addition of heavy ropes will challenge clients in safe, new ways and help them achieve their goals.
For many of my clients, I recommend full-body routines a few times a week. Couple that with some sprints and a diet of REAL food, and you are on your way to a healthier lifestyle. If it’s just you and your rope, you’ve got everything you need. I would recommend hitting a few of the major movement pillars (i.e., push, pull, level change, etc.) in your routine to ensure a balanced full-body approach.
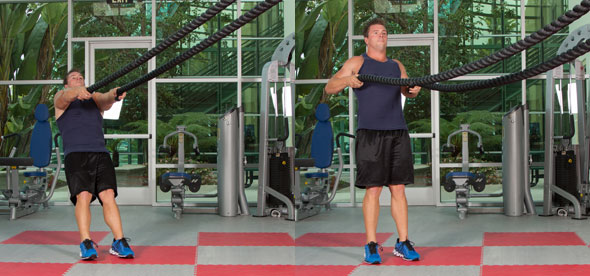
Here is a simple template to get you started. Set up three stations as follows: Start with a rope movement, then perform a bodyweight movement and then finish with a second rope movement.
Circuit 1
Station 1: Rope: Double Rope Slams - 20 reps
Station 2: Bodyweight: Skater Plyos (lateral jumps) - 20 reps (10 per leg)
Station 3: Rope: Rope Inverted Rows - 15 reps
Repeat this routine three times with little rest and then rest for two to three minutes before starting circuit #2.
Circuit 2
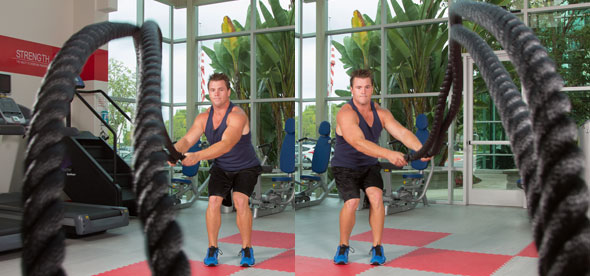
Station 1: Rope: Reverse Lunge Waves - 10 lunges per leg
Station 2: Bodyweight: Push-ups - 10 reps (add a clap if too easy)
Station 3: Rope: Vertical Rope Pulls - 2 lengths of the rope
Repeat this routine three times with little rest and then rest for two to three minutes before starting circuit #3.
Circuit 3
Station 1:Rope: Grappler Slams - 20 total (10 per side)
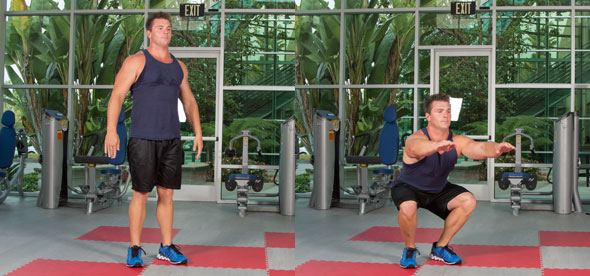
Station 2: Bodyweight: Squats - 15 reps
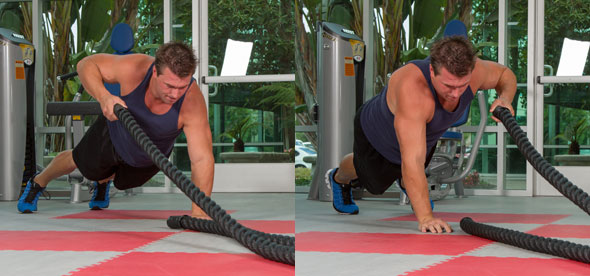
Station 3: Rope: Plank Rope Pulls - 20 total (10 pulls per arm)
Repeat this routine three times with little rest between stations.
Looking at the movements, you’ll see that we hit all three planes of motion, upper-body pushing and pulling, lower-body variations, and movements that challenge both your strength and conditioning to ensure a well-rounded workout.
EXERCISE DESCRIPTIONS
Circuit 1
Double Rope Slams
Double Rope Slams
Begin facing the anchor point in an athletic position while holding an end of the rope in each hand. Lift the ropes up and explosively drive them down into the ground. Be sure to use the entire body when performing the movement. Do not just “arm” the exercise. Maintain a neutral spine throughout and bend the hips and knees while slamming the rope.
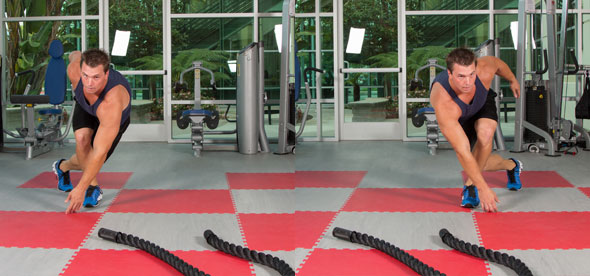
Skater Plyos (lateral jumps)
Skater plyos
Begin by pushing off your left leg and jumping laterally to the right. Land softly under control on your right leg while the left hand reaches toward the ground in front of the right leg. Next, push off the right leg to jump back to the left (starting position). Land on the left leg while the right hand reaches out in front of the left leg. Continue this side-to-side movement for the appropriate number of reps.
Rope Inverted Rows
Rope Inverted Rows
This movement is very similar to an inverted row exercise you’d do with a suspension trainer (TRX for example). Hang the rope over a vertical anchor (tree branch or pull-up bar) and face the anchor point. Walk your feet down toward the anchor point so your body is angled about 45 degrees from the floor. Keep your eyes on the anchor point and begin by flexing at the elbows and pulling your body up. Be sure to keep your shoulders down and back the entire time. Once your hands are just about in line with your chest, slowly extend your arms to return to the starting position.
Circuit 2
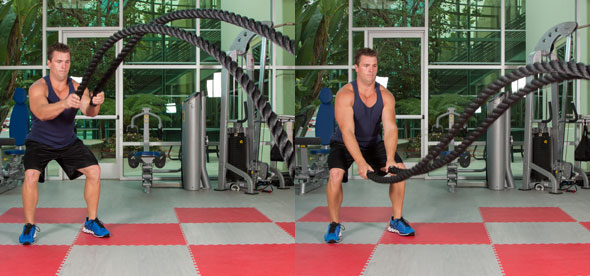
Reverse Lunge Waves
Reverse Lunge Waves
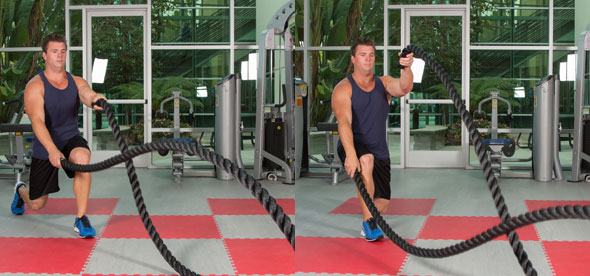
Face the anchor point in an athletic position while holding an end of the rope in each hand. Begin by creating “waves” with the rope by alternating your arms in a quick up-and-down wave or drumming fashion. While performing this wave movement with your arms, do alternating reverse lunges with your lower body at the same time. Maintain a neutral spine and keep your eyes on the anchor point throughout the movement.
Push-ups
Push-ups
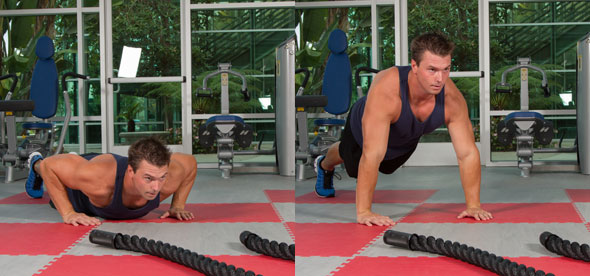
Begin in a traditional pushup position with your hands slightly wider than shoulder width and your elbows at a 45-degree angle from your body. Lower your entire body down under control and then push back up to the starting position. Maintain a neutral spine and keep your body engaged throughout the exercise to ensure proper form.
Vertical Rope Pulls
Vertical Rope Pulls
With the rope secured around a vertical anchor (tree branch, pull-up bar, etc.), assume an athletic position and begin by reaching up with one arm and pulling the rope toward the body. Alternate these vertical pulls for the desired number of reps.
Circuit 3
Grappler Slams
Grappler Slams
Face the anchor point in an athletic position while holding an end of the rope in each hand. Begin by lifting the ropes up, rotating your shoulders and hips right, and slamming the ropes down on the right side of your body. As you lift them back up, rotate your body left, creating an arc pattern with the rope, and slam them down on the left side. Continue this rotating pattern for the appropriate number of reps.
Squats
Squats
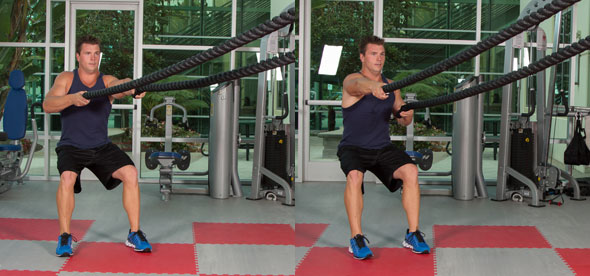
Take a slightly wider than shoulder-width foot position, with your toes pointed out slightly. Upon descent, keep your chest up, abs braced and push your butt back as you think about opening your knees. Keep your head position neutral (eyes looking forward) throughout the movement. Squat down as low as you can without breaking form (no lumbar flexion) and then return to the starting position by driving your hips through and standing up tall.
Plank Rope Pulls
Plank Rope Pulls
Assume a plank position facing the anchor point, extend one arm and pull one end of the rope toward your body. Balance on the opposite arm and repeat this pulling movement on the opposite side. Continue alternating arm pulls for the desired number of reps.

Source :  Doug Balzarini, C.S.C.S., MMA-CC, is the owner of DB Strength, which provides fitness training, education and resources. He is the strength & conditioning coach for Alliance MMA
 

Monday, 1 December 2014

How to perform Pistols, Single Leg Squats for CrossFit

Hip strength is Probably the most important factor for almost any sport. It's almost a given these days, that's why we squat, deadlift, clean and/or snatch heavy at least once a week at an absolute minimum.

Bilateral movements (2 legs at a time) are great for developing raw strength but you don't want neglect split stance (lunge variations) or especially movements where you are in a single leg unsupported stance like pistols. One foot on the ground, either balance or hop around pogo stick style until you can get stable again.

If you're already pretty strong at the big lifts then it's time to master the pistol.

Here's how to do it:

Try to treat it just like a 2 legged squat as much as possible
Hips back (at first)
Knees out
Go as low as you can with your heel down
Sit your butt right down to your heel
Stand up!
Hold a plate in front of you if you need a counter balance
Mobility check:

Put your feet together and try to squat all the way down with your knees out, if fall over backward you likely have some type of ankle mobility issues to work on.
Try wearing your weightlifting shoes at first, it'll be a little bit easier having a small heel lift.
Scaling:

Rings: Combo ring row and pistols
Bands: Pulls you out of the bottom of the movement
Boxs: Partial reps, helps to start sitting then stand
Eccentrics: Lower yourself down under control, sit on the floor then stand back up with two legs
We just started a new site that TechniqueWOD will eventually be hosted on called Fitr.tv. We have a weekly video podcast called Barbell Shrugged where we interview experts in fitness and nutrition!

Monday, 24 November 2014

Kipping Pull-Up

Banded Pull-ups: To Band or Not To Band?


Over the last two years, I’ve had the pleasure of visiting many different CrossFit boxes throughout the United States. Plus, I’ve been a solid member of three different CrossFit boxes. As a result, I’ve been able to experience many different coaching and programming styles in which each gym brought their own specialty to the table. However, I found something universal among most gyms: the banded kipping pull-up.
Kipping pull-ups are a high-skill exercise that requires coordination and strength to keep the shoulder supported under a dynamic load. This seems to be a major struggle for most novice and some intermediate CrossFitters. I know it was for me, especially coming from a bodybuilding background where strict isolated movements were most common. Whether it’s because of a lack of knowledge on how to properly teach the movement or the patience to do so, I’ve noticed that members get thrown on the bands almost immediately.
Being educated in human anatomy (I have a CPTS from Fitness Institute International and am ACSM certified) with a special interest/knowledge about the shoulder, I questioned this coaching style and whether banded pull-ups were actually affective and safe.
Recently, my fiance and I relocated a bit north of Fort Lauderdale to the Delray Beach area in Florida, and we became members of CrossFit Delray Beach. While finishing up a workout session one day, I started a conversation with Laura Canteri, one of Delray’s head coaches.  Laura is a former collegiate athlete who is passionate about human performance and program design. Once she had completed her Master of Science in exercise physiology, she enrolled in James FitzGerald’s OPT (Optimum Performance Training) assessment and program design courses. After learning about her background in exercise science, assessment, program design and coaching, I was anxious to hear her opinion on the banded kipping pull-up.
“I can’t speak for every coach, but I believe bands do more harm than good in terms of an athlete’s development,” Laura said. It was a breath of fresh air to hear my concerns validated.
Laura and I discussed how the most challenging part of a pull-up is the initial pull, which requires scapula retraction and depression. Band tension is highest at the bottom of the movement, so the initial snap of the band causes you to bypass the most important part of the pull-up. Athletes who continue to use the band will never learn how to fully activate the muscles needed for a strict pull-up and, in turn, will never build true strength. Laura and I then went on to discuss the importance of strength and skill in the movement.
“Its important to improve strength and skill simultaneously in all movements,” Laura said. “However, I stress the importance of strength before skill for kipping pull-ups due to the nature of the shoulder joint. If someone is unable to perform a strict pull-up, they will not possess the strength to support their shoulder in a dynamic load such as the kipping pull-up.”
Because the shoulder is a shallow socket joint and the most mobile joint in the human body, it’s highly susceptible to chronic shoulder problems and/or injuries. I’m not suggesting the removal of bands from your gym altogether, but I challenge you, whether you’re a coach at a box or a member of one, to hold yourself to a higher standard. Teach your members the importance of building strength and activating muscles that support the joints before you put them under the stress of a ballistic movement such as the kip. Program exercises that teach scapula retraction and depression such as ring rows and, of course, strict pull-ups.
If you’re a member of a box that allows you to use bands, start practicing without them. Add in strict pull-ups on your own, and if you can’t do a strict pull-up, then do jumping pull-ups and try to hold yourself up to the bar as long as you can. I guarantee you will get stronger and be able to do a bodyweight pull-up on your own.
Being fit and healthy is what we all want to achieve. On that journey, we hope to stay injury-free.
Stay enlightened, my friends!

 Source MHP-sponsored athlete Sarah Grace
  

25 Must-Try Medicine Ball Exercises


Time to get schweddy with some balls! Medicine balls, that is. Available in varying sizes and weights (some up to 150 pounds!), these weighted spheres can help improve muscular power and sports performance . The balls can be thrown and caught (don’t try that with a dumbbell!) making for explosive medicine ball movements that can improve overall athletic ability .
Plus, they’re super old school. Hippocrates used sand-filled animal skin pouches to help patients recover from injuries almost 2,000 years ago (clearly he was on to something). When choosing a weight, pick a ball that’s heavy enough to slow the motion (slower than if you weren’t using any weight at all), but not so heavy that control, accuracy, or range of motion take a hit (or the poor guy next to you).
Reps and sets will depend on intensity and fitness levels, so for most of these moves, we recommend aiming for three sets of 10-20 reps with good form. For those more focused on power and speed performance, switch it up with 3-5 sets of 3-5 reps (applying max force and max speed into every repetition ). Of utmost importance: Be aware of your surroundings. These balls can be a weapon of sorts, so pay close attention to the people (and pricey equipment) around you. Alright then, let’s go balls to the wall.

Full Body

  1. Rock and Roll Up: This one is a toughie at first to coordinate, but hits all the major muscle groups in one powerful move (byahh!). Lie down, back to the mat, with knees bent. Hold a medicine ball on the ground with arms fully extended overhead. Pull the knees into the chest, preparing to use the weight of the ball (and the strength of your core!) to help catapult you to a controlled squat position, then standing. Next, slowly lower back into a squat, and ease back to the floor, butt first before lying back down. Don’t get too comfy though: The goal is to rock and roll for 10-12 reps.

2. Lunge With Twist: Come on baby, let’s do the twist! Engage that core, standing hip width apart with shoulders relaxed. Holding a medicine ball a few inches in front of the chest, step forward into a lunge with the right leg. (Safety first! Keep the knee from sliding forward past the toes.) Get deep into that lunge, making sure the front thigh is parallel with the floor, then with extended arms, reach the medicine ball to the right, rotating the torso at the same time. Maintain the lunge and return to center. Come to standing, then lunge with the other leg (and rotate to the left this time). These can be done in place, or moving forward as walking lunges. Do the twist for 10-12 reps per side.

3. Lunge With Overhead Press: Stand with the feet together, holding a lightweight medicine ball in front of the chest in both hands. Lift the right foot off the floor, bending the knee, and hold this position for one count before stepping forward into a lunge. With the bodyweight shifting to the right leg, reach the medicine ball straight overhead (try to avoid pulling a matrix move). While still in the lunge, pull the ball back to the chest, and bring the front leg back to the starting position. Lunge for 10 reps per leg.

4. Squat Press and Throw: Heels grounded, come to a squat position (as if sitting in an invisible chair). Drive through the heels to jump, and throw the ball straight up as high as possible — then get the hell out of the way! (a quick step back should do the trick). Let the ball drop to the ground. Press it out for 10-15 reps.

5. Reverse Swing: This move could be as disastrous as throwing a bowling ball the wrong way, so read carefully. Stand with the feet hip-width apart. Hold a medicine ball directly in front of the chest, with the elbows pointing down toward the floor. Lower into a squat, keeping the back flat, and head facing forward. Reach the medicine ball back between the legs. Ready for the fun part? Explosively swing the ball up overhead to the point that it reaches behind the head and neck (just don’t throw it backward!). Keep the abs contracted as the ankles, knees, and hips extend. Bonus: Throw the ball to the ground (and watch out for your face!). Ball so hard for 10-12 reps.
 

Legs & Glutes

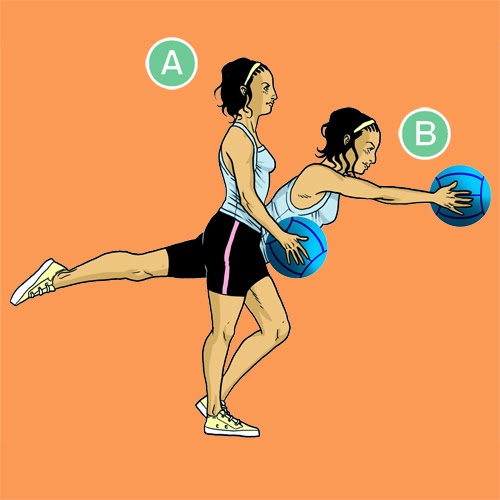
 6. Reaching Romanian Deadlift: This one takes balance, and a little breathing room to fully extend. Stand on the right leg, with a medicine ball in both hands. Bend the right knee slightly, and hinge forward at the hips, extending the left leg straight back (and for an extra challenge, extending the arms overhead). Feel like a ninja? Check! The body should now form a straight line that’s perpendicular with the standing leg. Return the extended leg to the floor, and repeat for 10-12 reps, then switch legs.

7. Step Jump: Hold a medicine ball to the heart, and never let go (Jack), while straddling the middle of a low bench or step (make sure it’s sturdy!). Drop into a squat until the tush makes contact with the bench. Stand about six inches from a low bench or platform, and jump up onto it so the feet land in a natural, wide stance.. Carefully jump back down to the start position. Jump up for 10-12 reps.

8. Circle Squat: Stand holding a medicine ball at the right hip. Circle the ball overhead toward the left, while stepping out the left leg to into a squat (just like a sumo wrestler). Circle the ball all the way to the right side of the body, while still in the squat, then step the feet back together, and circle the ball back to the right. Repeat 8-10 times through, then switch directions.

9. Single-Leg Squat: Stand with feet hip-width apart, knees slightly bent. Lift the right foot off the ground and extend it forward. Hold a medicine ball in front of the bellybutton. Lower the body into a squat position, sitting back into an imaginary chair with the knees safely positioned over the feet. Return to start position, and switch legs. That’s one rep. Get your squat on for 10-12 more.

10. Single-Leg Butt Lift: We’re warning you, this one really puts on a show. Lie on your back and place the sole of the right foot onto the medicine ball. Thrust the hips to the sky (very Jane Fonda-esque) with the left leg straight in the air, with all your weight supported by the right foot and the shoulders. Hold for one count, then slowly return to the start position with the butt on the matt, and repeat for 10-12 reps on each side.
 

Chest and Back


11. Medicine Ball Push-Up: Drop down and get ballsy. Starting in a traditional push-up position, toes tucked under, place your palms on the medicine ball, and shift your bodyweight forward until in plank position. Keeping the core tight, and the head aligned with the spine, slowly lower the chest toward the ball (woof!) until it nearly touches, keeping the elbows pinned tightly at your sides. Finish the move by pressing upward through the arms until they’re fully extended. Need an adjustment? Pop the knees on the mat and push it real good for 10-12 reps.

12. Weighted Superman: Lie face down on the mat with arms stretched out in front, holding onto a lightweight medicine ball (try starting with 4-6 lbs). Slowly raise the arms and legs up as high as possible, engaging the back muscles. Hold the position at the top for a few counts, all the while pretending you have a cape around your neck. Lower the body back down to the mat and repeat for 12-15 reps.

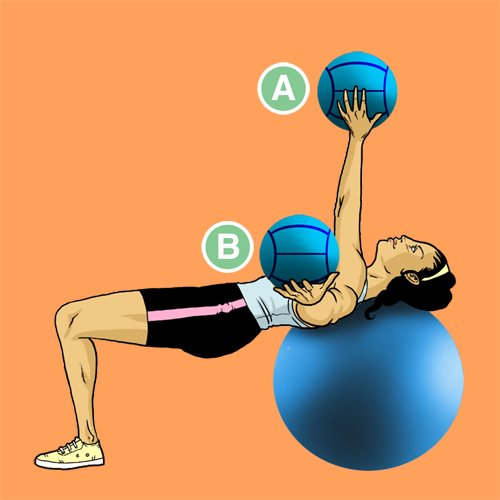
13. Lying Chest Toss: Since two balls are better than one, this move enlists a pair. Lie face up on a stability ball with the head and shoulder blades resting on the ball’s center, and knees bent at a 90-degree angle (the torso should be parallel to the floor). Keeping the neck in a neutral position (not straining forward or hanging back), hold a medicine ball with both hands just above the chest, with the elbows bent and pointed out to the sides. Push the ball out, in line with the chest, (like a classic chest pass) and toss it straight up toward the ceiling. Be extra careful not to toss the ball too hard. (Just remember: What goes up must come down.) Repeat for 12-15 reps.

14. Rolling Push-Up: If 9th Grade phys ed is in the past, then you know what push-ups are all about. Adding in a medicine ball quickly morphs the upper body-blaster into an even more challenging move. Get into high-plank with a medicine ball under one hand, and lower the chest toward the floor to perform a push-up. Return to high-plank and roll the ball to the other hand. Roll out 8-10 reps, or as many as possible maintaining good form.

15. Wall Pass: Find the nearest med ball-safe wall (when in doubt, always ask the gym’s staff which areas are fair game). Stand about 3-4 feet in front of it, holding a lightweight medicine ball with both hands. Get into an athletic stance, with a slight bend in the knees, and the core engaged. Bring the ball to the chest, and firmly throw it at the wall (get that aggression out!), and catch the ball on its return. Your mission: Balls to the wall for 12-15 reps — without taking off another gym goer’s head.


Shoulders and Arms


16. Ball Fly: This can get a little tricky as far as balancing goes, but we promise you’ll look like a total champ once you’ve got it down. Lie face up on a stability ball with the neck and shoulder blades resting on the ball’s center, and knees bent at a 90-degree angle (torso parallel to the floor). Now it’s time to really put on a show: With the abs engaged and hips raised, extend the arms, holding a lightweight medicine ball to the ceiling. Shift the ball to the left hand, and slowly lower the ball until the left arm is parallel with the floor (maintain a slight bend in the elbow). Bring the ball back to the center and shift the ball to the right hand (do the same thing on this side) to complete one rep. Repeat for 8-10 reps to really feel the burn. 17. Shoulder Press: This move is one of the easiest for beginners, but can be amped up with a heavier ball. Hold a medicine ball at the chest (about an inch away, right in front of the sternum). Extend the arms to the ceiling, reaching the ball overhead, and slowly lower the ball back to the start position. Easy peasy, right? Press it out for 12-15 reps.
18. Figure 8: This is totally like ribbon dancing, just probably not as graceful. Stand with feet about shoulder-width apart. Hold onto a medicine ball with both hands to one side of the head, with arms fully extended. Slowly move the medicine ball in a fluid, controlled motion, forming the figure 8. Repeat 8-10 reps through clockwise, then switch directions. This one can be deceivingly tiring, so try it with a lighter ball first.
19. Triceps Extension: Stand in a comfortable stance, or sit tall in a chair, with the core engaged. Hold a medicine ball in both hands with the arms extended overhead, inner arms grazing the ears (resist the urge to lurch the arms forward and make an elephant noise). Next, bend the elbows, lowering the ball behind the head until the arms form a 45-degree angle (or as far as feels comfortable). Squeeze the triceps to straighten the arms, bringing the ball back to the starting position. Pump out 12-15 reps.
20. Bicep Curl: Stand with feet shoulder-width apart, holding the med ball in both hands at the chest. Keeping the elbows close to the body, lower the ball toward the ground until the arms are fully extended. Then curl the ball back up to the chest. Lower the arms back to the starting position. Curl for 12-15 reps — just never at the squat rack.

Core

21. V-Up: How To: Lie flat on your back, legs extended (but try not to snooze on the mat). Reach the arms overhead—à la first thing in the morning stretch—with a medicine ball in both hands. Engage the core to lift the hands and feet simultaneously so the body forms a  “V” position. At the top of the “V,” pass the ball from the hands to the feet. Squeeze the ball between your sneaks, and slowly lower the arms and legs back down to the floor. Return to the “V,” and pass the ball back to the hands. That’s one rep. Wipe the sweat from your brow. Repeat for 8-10 more.
22. Overhead Slam: Stand with your feet shoulder-width apart, and knees slightly bent. Hold a medicine ball in both hands, and lift it overhead. Then bend at the hips (slightly hinging forward), careful not to arch the back, and slam the ball on the ground directly in front. Ask fellow gym-goers nicely if it’s OK to slam on. And don’t slam toooo hard (control is key). Retrieve the ball and keep at it for 10-12 reps.
23. Straight-Leg Sit-Ups: Ready to take the standard sit-ups up a notch? Lie flat, back to the mat, with a medicine ball in both hands. Extend the arms straight so the ball is directly above the hips. While keeping the legs together, raise them directly over the hips to the ceiling (so the body forms a giant “L”).  With control, return to the start position and bust out 12-15 reps.
24. Hay Bailer: Kneel on the right knee, (with the left foot back, toes curled under) to form a 90-degree angle. Hold a medicine ball in both hands close to the body while keeping the torso tight, and perpendicular to the floor. Bring the medicine ball toward the right hip, while keeping the rest of the body forward, then transfer it diagonally up and across the body (Think: John Travolta in Saturday Night Fever). Hold this position for one count before returning to the start position. Repeat the movement in the opposite direction with the right foot forward. (Pro tip: The more the arms are extended, the harder the move is). Bail that hay for 12-15 reps.
25. Toe Touch: Touching your toes just got even trickier. Lie on the floor, holding a medicine ball in both hands. Extend the arms overhead, with shoulders back and down to the mat. While keeping the legs together, raise them directly over the hips to the ceiling (so the body forms a giant “L”). Next, bring the ball overhead (keep the neck in a neutral position throughout), and reach it as close to the toes as possible. Crunch the upper body to the toes for 12-15 reps.

Source http://greatist.com/fitness/25-must-try-medicine-ball-exercises

Thursday, 20 November 2014

What is Ankorr

 
 Ankorr is the worlds first "animate load harness". It's unique design allows the "anchor points" to move through 180 degrees of sagittal planes & 360 degrees of transverse planes. This means our athletes & soldiers can move forward under load, spin 180 degrees through their sagittal planes then move in reverse while staying under constant load.
In doing so, Ankorr pioneers what we refer to as "fluid resistance". This is where we can simulate "game specific situations" for athletes & "field specific conditions" for soldiers. This prepares them both for operational readiness like never before.
The unique training arm that comes with Ankorr also sets it apart. "The ZUU" (www.thezuu.com.au) is a world class exercise platform based on primal pattern movements. Developed to increase strength endurance, mobility, strength through full ranges, anaerobic threshold, cardio vascular & character without the use of any equipment.
Combine a world class training program with a ground breaking functional tool & you'll understand why Ankorr is a "must have" in athletes, soldiers & coaches training kits.


Source | http://www.ankorr.com/

Tuesday, 18 November 2014

TRX Workout for beginners

This TRX workout is designed for beginners. One of the things I hear most often when I talk about TRX, including in response to my TRX beginner tips, is that people want to try it, but aren’t sure what to do and don’t want to look silly . My goal with this workout is to introduce you to some basic moves and give you something you can pull up on your phone at the gym so you know what to do. This workout is an interval workout, which is very common for TRX. Each move is performed for 30 seconds. Move as quickly as you can from one move to the next. They are staggered to focus on upper body, lower body, and core so you shouldn’t need to rest in between (but of course, if you do need a rest, take it). As you advance, feel free to increase the interval. I typically do 30-60 second intervals depending on what I’m doing. The exercises are split into two mini circuits and you’ll repeat each circuit three times. Form notes for the exercise appear below the graphic.


Form Notes:
Most of these notes reference the non-TRX version of the exercise (squat, lunge, plank, etc) and they assume you are familiar with the proper form for those exercises. If you are not familiar with the non-TRX version, please please please make sure you understand the proper form before you attempt the TRX versions.
  • Chest press - For me, the easiest way to think about this move is to think of it as a push-up with your hands in the straps. Your elbows should come along your sides at roughly a 45 degree angle. The straps should be outside your arms. Keep your wrists straight.
  • Squat - The form here is almost identical to a normal squat but your weight is further in your heels since you have the TRX for support. Make sure you are using your legs, not pulling with your arms.
  • Rows - Keep your wrists straight. When your arms are extended, your palms should be facing the ground. As you pull your bodyweight up, rotate your hands so that at the top of the movement, your palms are facing inward. Keep your elbows in so they are shaving along your ribs.
  • Plank - This is just like a normal forearm plank, but your feet are in the straps. If you’re anchored to a wall, make sure your feet aren’t touching the wall (that’s cheating).
  • Reverse lunges - Again, this is similar to a reverse lunge. However, you aren’t really stepping back on your back leg, you are floating it back. When you first start, tap your back toe to the ground as lightly as possible. Work up to the full version where you hover the back leg without touching the ground. Remember to use your legs, the straps are just for balance. Do 30 seconds on your right leg first, then switch to your left.
  • Bicep curls - Hold the straps with your arms extended out in front of you, palms up. As you perform the bicep curl, keep the 90 degree angle between your upper arms and your torso (this is harder than it sounds). Control the movement as you lower back down, don’t just drop.
  • Hamstring curls - With your heels in the straps and your toes pressing against the handles, press up into a reverse plank with your shoulders on the ground. Your body should be in one long line from your shoulders, through your hips and legs, to your feet. From this position, pull your heels in towards your butt without changing the position of your torso.
  • Tricep press - Face away from the anchor point holding the straps above your head and your palms facing forward. The motion is similar to a normal overhead tricep press. Keep your elbows just at the edge of your peripheral vision. Your upper arms should not be moving, your elbows should be anchored in place, the only motion should be your forearms
  • Knee tucks - Start in plank position, top of a push-up, shoulders over wrists, feet in the loops. Pull your knees in toward your chest, return to start, repeat.
 Source : http://busy-bod.com

Friday, 14 November 2014

Reform Your Body with TRX

 There is a constant stream of new gadgets being introduced to the fitness scene, and many of them are fads.  I rarely jump on them.  I like to play, research, investigate, try out as much as possible; and usually I end up writing them all off. TRX Suspension Training was showing up at the trade shows and in the research I was doing, and it seemed interesting to me. So when I found out a colleague of mine had one, I asked to borrow it and see if it was all it seemed to be.
You need space when using the TRX, although it IS possible to get a full body workout straight up and down with the apparatus, but you will still need room to go side to side. I brought the TRX to my gym, hooked it up to the Smith machine, since there was no Xmount at the time, and tried a workout with it.


The TRX kicked my butt

I rarely get sore, but I could really feel it after using TRX the first time AND second time, the following day. Now, I don’t necessarily think that getting that sore is so good for you - but - I knew that this device was useful - big time.  This was going to be great for me and my clients; I did not hesitate for a moment to order it.
I used it on myself for a while, and made myself quite familiar with it. As with all new devices, as a trainer, I find it best to truly understand a product before I use it on my clients, even with my background in anatomy and biomechanics.


With my constant desire to research and investigate these new devices, paired with my knack for exercise design, I often find myself training other trainers with them.  So after a few days of personally studying (and playing) with the TRX, I worked out with a few of my coworkers one on one - it’s always fun to play with liked-minded souls. For those who took an interest in the TRX and continued on using it with me, their bodies completely changed. I also think one of the reasons trainers are so enamored with the TRX is because it is not only a really great piece of equipment, it also draws a lot of attention in the gym - those two things together will keep a trainer very busy with new clients.
Speaking of clients, I began supplementing my clients’ training shortly after practicing with my fellow trainers, and just like the fitness professionals I worked with, they saw great results. It changed their bodies!


With the TRX you can really tailor the workout to each client’s specific needs within a millimeter.  You can choose to focus more on strength or fat loss. You can go a more cardiovascular route and include rehab components.  You can train a wide range of ages and fitness levels... in the hands of a good trainer, almost everyone can benefit from a TRX workout.
The versatility of the TRX makes it a very accessible apparatus to achieving a great workout. For example, people with knee issues that keeps them from squatting or lunging can do lean-back versions using their own body weight, which makes them have to use their core tremendously, along with their arm and upper body strength and stabilizers. There is usually a way to make the TRX “work for you.”
Some time after I had begun using the TRX with my clients and coworkers, Fitness Anywhere started offering certifications for their product. I quickly signed up, and took the TRX-instructor certification.  I had a great time, the instructor was fun... I had so much energy during my certification class that I did cardio on my lunch break! I would recommend any trainer looking to use TRX take one of the many courses Fitness Anywhere offers; I believe strongly in taking certifications when using specialized tools on your clients when available.
TRX also has great synergy with other fitness tools. Henkin Fitness, who makes the sandbag I use in my videos, has a strap called The Ultimate Core Strap that allows you to attach the Ultimate Sandbag to the TRX. They also have designed several exercises within their own theory with the sandbag and TRX together.  I, of course, have embraced this, played with it - and added on more.  This is awesome, and I love seeing the fitness community coming together and building off of each others’ successes.

 This is why I like the TRX so much
There isn’t a single session in which I’m training a client on the TRX where someone isn’t asking me about the TRX or for my card.  That should tell any trainers out there all you would want to know.  Personally, I love that it does so much for me. I can do a whole body workout. I can do cardio, weights and core all-in-one, in 20-30 minutes if I like. Or, I can do a longer and more specific workout.  Sometimes I use the TRX as part of a super-set, or just part of a workout in general.
I have seen over and over again how TRX has changed peoples' bodies. I could give you amazing client case studies, but I wouldn't even know where to begin there are so many. Bottom line, it rocks.
After a few years I bought a new one; the old TRX is still hanging on, but the yellow is gray looking and the handles have seen better times. One seam on the top part of the strap went as well; it’s fully usable, since it’s the loops that adjust the heights and they are not far apart. It’s still going strong... something you can’t say often for a piece of equipment used as often and as long as this has been. I use the new one for my shoots, and “old reliable” for training (it’s still my favorite - it’s broken in, you know how that usually feels better).  If you choose to get the TRX and any of its it’s attachments like I did, use it in good health and stay

Source Summer-Fit http://www.summer-fit.com


Wednesday, 12 November 2014

Mark Hunt as UFC Champ Would Be One of MMA's Most Improbable Stories


When you start to think about MMA's most improbable stories, you may immediately think about Matt Hamill and his early success, or perhaps Nick Newell's comeuppance in recent years.
When you think about tournaments and championships, perhaps Mark Coleman's run in the Pride Grand Prix 2000, or Randy Couture's return to the heavyweight division in 2007, will come to mind. Or maybe you throw out Matt Serra's stunning upset of Georges St-Pierre for the welterweight belt.
Those would be matched, if not exceeded, in improbability if Mark Hunt walks out of UFC 180 as the UFC Interim Heavyweight Champion on Saturday, Nov. 15, in Mexico City, Mexico. It truly would be one of the most remarkable stories in this sport's young history.

When Hunt entered his MMA career, he was already a notable kickboxer who had won the 2001 K-1 World Grand Prix. With some status in Japan and as an ever-tough competitor, he jumped right into action against quality competition.
Hunt began his career 5-1 with wins over Wanderlei Silva and Mirko "Cro Cop" Filipovic. However, it was still apparent he was out of his depth on the ground as his MMA debut against Hidehiko Yoshida showed. Regardless, he was a fan favorite because of his style of fighting, and Pride placed him in suitable matchups early on.
His fifth consecutive victory came in the opening round of the 2006 Pride Openweight Grand Prix.
After advancing, Hunt would begin to suffer a significant setback as he was exposed time and again. He was taken down and submitted easily by Josh Barnett in the quarterfinals. That would not stop Pride from putting him against Fedor Emelianenko for his next contest.
Hunt was still a novice on the ground and was only five months removed from his quick loss to Barnett. Fedor won on the ground as many would expect.
After the fall of Pride, the “Super Samoan” would continue fighting. He would also continue losing.
At DREAM 5, Alistair Overeem finished him with a rudimentary keylock in just 71 seconds. In 2008, at the year-end Japan classic Dynamite!!, Hunt suffered his most surprising defeat when 185-pound Melvin Manhoef cracked the talented striker and his thick skull in just 18 seconds for an upset knockout.
If anyone had hopes of Hunt doing anything special in MMA, their dreams died on that night. We knew who Hunt was—a fantastic striker who was fun to watch in stand-up fights. He had virtually no ground game and now suffered a KO loss to a fighter two weight classes below him.
Hunt would carry on and lose to Gegard Mousasi in the DREAM Super Hulk Tournament by straight armbar in 80 seconds.
Even with three fights, and three losses, after the death of Pride, Hunt was still in negotiations with the UFC. His contract came as part of the Pride buyout. Dana White and the UFC attempted to buy him out, but Hunt refused. He wanted to test himself in the best MMA organization on the planet.
In 2010, Hunt made his UFC debut.
It was a 63-second loss to Sean McCorkle.
Hunt had become a punch line. We already knew what kind of fighter Hunt was, but at least he lost to notable names. Now Hunt had just lost to McCorkle. The “Super Samoan” had little to offer the fans, the heavyweight division or the UFC.
Or, so we thought.
Five months later, Hunt would get a fight close to home in Australia. He pasted Chris Tuchscherer with a walk-away KO. Hunt was able to show the UFC audience why so many fans had loved him during his earlier career.
His next test would be against Ben Rothwell at UFC 135—a matchup that screamed Rothwell would take him down and submit him or, if nothing else, control him for a decision win. That did not happen. Hunt defended 12 takedowns in the fight and landed two of his own. He kept the fight on the feet for the final two rounds and won a decision.
Enter Cheick Kongo. Exit with a TKO win.
With three wins in the UFC, Hunt moved himself up the ladder nicely. Now he would face Stefan Struve, a young gun in the division with a nice ground game. It was Hunt's stiffest task to date under the bright lights of the UFC. Another passing grade.
Hunt survived takedowns and submission attempts, came from behind and delivered one of the best knockouts of 2013.

 Four straight wins earned Hunt a potential title eliminator against Junior dos Santos. The two stood toe to toe, but Hunt would come out on the losing end to a spinning heel kick in the last minute of the fight. It earned him a Fight of the Night bonus, but it also earned him many new fans for the performance.
The UFC knew it had a fun draw in Hunt. In the shallow talent pool of the heavyweight division, he was a valuable commodity. Back near home, Hunt would take on Antonio Silva. The two put on a Fight of the Year candidate. It turned out to be a majority draw, but the fight itself gave everyone the fight they wanted.
Hunt, 4-2-1 in his UFC career, would get Roy Nelson for his first bout in 2014. Nelson had improved boxing, but his wrestling and submissions seemed like a natural fit for a quick end to Hunt's night. That is, after all, what history has told us.
The New Zealander had apparently burned his history books.
Hunt defended takedowns from Nelson and survived on the ground. Improbable, but his improvements in these categories have stunned us all. In the second round, Hunt gave us another stellar walk-away knockout.
After the fight in September, one would have thought Hunt would earn another top-10 fight, but we did not expect the UFC to give him the call once Cain Velasquez got injured.
Now we are here. UFC 180 is on Saturday, and Hunt will get a shot at UFC gold.


This isn't the Hunt of nearly 15 years ago. Yes, he has improved takedown defense, but at 40 years old, he is also slower on the feet. He is still crafty, but this seems like a steep hill to climb. The deck is stacked against him in facing Fabricio Werdum.
If Hunt can pull this off on Saturday, it will be an all-time story to tell. His technical deficiencies, his unlikely road to the UFC and his surprising progression as an MMA fighter have made this one of the most improbable roads to a title ever.
Interim championship or not, Saturday could yield a special result.
If you want an underdog story, Mark Hunt is the book you grab off the shelf to read. He is the one who will make you believe in incredibly unlikely things happening in MMA. If the stars align just right in Mexico City, the jaws of millions will be left on the floor as Hunt's hand is raised as a UFC champion.

All stats provided by FightMetric 
Article by By Nathan McCarter , Featured Columnist
.