With our 16 Week Challenge we are searching for 10 committed people , who want to transform their health and their physique.
This program is a 16 week program, broken down into 4 sections, which you can follow from home..--> Lose Fat --> Build Lean Muscle --> Clear Skin --> Energy and Vitality --> HEALTHY Clean Body --> Re-set your Metabolism to Fat Burning Furnace --> Understand how to Fuel your Body Long Term --> Closed Facebook Forum for Support --> Personal Mentoring and Support If you would like to be considered, please like and head over to our FB Page and message us https://www.facebook.com/fitnhealthyu
I use this product daily. If you want a delicious high protein bread
try this. This is a super low carb, high protein, high fat loaf, it is
gain-free, sugar-free and has dairy-free options. Delicious served
toasted with eggs or avocado (or both) or just use as a sandwich base
and fill with your favourite ingredients.
Prep time: 15mins Cook time: 50mins Yield: approx 20 slices
Ingredients:
3 scoops Coconut 180Superfood
1 cup ground linseed
1/2 cup pumpkin seeds
1/4 cup sunflower seeds
2 Tbs chia seeds
2 Tbs sesame seeds
1/4 tsp salt
2 tsp baking powder
60g melted butter or coconut oil
4 eggs
1/2 cup natural yoghurt or coconut cream
1 Tbs apple cider vinegar
Instructions:
Preheat oven to 180c and line a loaf tin with baking paper.
Place pumpkin seeds and sunflower seeds in a food processor and process until ground but still with some chunky bits.
In a large bowl mix together 180,
ground linseed, chia seeds, sesame seeds, salt, baking powder, pumpkin
seeds and sunflower seeds.
In a separate bowl whisk together wet ingredients until well combined.
Pour wet ingredients into dry and
mix gently to combine – will make a thick batter (not a bread dough), if
it seems too dry add some extra yoghurt or coconut cream.
Transfer to loaf tin and bake for approx 50mins until firm.
Nutritional Information: Amount per slice – approx 20 slices
Calories
154.8
Total Carbohydrates
4.9g
Total Fat
12.4g
Dietary Fibre
3.2g
Saturated Fat
4.0g
Sugars
0.5g
Polyunsaturated Fat
3.4g
Protein
7.5g
Monounsaturated Fat
2.9g
Sodium
53mg
Net Carbs per slice = 1.7g (Total carbs – indigestible fibre which has no impact on blood sugar).
Enjoy !!
We'd love to hear how yours turns out please post up your comments :)
Learning how to jump higher will help you in more than one way. There
are lots of exercises that will help you increase your vertical leap,
all you need to do it find a workout that suits your needs. You should
realize that no two people are build the same way, find something that
works for you.
If you are a person who is into sports, jumping higher is a huge asset
and knowing how to increase your jump can be a valuable tool to you. It
doesn't matter if you are a basketball, baseball, or football player,
increasing your vertical leap will help you improve your game by leaps
and bounds. If you take the time to learn how to jump higher, you will
not only increase your vertical jump, but it will help you improve your
overall agility. This will make a huge difference in your performance as
an athlete.
One of the ways to help you start to jump higher is by including power
training and strength training as well. Strength training will build the
muscles in your legs and calves to increase your vertical jump. Power
training will teach your body how to be explosive which can be used in
every sport.
If you have a jump rope, good. If you don't, go out and get one today
because jump roping about twenty to thirty minutes per day is a great
way to increase your vertical jump. You can also increase your leg
strength by running and jumping up stairs or bleachers. When jumping,
slowly increase the number of steps you are jumping so you are
constantly increasing your jump. You could also buy jump boxes from a
sports store and jump on and off of them. When you are able increase the
height of the boxes, you will know that you are making great
improvement on your journey to jump higher.
In just a few weeks, these exercises will help you improve your fitness,
agility, flexibility, and stamina. Finding ways to jump higher is
essential for most athletes. Basketball players, volleyball players,
high jumpers, and long jumpers can all benefit from jumping higher. If
you can increase your vertical jump, you will excel in these types of
sports.
To be completely honest, you don't need to be a sports person to learn
to jump higher. If you are just an average person, you can include
exercises in your daily workout to increase your vertical leap. If you
have always wanted to be fit and more agile, you will find that jumping
higher will get you there in no time at all. Power training activities
like jump roping, box jumping, and running stairs will help you lean to
jump higher.
Knowing how to jump higher is a skill that will help you in many ways
throughout your life, in sports, and outside of sports. It will help
boost your confidence and is a great boost in morale. Take the steps
that you need to in order to start jumping higher. You will not regret
it.
Carbohydrates have earned somewhat of a bad reputation over the
years. Like other macronutrients before them, carbs have fallen victim
to the latest diet trends and fads, many of which recommend
significantly reducing carbohydrate intake across the board. In fact,
the topic often inspires heated debate between health and fitness
experts, not to mention the feelings of love, hate and guilt inspired in
the average person. Carbs have become the guilty pleasure of
macronutrients.
For those with weight loss as a goal, low-carb diets have seemed to
provide the answer. Reduced carbohydrate diets are commonly recommended
based on the initial weight loss; however, studies have found this
initial weight loss is often not sustained and, in many cases, leads to
weight gain down the road. Plus, without carbs to utilize for energy,
the body begins to burn protein. Over the long-term, a balanced diet
including carbohydrates will yield the best results.
It’s time to set the record straight about this essential macronutrient and find out the real impact of carbs on our bodies.
The Role of Carbs
Carbohydrates are a key source of energy. As the
body ingests these macronutrients from food, it sets in motion a complex
process of carbohydrate breakdown, insulin release and sugar
absorption. This process creates, ideally, a steady stream of energy for
the body, whether the individual is typing away at a desk or completing
a rigorous training session. Clearly, carbohydrates play a vital role
in our diets.
The Right Carb for the Right Job
We’ve all heard the terms simple and complex carbs and, more
recently, glycemic index. These refer to the structure of the
carbohydrate and how quickly it’s broken down into glucose in the
bloodstream. In general, the diet should focus on complex carbohydrates,
such as whole-grain breads, rices and cereals, along with the right
simple carbohydrates such as fruits, vegetables and low-fat dairy
(simple carbs like refined sugar are best avoided). These types of
carbohydrates provide not only energy, but also vitamins and minerals
and, in many cases, fiber. When quickly trying to replenish energy
stores after an intense workout, the right carb is often a simple carb
paired with protein. Chocolate milk, yogurt with fruit and similar post-workout snacks can be good options. Like anything else in a good nutrition program,
it comes down to taking a total-diet approach and choosing the right
carb to fuel your day or refuel after a training session.
The Dark Side of Carbs
Yes, carbs are a primary source of energy and a must for a quality
nutrition program. And yes, carbs can have a dark side just like any
other macronutrient consumed in excess. This is where carbs start
earning a bad reputation and it’s all in how we eat them. Carbohydrates
are a source of energy, broken down by the body and then used or stored
as glycogen, which is a quick source of energy to power your muscles
through their next lifting session or high-intensity interval training
workout. Unfortunately, the body’s ability to store glycogen is limited.
Once the glycogen reserves are full, where does the excess glucose go?
That extra energy broken down from excess carbohydrates is stored as fat instead of glycogen. Not all carbs lead to fat, just the excess ones.
It’s time to recognize the real impact of carbs—the energy they
provide for day-to-day needs or extreme workout—as well as how we
utilize them, for better or worse. Making a place for quality
carbohydrates like whole grains, fruits, vegetables and legumes in a
good nutrition program can ensure long-term success
1. Take the introductory course offered by your CrossFit affiliate.
If you are new to CrossFit, taking the orientation course at your CrossFit box (gym) that teaches you proper exercise technique is a must. These introductory classes are vital to your success as a “CrossFitter,” especially if you have never regularly performed the foundational movements of CrossFit. These movements include, but are not limited to, various types of squats, overhead presses, dead lifts, and Olympic lifts. Even if you are an experienced CrossFitter, it’s a good idea to periodically revisit an introductory course to review the basics of proper movement technique.
Bottom line: Make sure you are ready for all of the CrossFit movements by attending your box’s introductory course.
2. Know how to modify every movement, every time.
Practicing excellent form during every repetition of every exercise is one of the most effective injury-prevention strategies. Make sure you know your options for the successful completion of every single repetition. In CrossFit, the workout of the day (or WOD) is posted along with recommendations (or Rx) for load and/or movement skill. For example, the load recommendations for the wall ball movement, which involves quickly moving from a deep squat to standing while tossing a large medicine ball several feet overhead, typically include a 20-lb ball for men and a 14-lb ball for women. However, some individuals cannot safely perform wall balls with that amount of weight. In fact, some people cannot safely perform wall balls at all, and they must modify the exercise to one that is suitable to their capabilities. Whether it’s selecting a lighter weight than the Rx recommendation, or altering the movement (e.g., modifying to a half-squat rather than a deep squat in the wall ball example), knowing how to scale the different variables of an exercise to meet your specific goals or limitations will help you safely and effectively complete a WOD. Knowing the right modifications for your individual needs is best learned during the introductory CrossFit course (see Step #1), and through having a frank discussion with your CrossFit coach (See Step #3). Lastly, understand that your physical capacity changes from day-to-day and, depending on your fatigue level and frequency of training, you might need to modify a movement one day, but several days later perform that same movement at the Rx recommendation.
Bottom line: Be sure you approach each WOD with the knowledge of how to modify a movement, if necessary.
3. Regularly communicate with your CrossFit coach.
Although this is Step 3 on the list, it fits in with the previous points and cannot be emphasized enough. First, let the coach of the class you are attending know about any limitations or past injuries that might make the performance of a particular WOD unsuitable for you. Then discuss with your coach possible modifications in movement and/or weight load that will make the exercises work for you. Be sure to arrive a few minutes early and talk with your coach BEFORE class so that when the timer is winding down to begin the WOD, you are not left wondering what to do. As a coach myself, I ALWAYS appreciate it when participants approach me before class to inform me of any current limitations. In addition, I always announce modifications that can be performed instead of the Rx recommendations before each workout.
Bottom line: If you are unsure about how to perform an exercise so that it works for your individual needs, ask your coach before the WOD begins!
4. Respect your limits.
We all have limitations and strengths. Because the programming is so varied in CrossFit, you will probably find that some movements come more naturally to you than others. For example, people with endurance-training backgrounds who have low body fat and lighter body weights often find the gymnastics-style movements, such as pull-ups and burpees, easier to tackle. However, those same body types often find strength-based exercises such as squats and deadlifts more challenging. The point is to recognize that everyone (including you) will experience exercises that are more or less difficult to master than others. You must respect your limitations and not let the highly competitive atmosphere of performing a CrossFit WOD with your peers cloud your judgment. Only perform movements that you can safely execute with good form. This might mean that you need to unload your barbell during a WOD if fatigue sets in and your form starts to decline.
Bottom line: Be honest about your limitations and avoid letting competition prevail over proper form.
5. Avoid overtraining.
This step might seem obvious, but it can be overlooked by new and veteran CrossFitters alike who are eager to compete and improve. To be successful in CrossFit, participants must train smartly by progressing training volume gradually. The high-intensity nature of CrossFit WODs requires adequate rest and recovery between sessions to decrease the likelihood of injury. Initially, a frequency of two CrossFit workouts per week is a good starting point. Over time, adding in more days, while still paying attention to rest and recovery, can be accomplished. The number of days per week that an individual can tolerate performing WODs depends on numerous factors (e.g., current state of fitness, goals, and desire). Be sure to discuss your goals with your CrossFit coach so that he or she can provide you with safe and effective programming guidelines to help you achieve them.
Bottom line: Have a plan for proper progression to decrease the risk of overtraining.
Source: Sabrena Merrill, M.S., is an exercise physiologist and ACE Education Content Development
Time to get schweddy with some balls! Medicine balls, that is. Available in varying sizes and weights (some up to 150 pounds!), these weighted spheres can help improve muscular power and sports performance .
The balls can be thrown and caught (don’t try that with a dumbbell!)
making for explosive medicine ball movements that can improve overall
athletic ability . Plus, they’re super old school. Hippocrates used sand-filled animal
skin pouches to help patients recover from injuries almost 2,000 years
ago (clearly he was on to something). When choosing a weight, pick a
ball that’s heavy enough to slow the motion (slower than if you weren’t
using any weight at all), but not so heavy that control, accuracy, or
range of motion take a hit (or the poor guy next to you). Reps and sets will depend on intensity and fitness levels, so for
most of these moves, we recommend aiming for three sets of 10-20 reps
with good form. For those more focused on power and speed performance, switch it up with 3-5 sets of 3-5 reps
(applying max force and max speed into every repetition ). Of utmost
importance: Be aware of your surroundings. These balls can be a weapon
of sorts, so pay close attention to the people (and pricey equipment)
around you. Alright then, let’s go balls to the wall.
Full Body
1. Rock and Roll Up: This one is a toughie at first to coordinate, but hits all the major muscle groups in one powerful move (byahh!). Lie down, back to the mat, with knees bent. Hold a medicine ball on the ground with arms fully extended overhead. Pull the knees into the chest, preparing to use the weight of the ball (and the strength of your core!) to help catapult you to a controlled squat position, then standing. Next, slowly lower back into a squat, and ease back to the floor, butt first before lying back down. Don’t get too comfy though: The goal is to rock and roll for 10-12 reps.
2. Lunge With Twist: Come on baby, let’s do the twist! Engage that core, standing hip width apart with shoulders relaxed. Holding a medicine ball a few inches in front of the chest, step forward into a lunge with the right leg. (Safety first! Keep the knee from sliding forward past the toes.) Get deep into that lunge, making sure the front thigh is parallel with the floor, then with extended arms, reach the medicine ball to the right, rotating the torso at the same time. Maintain the lunge and return to center. Come to standing, then lunge with the other leg (and rotate to the left this time). These can be done in place, or moving forward as walking lunges. Do the twist for 10-12 reps per side.
3. Lunge With Overhead Press: Stand with the feet together, holding a lightweight medicine ball in front of the chest in both hands. Lift the right foot off the floor, bending the knee, and hold this position for one count before stepping forward into a lunge. With the bodyweight shifting to the right leg, reach the medicine ball straight overhead (try to avoid pulling a matrix move). While still in the lunge, pull the ball back to the chest, and bring the front leg back to the starting position. Lunge for 10 reps per leg.
4. Squat Press and Throw: Heels grounded, come to a squat position (as if sitting in an invisible chair). Drive through the heels to jump, and throw the ball straight up as high as possible — then get the hell out of the way! (a quick step back should do the trick). Let the ball drop to the ground. Press it out for 10-15 reps.
5. Reverse Swing: This move could be as disastrous as throwing a bowling ball the wrong way, so read carefully. Stand with the feet hip-width apart. Hold a medicine ball directly in front of the chest, with the elbows pointing down toward the floor. Lower into a squat, keeping the back flat, and head facing forward. Reach the medicine ball back between the legs. Ready for the fun part? Explosively swing the ball up overhead to the point that it reaches behind the head and neck (just don’t throw it backward!). Keep the abs contracted as the ankles, knees, and hips extend. Bonus: Throw the ball to the ground (and watch out for your face!). Ball so hard for 10-12 reps.
Legs & Glutes
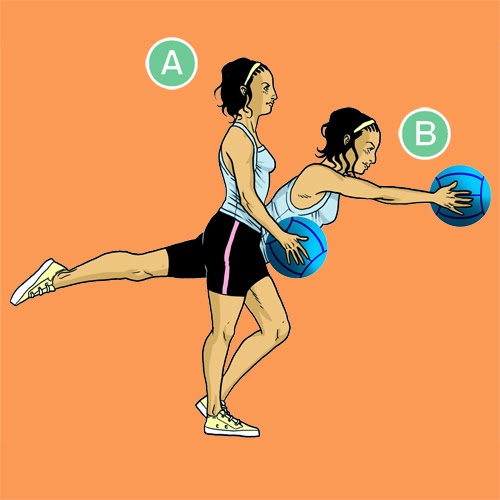
6. Reaching Romanian Deadlift: This one takes balance, and a little breathing room to fully extend. Stand on the right leg, with a medicine ball in both hands. Bend the right knee slightly, and hinge forward at the hips, extending the left leg straight back (and for an extra challenge, extending the arms overhead). Feel like a ninja? Check! The body should now form a straight line that’s perpendicular with the standing leg. Return the extended leg to the floor, and repeat for 10-12 reps, then switch legs.
7. Step Jump: Hold a medicine ball to the heart, and never let go (Jack), while straddling the middle of a low bench or step (make sure it’s sturdy!). Drop into a squat until the tush makes contact with the bench. Stand about six inches from a low bench or platform, and jump up onto it so the feet land in a natural, wide stance.. Carefully jump back down to the start position. Jump up for 10-12 reps.
8. Circle Squat: Stand holding a medicine ball at the right hip. Circle the ball overhead toward the left, while stepping out the left leg to into a squat (just like a sumo wrestler). Circle the ball all the way to the right side of the body, while still in the squat, then step the feet back together, and circle the ball back to the right. Repeat 8-10 times through, then switch directions.
9. Single-Leg Squat: Stand with feet hip-width apart, knees slightly bent. Lift the right foot off the ground and extend it forward. Hold a medicine ball in front of the bellybutton. Lower the body into a squat position, sitting back into an imaginary chair with the knees safely positioned over the feet. Return to start position, and switch legs. That’s one rep. Get your squat on for 10-12 more.
10. Single-Leg Butt Lift: We’re warning you, this one really puts on a show. Lie on your back and place the sole of the right foot onto the medicine ball. Thrust the hips to the sky (very Jane Fonda-esque) with the left leg straight in the air, with all your weight supported by the right foot and the shoulders. Hold for one count, then slowly return to the start position with the butt on the matt, and repeat for 10-12 reps on each side.
Chest and Back
11. Medicine Ball Push-Up: Drop down and get ballsy. Starting in a traditional push-up position, toes tucked under, place your palms on the medicine ball, and shift your bodyweight forward until in plank position. Keeping the core tight, and the head aligned with the spine, slowly lower the chest toward the ball (woof!) until it nearly touches, keeping the elbows pinned tightly at your sides. Finish the move by pressing upward through the arms until they’re fully extended. Need an adjustment? Pop the knees on the mat and push it real good for 10-12 reps.
12. Weighted Superman: Lie face down on the mat with arms stretched out in front, holding onto a lightweight medicine ball (try starting with 4-6 lbs). Slowly raise the arms and legs up as high as possible, engaging the back muscles. Hold the position at the top for a few counts, all the while pretending you have a cape around your neck. Lower the body back down to the mat and repeat for 12-15 reps.
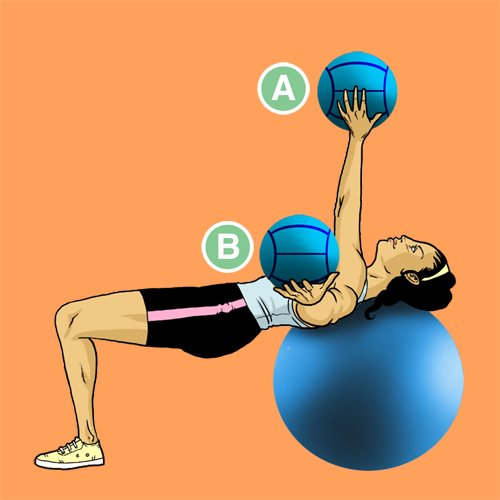
13. Lying Chest Toss: Since two balls are better than one, this move enlists a pair. Lie face up on a stability ball with the head and shoulder blades resting on the ball’s center, and knees bent at a 90-degree angle (the torso should be parallel to the floor). Keeping the neck in a neutral position (not straining forward or hanging back), hold a medicine ball with both hands just above the chest, with the elbows bent and pointed out to the sides. Push the ball out, in line with the chest, (like a classic chest pass) and toss it straight up toward the ceiling. Be extra careful not to toss the ball too hard. (Just remember: What goes up must come down.) Repeat for 12-15 reps.
14. Rolling Push-Up: If 9th Grade phys ed is in the past, then you know what push-ups are all about. Adding in a medicine ball quickly morphs the upper body-blaster into an even more challenging move. Get into high-plank with a medicine ball under one hand, and lower the chest toward the floor to perform a push-up. Return to high-plank and roll the ball to the other hand. Roll out 8-10 reps, or as many as possible maintaining good form.
15. Wall Pass: Find the nearest med ball-safe wall (when in doubt, always ask the gym’s staff which areas are fair game). Stand about 3-4 feet in front of it, holding a lightweight medicine ball with both hands. Get into an athletic stance, with a slight bend in the knees, and the core engaged. Bring the ball to the chest, and firmly throw it at the wall (get that aggression out!), and catch the ball on its return. Your mission: Balls to the wall for 12-15 reps — without taking off another gym goer’s head.
Shoulders and Arms
16. Ball Fly: This
can get a little tricky as far as balancing goes, but we promise you’ll
look like a total champ once you’ve got it down. Lie face up on a
stability ball with the neck and shoulder blades resting on the ball’s
center, and knees bent at a 90-degree angle (torso parallel to the
floor). Now it’s time to really put on a show: With the abs engaged and
hips raised, extend the arms, holding a lightweight medicine ball to the
ceiling. Shift the ball to the left hand, and slowly lower the ball
until the left arm is parallel with the floor (maintain a slight bend in
the elbow). Bring the ball back to the center and shift the ball to the
right hand (do the same thing on this side) to complete one rep. Repeat
for 8-10 reps to really feel the burn.
17. Shoulder Press: This
move is one of the easiest for beginners, but can be amped up with a
heavier ball. Hold a medicine ball at the chest (about an inch away,
right in front of the sternum). Extend the arms to the ceiling, reaching
the ball overhead, and slowly lower the ball back to the start
position. Easy peasy, right? Press it out for 12-15 reps. 18. Figure 8: This is totally like ribbon dancing,
just probably not as graceful. Stand with feet about shoulder-width
apart. Hold onto a medicine ball with both hands to one side of the
head, with arms fully extended. Slowly move the medicine ball in a
fluid, controlled motion, forming the figure 8. Repeat 8-10 reps through
clockwise, then switch directions. This one can be deceivingly tiring,
so try it with a lighter ball first. 19. Triceps Extension: Stand
in a comfortable stance, or sit tall in a chair, with the core engaged.
Hold a medicine ball in both hands with the arms extended overhead,
inner arms grazing the ears (resist the urge to lurch the arms forward
and make an elephant noise). Next, bend the elbows, lowering the ball
behind the head until the arms form a 45-degree angle (or as far as
feels comfortable). Squeeze the triceps to straighten the arms, bringing
the ball back to the starting position. Pump out 12-15 reps. 20. Bicep Curl: Stand
with feet shoulder-width apart, holding the med ball in both hands at
the chest. Keeping the elbows close to the body, lower the ball toward
the ground until the arms are fully extended. Then curl the ball back up
to the chest. Lower the arms back to the starting position. Curl for
12-15 reps — just never at the squat rack.
Core
21. V-Up: How
To: Lie flat on your back, legs extended (but try not to snooze on the
mat). Reach the arms overhead—à la first thing in the morning
stretch—with a medicine ball in both hands. Engage the core to lift the
hands and feet simultaneously so the body forms a “V” position.
At the top of the “V,” pass the ball from the hands to the feet.
Squeeze the ball between your sneaks, and slowly lower the arms and legs
back down to the floor. Return to the “V,” and pass the ball back to
the hands. That’s one rep. Wipe the sweat from your brow. Repeat for
8-10 more. 22. Overhead Slam: Stand
with your feet shoulder-width apart, and knees slightly bent. Hold a
medicine ball in both hands, and lift it overhead. Then bend at the hips
(slightly hinging forward), careful not to arch the back, and slam the
ball on the ground directly in front. Ask fellow gym-goers nicely if
it’s OK to slam on. And don’t slam toooo hard (control is key). Retrieve the ball and keep at it for 10-12 reps. 23. Straight-Leg Sit-Ups: Ready
to take the standard sit-ups up a notch? Lie flat, back to the mat,
with a medicine ball in both hands. Extend the arms straight so the ball
is directly above the hips. While keeping the legs together, raise them
directly over the hips to the ceiling (so the body forms a giant “L”).
With control, return to the start position and bust out 12-15 reps. 24. Hay Bailer: Kneel
on the right knee, (with the left foot back, toes curled under) to form
a 90-degree angle. Hold a medicine ball in both hands close to the body
while keeping the torso tight, and perpendicular to the floor. Bring
the medicine ball toward the right hip, while keeping the rest of the
body forward, then transfer it diagonally up and across the body (Think:
John Travolta in Saturday Night Fever). Hold this position for one
count before returning to the start position. Repeat the movement in the
opposite direction with the right foot forward. (Pro tip: The more the
arms are extended, the harder the move is). Bail that hay for 12-15
reps. 25. Toe Touch: Touching
your toes just got even trickier. Lie on the floor, holding a medicine
ball in both hands. Extend the arms overhead, with shoulders back and
down to the mat. While keeping the legs together, raise them directly
over the hips to the ceiling (so the body forms a giant “L”). Next,
bring the ball overhead (keep the neck in a neutral position
throughout), and reach it as close to the toes as possible. Crunch the
upper body to the toes for 12-15 reps.
I've found that the best classes are the ones with an instructor whose
style you like the best and who plays the best music. If you've never
taken a spin class, just arrive a few minutes early and
talk to the instructor. They will help you adjust the bike to your
height and explain how to dial up or down the intensity. You can go at
your own pace though and work as hard as you feel comfortable.
Spinning is such an awesome workout and not just for your legs. Some
teachers have the participants do push-up motions on the handlebars,
etc. Unless you sneak out of the class early, you are pretty much
guaranteed a good 45-minute workout. Being in a class definitely helps
you keep going, as opposed to when you're on your own, you might have
quit earlier. I've read that spin class burns between 400-600 calories
and, depending on how fast you pedal, a 40 minute class is the
equivalent to 15-20 road miles.
My word of caution is definitely bring a large bottle of water with you
to class- and a towel. It gets pretty sweaty- in a good way! Oh, and
you might be pretty sore in the "crotch region" after the first couple
of classes- sorry, no real way to avoid that, but you can buy padded
shorts or a seat pad that actually does help. I've used one before, but
then forgot to take it off the bike seat/saddle and left it behind. You
don't need special shoes, regular tennis shoes work fine, but if you
get to liking the class so much and you're doing it often, they do make
special shoes that clip into the pedals as opposed to your regular
tennis shoe being strapped to the pedal.
One more thing, about group classes in general- if you find one you like
and start going regularly, you'll end up seeing the other "regulars"
and it gets to become kind of a connection-sharing thing. You become
friendly with the other members and get used to meeting up with them at
class and that can be inspiring and fun to have a regular group of
people to workout with. You never know who you'll meet- just sayin.
Self-myofascial release, also known as “foam
rolling,” has transformed from a once mysterious technique used only by professional athletes, coaches, and therapists to a familiar everyday practice for people at all levels of fitness. Recent information, technology, and affordable products have introduced an increasing array of training and recovery methods to the average person.
Self-myofascial release is a fancy term for self-massage to release muscle tightness or trigger points. This method can be performed with a foam roller, lacrosse ball, Theracane, or your own hands. By applying pressure to specific points on your body you are able to aid in the recovery of muscles and assist in returning them to normal function. Normal function means your muscles are elastic, healthy, and ready to perform at a moment’s notice.
Do I Have Tight Muscles or Trigger Points?
Trigger points are specific “knots” that form in muscles. They are unique and can be identified because they will refer pain. Pain referral, for our purposes, can most easily be described as the pain felt when pressure is applied to one area of the body, but the pain is felt or radiated in another area.
A common example of a trigger point is felt while foam rolling your iliotibial (IT) band as it causes pain to radiate up to the hip or all the way down the leg to the ankle. When rolling or working on tight/sore muscles you will experience discomfort or pain. Think of it like the pain you get while stretching. It should be uncomfortable, but not unbearable, and when you are done it should feel better.
Why Am I Doing Something That Hurts?
For many, deep tissue massage is easy to understand. Ideally someone is able to work out the knots in your muscles, and it is commonly known this process may be uncomfortable and at times painful. Self-myofascial release provides the user the ability to control the healing and recovery process by applying pressure in precise locations, because only you can feel exactly what is happening.
It is always recommended to consult with your physician or physical therapist for therapeutic/sharp pain and receive approval before starting self-myofascial release. For most people you will be cleared immediately and your doctor will encourage the practice.
Releasing trigger points helps to reestablish proper movement patterns and pain free movement, and ultimately, to enhance performance. Utilizing stretching alone is not always enough to release muscles tightness, which is why foam rollers have thrived on the mass market. Imagine a bungee cord with a knot tied into it and then envision stretching the cord. This creates tension, stretching the unknotted portion of the muscle and the attachment points. The knot, however, has remained unaltered.
Foam rolling can assist in breaking up these muscle knots, resuming normal blood flow and function. The goal to any corrective or recovery technique is to get you back to the point of normal functioning, as if nothing was ever wrong. When was the last time you trained like you were a teenager, going hard without a second thought, and injuries were something that only happened due to physical trauma like a 250lb linebacker hitting you?
What Causes Trigger Points and Tight Muscles?
Both have the same contributing factors including training, flexibility, movement patterns, posture, nutrition, hydration, rest, stress, and other lifestyle factors. Our bodies learn to compensate for what we throw at them every day, but we can exceed our ability to recover via too many intense workouts, poor posture, and other lifestyle factors.
This is when you need assistance using recovery techniques or through seeing a professional. If you lived a perfect life with everything in balance, you would theoretically never have either of these conditions, however I’ve yet to meet that person.
How Does Self-Myofascial Release Work?
Deep compression helps to break up or relax tight muscles and adhesions formed between muscle layers and their surroundings. Imagine you are tenderizing your own muscles. They should be soft and supple like a baby’s muscles. However, if our muscles are not taken care of properly we can experience loss of flexibility, adhesions, and painful movement.
The deep compression of self-myofascial release allows normal blood flow to return and the restoration of healthy tissue. The body naturally wants to be healthy and strong, but sometimes an extra boost is needed to achieve optimal muscle and tissue health.
How Do I Know What to Foam Roll and How to Do It?
Areas to focus on can be identified in two different ways. The first is through screenings. If you have followed the last two articles - squat screening and hip hinge screening - and have had struggles with either movement, you should include foam rolling in your workout and recovery program. You may target specific areas/muscles that relate to the movements you are focusing on.
If after using the foam roller your movement improves, you have a more specific strategy to follow. Secondly, trigger points and tight muscles can be found through self-exploration, utilizing the list of techniques below and exploring each one.
To foam roll properly, apply moderate pressure to a specific muscle or muscle group using the roller and your bodyweight. You should roll slowly, no more than one inch per second. When you find areas that are tight or painful, pause for several seconds and relax as much as possible. You should slowly start to feel the muscle releasing, and after 5-30 seconds the discomfort or pain should lessen.
If an area is too painful to apply direct pressure, shift the roller and apply pressure on the surrounding area and gradually work to loosen the entire area. The goal is to restore healthy muscles - it is not a pain tolerance test. You may also use other objects to work on muscles such as a tennis ball, lacrosse ball, Theracane, or Trigger Point Therapy Kit.
Never roll a joint or bone. Avoid rolling your lower back. To target these muscles I recommend using tennis or lacrosse balls. If you are having issues with your neck, refer these issues to an appropriate medical professional, as these areas they can be more sensitive and require more advanced attention.
What Happens After Foam Rolling?
You may be sore the next day. It should feel as if your muscles have been worked/released, however you should not push yourself to the point of excessive soreness. Drink plenty of water, get enough sleep, and eat clean. This will help to flush your system and fuel your muscles more effectively. Give it 24-48 hours before focusing on the same area again.
Source: Jeff Kuhland - Corrective Exercise and Outdoor Fitness
You may have seen more and more people at the gym swinging what looks
like a cannonball with a handle. Those weird looking weights are called
kettlebells and they’ve been used by Russian strongmen for over two
centuries to “become strong like bull.” If you’re ready to experience
one of the most versatile pieces of training equipment known to man and
get the workout of your life, read on.
The History of the Kettlebell
Kettlebells have been a staple in Russian exercise and physical
culture since the 1700s. In fact, any old-time strongman or weightlifter
in Russia was called a Girevik, or “kettlebell man.” The most famous Girevik was
a bear of a man named Pyotr Kryloff. Called the “King of Kettlebells”
Kryloff was a circus and strongman performer during the late 19th and
early 20th centuries. According to Pavel Tsatsouline in his book Enter the Kettlebell,
Kryloff “could cross himself in the Russian Orthodox manner with a
70-pound kettlebell, military press the same kettlebell with one arm 88
times, and juggle three of them at once!”
Russian strongmen weren’t the only ones who made use of the
kettlebell. The Soviet army also incorporated kettlebells into their
strength and conditioning programs. Every Soviet military unit had a gym
called the “courage corner” where kettlebell snatches and swings were
performed. The strength and conditioning that Soviet soldiers developed
through the use of the kettlebell made them the envy of other countries.
Lt. Gen. Giffard Martel, a commander in the British army during WWII,
noted that “the rank and file of the Red Army was magnificent from a
physical point of view. Much of the equipment we [British soldiers]
carry on vehicles accompanying the infantry is carried on a man’s back
in Russia.”
AoM reader and Orthodox priest Father John A. Peck continues the tradition of Eastern strength training.
While American strongmen have trained with the kettlebell since the
late 19th century, it wasn’t until fairly recently that they achieved
mainstream use. Former Soviet fitness instructor Pavel Tsatsouline and
his book Enter the Kettlebell has
played an important role in bringing the kettlebell to the masses in
the United States. Thanks to Pavel and others like him, the kettlebell
has become a staple in gyms across America.
Benefits of Kettlebell Training
Kettlebell training is extremely dynamic. When you kettlebell train,
you’re not only getting a strength training workout, but you’re also
getting some high-intensity conditioning (great for increasing testosterone!).
In addition to getting your muscles jacked and your heart pumping,
kettlebell training also increases power and explosiveness, particularly
in the hips. Consequently, many powerlifters are incorporating
kettlebells into their training to help with the hip explosion necessary
to properly perform and maximize the deadlift and the squat. Finally, kettlebell training increases flexibility and range of motion.
What makes the kettlebell especially useful is that it can impart all
these benefits and work the whole body and yet is small enough for any
man to store and use no matter if he’s living in a house, apartment, or
dorm room (just watch out for your roommate’s head when you’re swinging
it around!).
If you’re ready to harness your inner Russian strongman, read on. Below, Mr. Know Your Lifts showcases four basic exercises that you can perform with a kettlebell.
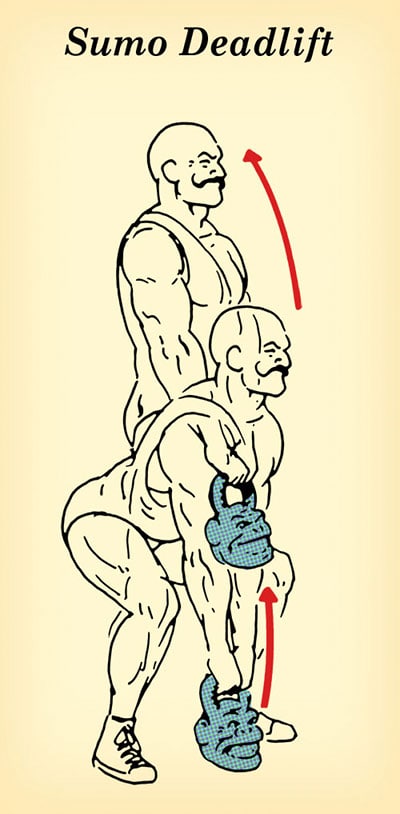
Sumo Deadlift
The sumo deadlift is great for loosening up the old hip flexors as
well as strengthening the quads and the abductor muscles. It’s also a
good lift to master first as it lays the foundation for many other
kettlebell lifts and swings.
Stand over your kettlebell with your feet slightly wider than
shoulder-width apart. Have your feet turned out just a bit. Sit back as
if you were going to sit in a chair or take a crap in the woods. Keep
your heels firmly planted on the ground. No tippy toes. Pick up the
kettlebell with both hands, making sure to keep your arms straight. Your
shoulders shouldn’t be ahead of your knees. Keeping your back and arms
straight, lift the kettlebell off the ground with your legs until you’re
standing straight up. Do not bend your arms as you stand, and do not
lift with your back. When you’re in the standing position, your body
should form a straight line. Lower the kettlebell back to the ground.
Repeat ten to twenty times.
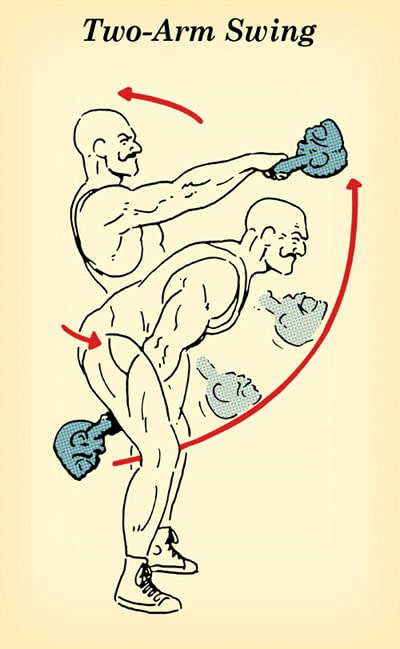
Two-Arm Swing
The two-arm swing is a staple of kettlebell
training. It’s definitely a full-body exercise, but you’ll especially
feel it in your hips, quads, and shoulders. It’s a
great auxiliary exercise to increase the hip explosiveness necessary for
the deadlift and squat.
Stand above your kettlebell with your feet
shoulder-width apart and the bell between your heels. Lower your hips as
if you were going to sit down in a chair and grab the kettlebell with
both hands. Arms should be straight; shoulders behind knees; back
straight. Make sure your weight is on your heels — not your toes.
Basically you’re doing the starting position of a sumo squat.
Pop your hips forward to get the kettlebell
to swing out in front of you a bit. To give you an idea of the motion
I’m talking about, you basically want to “hump” the air in front of you
(credit goes to my high school football coach for this phraseology).
Let the kettlebell swing back behind your
butt like you were snapping a football to a quarterback. When the bell
is by your butt, explosively drive your hips forward (hump that air!)
and swing the kettlebell up to about chest level. Keep your arms
straight and relaxed during the swing up. When the kettlebell reaches
chest-level, let your arms swing back down so that the kettlebell goes
back to your butt. Drive your hips forward for another swing.
Repeat. Make sure you keep your head up and back straight during your
swings.
You can swing for time or for reps. Personally, I like sets of twenty.
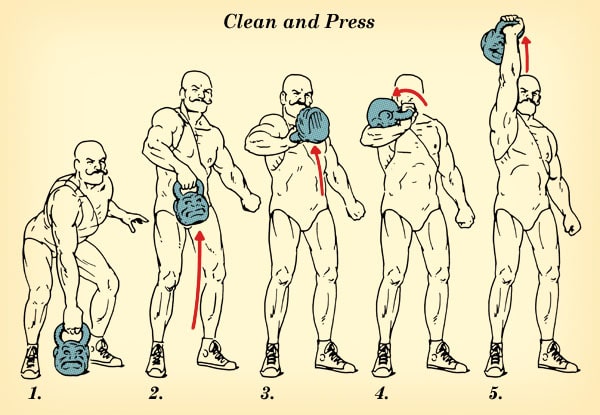
Clean and Press
The clean and press is a full-body movement. You’re definitely going
to be sore all over the next day after performing a few sets of these.
Straddle the kettlebell with your feet a little wider than
shoulder-width apart and slightly pointed out. Squat down and grasp the
kettlebell’s handle with one hand in an overhand grip. Position your
shoulder over the kettlebell while keeping your back straight and
looking forward (Fig. 1).
The following is done in one motion. Inhale and pull kettlebell up
off the floor by bringing your hips forward. Once kettlebell is off the
ground, vigourously pull it up with your shoulder, allowing your elbow
to bend out to your side. Imagine you’re pulling the starter cord on a
lawnmower. Keep the kettlebell as close to your body as you can (Fig.
2).
When the kettlebell reaches about chest level, rotate your elbow
under the bell (Fig. 3). Catch the kettlebell on the outside of your
arm; wrist is straight and knees are slightly bent. The bell will end up
between your forearm and bicep (Fig. 4). This is called the “rack
position.” Exhale. Some folks (like me) like to do a full-on front squat
instead of slightly bending their knees. I prefer this method because
it gives my quads a nice workout.
Inhale and explosively press the kettlebell off your arm and straight
up to lockout over your head. Exhale when you reach lockout (Fig. 5).
Lower the kettlebell back to the rack position. Slowly lower the
kettlebell to the ground between your legs while squatting down, keeping
your back straight, and your head looking forward. Repeat.
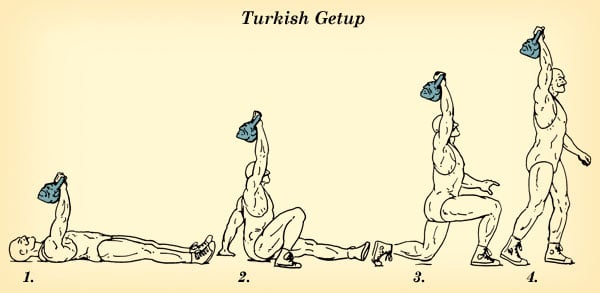
Turkish Getup
The Turkish getup looks easy, but — holy smokes — it’s a killer
exercise. It works your entire body — hips, legs, core, shoulders,
forearms — and aids in stability and balance. I highly recommend you
start off with a lighter kettlebell when you first start doing the
Turkish getup. I could barely eek out 5 reps with a 26-pound kettlebell
the first time I performed it. Turkish Getup keys: keep the arm that’s holding the
kettlebell straight and your eyes on the weight during the entire lift.
Take it slow and be deliberate with your movements.
1. Hold the kettlebell in your right hand and fully extend your right
arm above you so that you’re holding the kettlebell above your chest.
Your shoulder should be tight in the socket. To achieve this, think
about “packing” your shoulder/shoulder blade down and back. Your lat
should be touching the ground (Fig. 1).
2. Bend your right leg at your knee so that your right heel is back
near your butt. Keep your left leg straight. Place your left arm out to
the side, with your palm face down on the ground. Keep your right arm
fully extended above your head and your eyes on the kettlebell.
3. Begin to lift your right shoulder off the ground and come up and
rest on your left elbow. Remember, keep the kettlebell above you. Right
arm is still fully extended. Keep your chest up and out.
4. Transition from your left elbow to your left hand. Focus on
keeping that right arm fully extended. Continue that good posture by
keeping the chest up and out (Fig. 2).
5. Drive your hips upward and squeeze those glutes. You should now be
in a bridge position with just your left hand and both feet on the
ground. Your right arm is still fully extended and your eyes are on the
weight.
6. Sweep your extended left leg back behind your body so that your
left knee is on the ground. You should be in a lunging position. Torso
should be erect. Keep that right arm extended! (Fig. 3).
7. Now just stand up. It’s the same movement as if you were rising from a lunge. Again, keep your right arm straight (Fig. 4).
Congratulations! You just completed one repetition of a Turkish
Getup. Now it’s time to follow the steps above in reverse and return to
the starting position on your back. Go for 5 to 10 reps. Switch sides
and perform the lift on your left side.
After finishing my cardio training this morning, I headed toward the Captain’s chair for some abs workout. Did the first set, then this elder man, looking very serious and worried, came closer and asked me why am I doing abs workouts, if there’s no belly fat going on there?
I replied that today was abs day, and I was happy to see him doing crunches and lateral bends as well. There’s nothing better than staying active and feeling completely sore, in the morning, from yesterday’s workout.
And when it comes to physical activities, there’s always a way where there’s a will, whether you’re an elder person, an overweight one, an extremely busy individual working 24/7 or a beginner who wants to get in shape or sculpt a toned and strong body.
I already gave you some workout suggestions in the HIIT and CrossFit articles, so if you lack ideas, you can always find high intensity interval training and CrossFit routines online, and it’s a nice way to get started. Still, if you’re the type of person who’d rather spend their free time on the couch than do anything cardio-related, here’s another recommendation: kettlebell workouts. Why should you try kettlebell exercises?
1. They were invented by Russians, so you’ll get strong, really strong.
2. Kettlebells are extremely versatile and unlike dumbbells, they change their center of gravity during the routines, so they require more force and coordination from your muscles. For this reason, the kettlebell training is classified as functional fitness, this term being used for exercises that mimic movements done in our daily activities.
The kettlebell is a heavier replacement for the grocery bag or overstuffed briefcase. It is harder to handle than the classical dumbbells, because of its shape, so during a workout session you’ll burn more calories, work more muscle groups, build more power and strengthen your upper and lower body at the same time.
The exercises are pretty similar to those involving dumbbells, but there are also new movements so you can create complex and entertaining workouts. Moreover, your core will be constantly under an increased load, so if you want stronger abs and back muscles, this is definitely a must try.
3. Working out isn’t only for people who want to bulk up or lose weight.
You can be fit and healthy and still do your daily workouts, as once
you start, they become your lifestyle! So if your purpose is to tone up,
kettlebells are a good choice, as long as you stick with lighter
weights.
If you want to put on mass and build
pumped muscles, go for heavier kettlebells, and if you want to drop
weight, incorporate these cute fitness tools into your HIIT session. I’m
sure you’ll love them, even if you’re the type of person whose only
workout is lifting the kettle for pouring tea or coffee in their
favorite cup before heading to office.
Was weight loss among your New Year’s
Resolutions? Replace the kettle with a kettlebell and don’t stop until
you’re done with the 5 exercises below!
1. Swing
This is a basic movement everyone should try when starting with kettlebells.
Put your hands on the handle, keep your feet hip width apart and bend
your knees. Hinge from your hips to swing the weight between your legs,
then bring it toward your chin. Keep the momentum in the swing and
repeat for 1 minute.
Tip: involve your
glutes and lower body, instead of doing the movement from your
shoulders, as this will burn more calories and work your muscles more
efficiently
2. Single arm squat
To perform the kettlebell squat
correctly, you need to start in the rack position: your right elbow
should be by your side, the weight in front of the right shoulders and
the palm facing in. Hips should be pushed back and knees bent, in a
typical squat position.
From here, you can simply lower your
thighs and glutes and stand back up, or squat, lower the kettlebell
below your right knee, then stand and curl the weight to your chest,
allowing it to rotate toward your right side. Repeat for 30 seconds and
switch sides.
Tip: you can replace this exercise with kettlebell sumo squats.
3. Shoulder press
Start standing or in the rack position,
with the weight in your right hand, or grab the kettlebell with both
hands. If you’re doing the press standing, push the weight straight
overhead and slowly lower it back down, to the initial position. If
you’re starting in the rack position, lower into a squat, then
straighten your legs and press the right arm overhead. Return to the
rack position and repeat for 30 seconds on each side.
4. Lunges
These are done like regular lunges, but
you’ll start from the rack position and grab the kettlebell with your
right hand, lunging for 30 seconds for each side. To make it a bit
tougher, you can do walking lunges, and twist between steps.
5. Kettlebell windmill
The windmill is excellent for your core
and shoulders. Start with the kettlebell overhead, feet apart as seen in
the picture and keep the right arm straight. Push your hips to the
right and slide the left hand down the left leg, just like you do in
regular windmills. Then reverse, return to the starting position and
repeat for 30 seconds. Switch sides and repeat for another 30 seconds.
This workout can be done at home and the only piece of equipment is a kettlebell. Also, the movements are basic and target all your major muscles, so until you get more used to this form of training, you can stick with simpler exercises.
Repeat each exercise three times and
limit the breaks between sets to 10-15 seconds, to keep your heart rate
elevated and force your body to burn more calories. The routine above
shouldn’t take you more than 25 minutes, even if you never worked with a kettlebell before.
Ready to give it a try? Good luck and sore muscles!
Hop on a bike withouta helmet? Mom would definitely shake her head. But there’s an exception to every rule: Indoor cycling (aka “spinning,” its trademarked name) is a cardiovascular, butt-kicking workout that takes us on a stationary but sweaty ride of our life. Read on to learn what makes this bike different than hopping on an ordinary two-wheeler.
You Spin Me Right Round — The Need-to-Know
More intense than a stationary bike (and that 3rd grade tricycle), indoor cycling keeps things cool with bumpin’ music and a killer class atmosphere. Expect to sit tight for 30 to 75 minute sessions, which can burn up to 900 calories (take that, Bikram yoga!). The intensity varies throughout the class, thanks to changing up body position, pedal speed, and resistance. And get ready to listen up: The instructor will yell out instructions to imitate a real ride of climbs, sprints, and coasts. The best part? Most bikes can track mileage, pulse, and calories burned to record progress throughout the class. In some special classes,
the pedaling is even mixed with upper body workouts, resistant bands,
or a themed adventure (Michael Jackson tribute, anyone?).
Spinning® is definitely no ride in the park, though. It guarantees to
amp up VO2 max (the rate oxygen is carried to the muscles), a sign the body is being pushed . All that pedaling will tone up muscles, too, working the quads, hamstrings, glutes, calves, and core. Studies have also found that indoor cycling can help shed unwanted pounds and potentially ward off migraines, while keeping impact on the joints to a minimum . Now that’s a #winning combo.
Ride or Die — Your Action Plan
Whether you’re a spin class newbie or simply brushing up on the etiquette, here are some tips for a successful joyride:
Suit up. The body will definitely work up a sweat, so throw on moisture-wicking clothes to keep cool n’ dry. As for the feet, cycling shoes are required for some classes, but normal athletic kicks will work fine in most cases.
Take a seat. If it’s an option, reserve a bike online
to guarantee a spot in the class. Otherwise, get there early to snag a
seat! And newbs, don’t head straight to the back: Getting a bike up
front will make it easier to follow along.
Adjust your saddle. Create the perfect fit
on the bike. The right height on the seat is when one leg is at a
30-degree angle at the bottom of the pedal stroke. The seat should also
be able to slide forward or back depending on what feels best. As for
the handlebars, position them so the neck and back doesn’t strain. And
strap or clip in the feet: The balls of the feet should rest on the
center of the pedal and the kneecap should be aligned directly with the
center, too.
Know the numbers. These bikes have a different kind of lingo: Some instructors call out numbers
for different hand positions on the bars. Gripping the center of the
bar is usually “Position 1,” home base for warm-ups and cool downs.
“Position 2” is where the hands will be for most of the class — right on
the bar that crosses the body. And “Position 3” is normally only used
when standing and climbing up those “hills.”
Insist on resistance. There are no real gears to change, but there is a resistance knob (or computer!). This will control how hard the muscles need to work to increase RPM (that’s bike talk for revolutions per minute).
Towel off. Keep a towel draped
over the handlebars for easy access — we’re sure that face may need a
wipe off here and there. And swigging water is encouraged mid-ride to
stay hydrated (although the spin n’ sip may take some coordination…).
Choose wisely. Love the club?
Choose sessions with dimmed lights or a disco atmosphere. Or, if seeking
more adventure, opt for classes that bring the outdoors to the studio. Studies show the fun factor is increased when the mood is juuust right .
Indoor cycling puts things in full gear with its awesome tunes,
control over resistance and speed, and overall intensity. Hop on to the
nearest bike and give this class a go! Source Indoor cycling specialist and co-owner of Pedal NYC Ray Wallace
Language for Success: Creative Affirmations
Performance is 90% perception and 10% reality
Words can have tremendous power over our minds and, subsequently,
our athletic performance. It has been said: Performance is 90% perception
and 10% reality. Each of us is constantly engaging in our own internal
thought processing. We talk to ourselves and interpret each situation
based on our perception of what is going on around us. If this self-talk
is an accurate representation of reality, then we function quite
well. If our thoughts are irrational or exaggerated, then we may
become anxious or emotional, and performance is likely to decline.
Reconstructing Your Thoughts
Thoughts and attitudes are cognitive in nature. Our perception and
thoughts often lead to an emotional response. These thoughts and
emotions then provide the direction and control over our actions.
Thus it is crucial to become aware of what thoughts and self-statements
you are using prior to training or racing.
Self-talk can provide a sense of control if you learn to become
aware of self-statements and direct them in a positive manner. You
can, through self-talk, evaluate a potentially negative situation
as much less threatening once you have a sense of control over your
thought processes. How you interpret what is happening and the kinds
of labels you place on each situation determine how you are affected
emotionally.
Affirmations Defined
One powerful way to structure our thoughts and transform our goals
into results is through the use of affirmations. An affirmation
is a strong, positive self-statement, spoken in the present tense,
about a goal that has the potential for being realized. It is a
pre-planned statement of an aspiration, presented to the mind as
if it has already been achieved. You present it to the mind in the
present rather than the future tense. Although intellectually you
know your goal is in the future, successful mental programming dictates
that it be stated in the present tense as an already realized fact.
Affirmations are a powerful way to cancel or correct old negative
thoughts or ideas. Negative thoughts are carried in our mental computers
and are the source of self-limitation, fear, inhibition, and frustration
for all of us. In contrast, self-image, health, physical abilities,
relationships, and competition can all be affected positively by
the repetition of an affirmation.
A positive affirmation creates an attitude or posture in life that
says: "I can do this!" It is a conscious, carefully worded
positive statement that guides our behaviors in a constructive way.
It empowers us to replace old pessimistic scripts with new creative
phrases to help us realize our dreams. Words are effective tools
for transforming our perception of daily events.
The mind and body are so well connected that the body often does
not know whether a phrase or image is real, dreamed, or imagined.
So when your mind creates an image of success, your central nervous
system and whole body will process that image as if it were real.
Most of the time our actions are reflections of our mental pictures.
These pictures are placed in our mind most often by words. So choosing
the right words can make or break a performance.
I often use affirmations with my athlete clients to assist them
in reconstructing their thoughts. If athletes find themselves saying:
"I’ve never been able to beat this person before in a
race," they are preparing themselves to lose again in this
situation. I would help them to say something like: "I know
I am capable of beating this person. All I have to do is take it
one mile at a time. I have to focus on what is happening and what
is about to happen. I can then control my own performance. I have
worked hard, and I am well prepared for this competition."
How are Affirmations Used
Whenever you want to maximize your chances of getting the results
you want, affirmations are one of the fastest ways to arrive there.
If you want to create real changes in the way you train and compete,
use affirmations to:
• Improve concentration
• Relax and sleep well
• Build self-confidence
• Accelerate learning of athletic skills
• Deal with fear and negativity
• Heal quickly from injuries
• Increase endurance and strength
• Train faster and lighter
Guidelines for Using Affirmations
The subconscious mind is literal or factual in nature, just like
the hard drive of a computer. It receives information exactly the
way you present it. Thus, in using affirmations it’s best not
to use statements that are negative (e.g., "I hope I don’t
bonk in this race"). If I say: "Don’t think of pink
elephants," what’s the first thing that pops into your
mind? You end up drilling into your mind the very thing you’re
trying to avoid doing. Thus, affirmations need to be presented in
a specific way to optimize their effectiveness.
I was recently working with a bicycle racer, Jill, who had a fear
of riding in large groups. She had fallen down several times while
riding in a close pack and would get anxious whenever she got too
close to other riders. The problem intensified whenever she was
riding in a road race, having to make sharp turns in close quarters.
I asked Jill, what are you saying to yourself while you’re
riding? She answered, "I repeat to myself over and over: I
hope I don’t crash, I hope I don’t crash." Can you
guess what happened after that? She was continually programming
her mind and body to anticipate crashing. Consequently, she was
bracing herself, holding her arms and shoulders so tightly that
she could not handle the bike effectively. I then taught her to
turn her goals into positive self-statements: "I am riding
the bike smoothly and easily." "I am growing more relaxed
with each mile." That was a turning point for Jill’s cycling
career. For the first time, she could really enjoy riding.
Principles to Follow in Constructing Affirmations
Use the present tense: Act as if it’s already happening. If
you have a race coming up, avoid using the future tense because
the mind will see it as if it were still in the future. Instead
of saying, "I will be strong and fast," say, "I am
strong and fast." Or you can say, "I am becoming stronger
and faster every day."
Employ a positive outlook: When you use negative words, they may
be taken in by the brain without your awareness. Affirm what you
do want to happen rather than what you don’t want to occur.
Rather than saying, "I won’t tighten up in races,"
say "I remain relaxed and focused at all times."
Use self-image statements: Whenever possible, construct affirmations
beginning with "I" or "I am…" or "I
enjoy…."
Use specific, brief phrases: Make each phrase a short, clear statement
of your feelings, so that you can remember the phrase, and the mind
can then take it in more easily.
Make them permanent: Use the words "I always…."
Use mood words: Include words that suggest strong, positive emotion:
"I always get excited and enthusiastic at races."
Anticipate success: When creating your affirmations, don’t
let your critical side limit the type of phrases you create. Use
whatever thoughts seem to work for you.
Use cards or post-its: Write each affirmation on an individual index
card or post-it, and place them where you can view them regularly
- by your desk, refrigerator, or at a night stand.
(Excerpt from the book Your Performing Edge)
JoAnn Dahlkoetter, Ph.D.