Monday 26 October 2015

7 TRX Plank Variations for a Stronger Core

The word “core” is thrown around so often in today’s movement classes, it’s almost lost all meaning. The core doesn’t mean just your abdominals or the front of the body. It means the entire trunk, front and back, including the hips. 
The goal in this series of exercises is to help train and create core stiffness, which means the muscles of the core adequately support the spine. Dr. Stuart McGill, a leading back and spine researcher, puts it this way: “Core stiffness is essential for injury prevention. Core stiffness is essential for performance enhancement. Core stiffness is not optimized in body-building exercises. Core stiffness requires dedicated training.”
The plank is one of the best ways to train for core stiffness. Be sure your clients have mastered the basic plank, whether from their feet or knees, before moving on to the following variations featuring the TRX Suspension Trainer. 
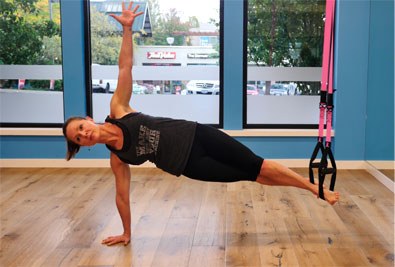
TRX Rotational Ward


Adjust the Suspension Trainer (ST) to fully lengthened and stand with the right side of the body to the anchor. With the arms extended from the chest and the hands inside of the foot cradles, line the elbows up to the anchor point. Stand in an offset position, with the right leg in front of the left. Build the plank by corkscrewing the shoulders, feeling the lats engage. Push down into the floor for full lower-body engagement, and squeeze the legs together. With the shoulders packed, pull the ST taught, keeping tension throughout the body and the ST. Keep the eyes on the horizon, and be mindful if form begins to suffer. Remind your client that he or she has to stay intentional on the plank position. This becomes a game changer for each exercise.

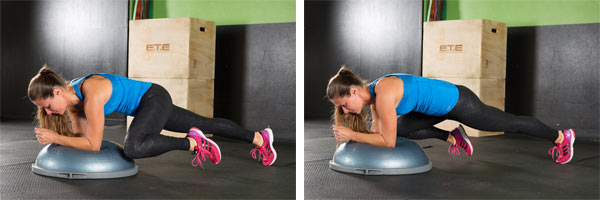
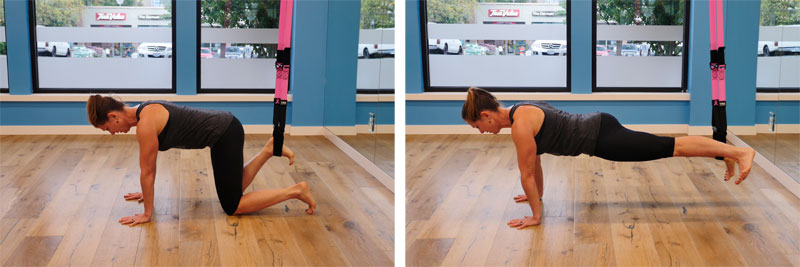
TRX Plank (hands or forearms)


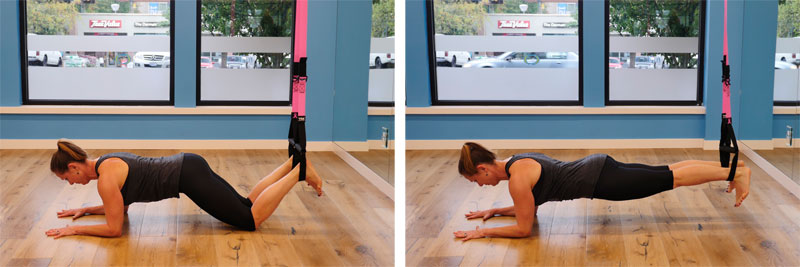
Adjust the ST to mid-calf. Face away from the anchor, place the toes in the foot cradles and assume a table-top position with the hands under the shoulders. Corkscrew the shoulders until a solid packing is felt around the shoulder girdle. Keeping the torso rigid, press the feet into the foot cradles and lift up into a plank position. Keep the feet flexed and the glutes, legs, torso and shoulders fully engaged. Hold the plank for 8 to 10 seconds. Continue as long as a perfect plank can be maintained. Rest and repeat, if desired.

TRX Side Plank (hands or forearms)


Adjust the ST to mid-calf and lie on one side with the hip in line with the anchor. The leg closest to the anchor is right in front of the back leg. Place the elbow or hand under the shoulder. Corkscrew the shoulder to create a shoulder pack. Flex the feet and squeeze them together; lift up by pressing into the foot cradles. Look straight ahead and hold the plank for 8 to 10 seconds; rest, reset and lift back up. Continue as long as a perfect plank can be maintained. Rest and repeat while lying on the other side.

Side-angle Plank (opposite arm extended)


Adjust the ST to mid-calf and lie on the floor while facing the anchor point. Set the right forearm into both foot cradles. Use the left arm to help set up the plank and stabilize the position. Corkscrew the shoulders to pack and spread the legs a little wider than shoulder-width apart. Press down into the foot cradles; don’t allow the torso to rotate. Extend the left arm to shoulder height. Hold this plank while lifting and tapping the left arm to the floor. Repeat on the other side.

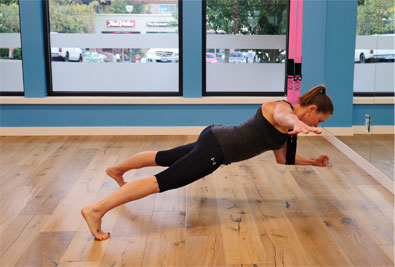
Forearm Plank (leg elevated)


Adjust the ST to fully lengthened and stand facing away from the anchor. Place the forearms into the foot cradles, keeping the elbows in line with the shoulders. Corkscrew the shoulders to create a pack, and keep the ribs pressing down toward the hips. Create a rigid torso and step toward the anchor to provide enough load to be challenged yet still maintain a perfect plank.

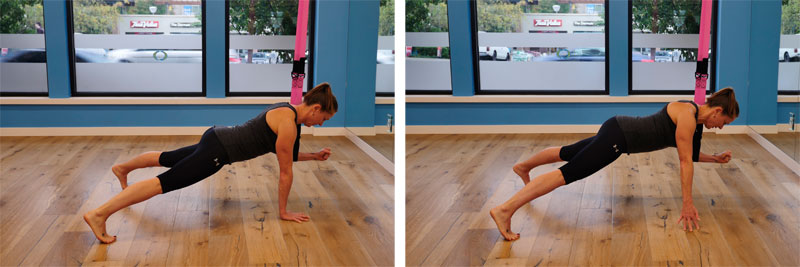
Single-Leg Plank with Alternating Elbow Tap


Adjust the ST to mid-calf. Face away from the anchor and lie on the floor with the hands beneath the shoulders; place the right foot in the foot cradle. Corkscrew the shoulders to pack them. From a table-top position, press down into the foot cradles and assume a plank position. Draw the right knee to the right elbow and hold for a beat. Keeping the knee high, rotate to the left elbow and hold a beat. Return to the right elbow.  Continue as long as a proper plank can be maintained and then repeat with the left knee.
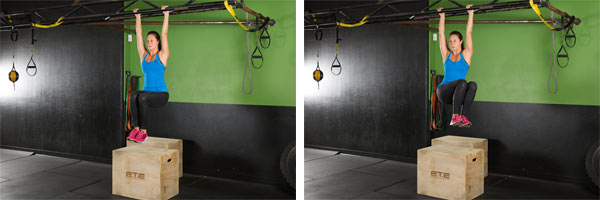
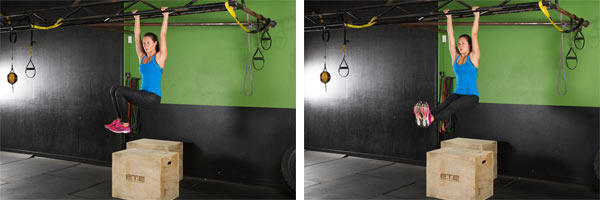
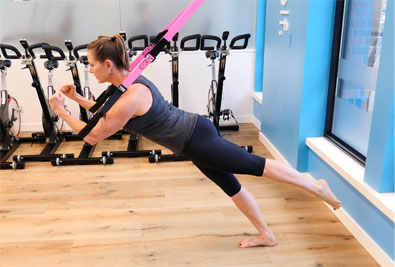
TRX Handstand


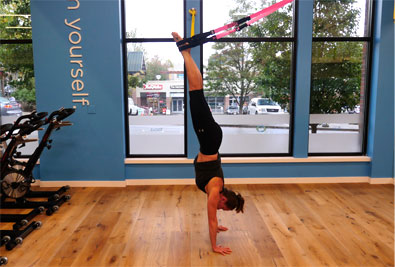
Adjust the ST to mid-calf and place the handles in single-handle mode. Stand facing away from the anchor and place the right foot in the foot cradles. Walk the hands away from the anchor until the ST is very taut. Continue walking back until the right leg is extended. Press the floor away, keep the shoulders set and lift the left leg to meet the right. While in this handstand position, think about keeping the shoulders away from the ears and tension in the core. Hold as long as a proper plank can be maintained and repeat with the other leg.

Source : ACE Elizabeth Andrews


Saturday 24 October 2015

Does Fasted Cardio Provide Significant Benefits?

One recent trend that has received a significant amount of attention, both in the online blogosphere and in traditional fitness media, is the idea of performing exercise first thing in the morning on an empty stomach. The practice of exercising in a “fasted state” has been promoted as a way to burn more calories from fat than from carbohydrates, making it an effective way to boost the fat-burning effects of exercise. 

There are a couple of theories on why doing cardio in a fasted state first thing in the morning may be more effective for fat burning. For example, cortisol is a hormone that helps promote the metabolism of fat for energy. One theory suggests that, because cortisol levels are higher in the morning, exercising on an empty stomach will lead to greater amounts of fat burning. A second theory posits that, because the body’s resting metabolism continues to work overnight while the body sleeps, lower levels of carbohydrates will be available for fuel before breakfast. As a result, the body will have to rely on fats as the primary energy source for any physical activity. 

Research exists to support both theories. For example, studies have shown that fasted exercise can help endurance athletes burn higher levels of fat than carbohydrates. However, while there may be some benefit to exercising on an empty stomach, here are three specific reasons why fasted exercise may not a good choice over the long-term. 
  1. Exercise in a fasted state could burn more calories from fat, but it also could cause the body to burn protein for fuel, which would reduce the amount that can be used to help repair and build muscle tissue. Gluconeogenesis is the process of converting proteins to glucose for energy. In short, if carbohydrates (glycogen in muscle and liver, glucose in the blood stream) are not immediately available for energy, the body can convert proteins for fuel, which leaves fewer proteins available to rebuild muscle post-exercise.
  2.  
  3. The body has plenty of free fatty acids (FFAs) available for exercise. The FFAs that are not immediately converted to energy to fuel muscle activity can be redeposited in adipose tissue in the abdominal region. In other words, they will end up as belly fat. Exercising when cortisol levels are higher could lead to more FFAs circulating in the blood than can be used. So, rather than depleting levels of fat, exercise first thing in the morning could actually shift body fat to the abdominal region.
  4.  
  5. If the goal is weight loss by metabolizing as much fat as possible, it is more important to consider energy expenditure over a 24-hour period and not just at one point during the day. Monitoring energy intake and expenditure throughout the day and identifying how to reduce excessive intake and increase opportunities to move can play a more significant role in long-term weight loss than trying to burn more fat by exercising first thing in the morning. 
While it doesn’t offer a viable long-term solution, exercising in a fasted state could be a SHORT-TERM technique for helping a client achieve a specific body-composition goal. Here are three things to consider about using fasted exercise: 
  1. For years, bodybuilders and figure competitors have utilized fasted exercise to help reduce body fat prior to a competition. This is because low-intensity, steady-state (LISS) exercise below the first ventilatory threshold will rely on FFAs as the primary fuel source. To be most effective for fat burning, exercise in a fasted state should focus on LISS, where the intensity is low enough to allow the client to talk comfortably during exercise. Exercise at higher intensities will metabolize more carbohydrates and require more oxygen; therefore, the rate of breathing will increase to bring in more oxygen and exhale more carbon dioxide, which will make talking difficult.
  2.  
  3. The body is an extremely adaptable organism. If the same exercise is performed at the same intensity for an extended period of time, the body will become very efficient at producing energy to fuel the activity. Doing fasted exercise first thing in the morning could help a client move past a sticking point, but after a period of time the body will adjust to this condition. That’s the signal that it’s time to change the workout.
  4.  
  5. A client may like to exercise first thing in the morning and simply prefer doing so on an empty stomach. If this is the case, help them maximize energy metabolism by recommending LISS over higher-intensity exercise protocols. If a client wants to participate in high-intensity exercise first thing in the morning, it is important that he or she know how to properly fuel after the workout. 
It’s important to note that eating a meal or snack too soon before exercise can raise the levels of insulin, which helps metabolize and store fat. If insulin is elevated prior to exercise, the result could be fewer FFAs available for energy. A low-glycemic snack more than 30 minutes prior to exercise can provide energy for a workout and reduce the risk of elevating insulin levels. 

Finally, keep in mind that substrate utilization for producing the energy required to fuel workouts is regulated by a number of variables, including hormone levels, available nutrition substrates, enzyme activity and the intensity, duration and type of physical activity. Exercise in a fasted state could provide some short-term benefits, but the downside is that it could also limit the amount of protein available for muscle building. It’s more important to help clients identify ways to be more active throughout the day and guide them toward healthier nutrition choices than it is to recommend working out at a specific time of day. 

Source ACE :  Pete McCall Health and Fitness Expert

Wednesday 21 October 2015

Juicing Recipes for Health: Top 10 Healthy Juice Recipes


juicing recipes for healthI remember the first time I saw someone carrying around a Mason Jar around filled with a thick green looking substance.  Inside was a kale smoothie based off of a juicing recipe that was packed: fiber, vitamins, and all the different types of green fruits and vegetables imaginable. It was in a word, incredible.
There is no doubt that juicing has taken the health world by storm, and you can hardly go a day without seeing someone gulping down a glass full of liquid produce.  If you are looking to quench your thirst through juicing, let’s take a look at the top 10 juicing recipes for health that you can make yourself.

Classic Green Juice

This is a classic green juice recipe.  For some added zing, squeeze in a few drops of lemon, and feel free to omit the ginger if you would rather your juice not be spicy.

You will need:
  • 1 green apple
  • 1 inch knob ginger
  • 5 large stalks celery
  • 1 cucumber
  • 1 large handful parsley
  • 5 stalks kale

Pink Lady Juice

If you enjoy juices that are on the fruitier side, this recipe will work great for you.
You will need:
  • 1 pear
  • 1 beet
  • 1 to 2 inches of ginger
  • 1 ½ cups of pineapple cut up into chunks

Veggie Ginger Juice

For some spice action, this is a standard juice that mixes together different vegetables.  This recipe is a great juice for the cold months to warm up your body.
You will need:
  • 3 large carrots
  • 1 beet
  • 1 green apple
  • 4 large stalks of celery
  • 1 large handful of spinach, parsley, or other dark green vegetable
  • 1 small cucumber
  • 1 inch of knob ginger

Total Health Booster

This juice will give you a gulp of vitamins (A, B, C, E) to fuels your entire body.  It is great for promoting strong bones and younger-looking skin.
You will need:
  • 1 medium apple that is cored and cubed
  • 2 medium soft pears (such as Bartlett) that is cored and cubed
  • 1/2 cup of fresh cherries with pits removed (or frozen and thawed)
Steps:
  1. In your blender, combine the apple, pears, and cherries and blend until smooth.
  2. Strain the juice and thin with water, if desired.
  3. Before you serve, garnish your Health Booster with fresh cherries.

Antioxidant Supreme

By now, most of us are aware of the power of antioxidants.  This juicing recipe is packed with berries that are bursting with potent anti-aging benefits.
You will need:
  • 1 cup of fresh blueberries (or frozen)
  • 1 cup of fresh strawberries, halved (or frozen)
  • 2 cups of peeled and coarsely chopped mango
  • 1/4 cup of water
Steps:
  1. In a blender, combine all your fruit: blueberries, strawberries, and mango.
  2. Add water and blend until smooth.
  3. Strain juice and thin with water, if desired.
  4. Garnish juice with sliced mango, blueberries, and strawberries before serving.

Energy Upper

juicing recipes for healthFruit is natural, and the sugars from natural fruit will give you an instant boost.  And with this juice, the electrolyte-loaded coconut water will help to keep you hydrated throughout the day.
You will need:
  • 1 can of lychee in syrup, drained and rinsed
  • 1 cup of frozen and thawed sliced peaches
  • 3/4 cups of coconut water (you may choose to use regular water if you do not have coconut water on hand)
Steps:
  1. In a blender, combine your lychees, peaches, and coconut water.
  2. Blend well and until smooth.
  3. Strain the juice and thin with water, if desired.
  4. Serve and enjoy.

Immunity Booster

If you are feeling a bit under the weather, this juicing recipe is a vitamin bomb that packs more vitamins than any pill, and will definitely help ward off seasonal colds or allergies.
You will need:
  • 1 grapefruit that is peeled and cut into chunks
  • 2 medium oranges to be peeled and cut into chunks
  • 3 kiwis peeled and cut into chunks
Steps:
  1. Combine your grapefruit, oranges, and kiwis into a blender.
  2. Blend until smooth.
  3. Strain juice and thin with water, if desired.
  4. Serve and enjoy.

Post-Workout Refuel

If you workout, you are definitely doing what you need to in order to keep your body healthy and strong.  This juicing recipe incorporates protein-packed almonds that will help to build and repair your muscles.  Also, the potassium in the nuts and sweet potato will help to balance your electrolytes and fluids.
You will need:
  • 2 medium oranges peeled and cut into chunks
  • 1/4 cup of whole and raw almonds
  • 1 small sweet potato that has been scrubbed and coarsely chopped
  • 1 medium apple to be cored and cubed
  • 1/2 cup of water
Steps:
  1. In a blender, combine your oranges, almonds, sweet potato, apple, and water.
  2. Blend until smooth.
  3. Strain juice and add water, if desired.
  4. Serve and enjoy.

Detox Juice

For a full-body detox, this juicing recipe is one that is high in fiber with veggies and fruit that will help to keep things moving through your digestive tract.  It is also packed with ginger to naturally calm and soothe your stomach.
You will need:
  1. 2 tablespoons of peeled and chopped fresh ginger
  2. 1 medium beet that has been scrubbed and coarsely chopped
  3. 4 medium carrots that are scrubbed and sliced
  4. 1 medium apple to be cored and cubed
  5. 1 cup of water
Steps:
  • In a blender, combine your ginger, beet, carrots, apple, and water.
  • Blend until smooth.
  • Strain juice and add water, if desired.
  • Serve and enjoy.

Summertime Mojito

This summertime juice is a virgin mojito that is fresh, simple, and delicious.
You will need:
  • 1 cucumber
  • 1 large pear
  • 1 large handful of mint
  • ½ of a lime

Drink Healthfully

Juicing is a great way to (literally) squeeze fruits and vegetables into your diet.  Especially if you typically do not eat a lot of fruits and vegetables, juicing gives you the opportunity to fuel and replenish your body with natural sugars and vitamins.

Source

Monday 19 October 2015

Cardio-Boxing for Super Fitness

Sports scientists agree that cardio-boxing is one of the best forms of exercise, because it conditions the total body and provides a complete workout for your cardiovascular and endurance systems.

The major benefits of cardio-boxing include:

 Increased Stamina
 Increased Strength
 Increased Speed
Increased Coordination

Cardio-boxing also promotes a person’s well being by strengthening their self-discipline and combined with strength training it’s well and truly the total package for self-defence and fitness and usually consists of:

 Adjusted heart rate work 
Actual boxing techniques 

 The usual workout consists of the age-adjusted heart rate work starting with 10 minutes for beginners and leading up to 20 minutes for the more advanced.  For the second part of the workout, you’ll need to perform and practice 20 minutes of actual boxing techniques.

 Cardio

The best way to measure the effects of an exercise program on your body is to check your pulse.

The easiest way to check the pulse is to place your index and middle fingers on your carotid artery or the wrist. Immediately after the exercise, count your pulse for 15 seconds and multiply by 4.

You can also check your pulse during the exercise but with safety as a first priority. To get a more precise reading of your pulse rate, purchase an electronic device from any sports store.

Now you have your exercising pulse rate or heartbeats per minute.  We’ll be concentrating at the upper end of your pulse region: the 50% - 70% ranges. 

To figure this out, deduct your age from 220. Suppose your age is 40, deduct this from 220 and you get 180. 

50% of 180 is 90 beats a minute,
60% of 180 is 108 beats a minute,
70% of 180 is 126 beats a minute and so on.

Don’t jump into 70% work straight away. Start with 50% and slowly work your way up to the 70% upper limit.

Start with no more than 10 minutes, and work up to 20 minutes. Once you’re comfortable with working out for 20 minutes at 70% then try to increase the heart rate up to 80%.

Mix up your cardiovascular activities in the gym. Use the treadmill, skipping, rower, climber, and bike and other equipment that might be available to you.


Boxing

The boxing stance is the posture a boxer takes before and after every action depending on whether you are left or right handed. We’ll be dealing with the most common; right-handed. For left-handed people, just reverse the instructions.

Stand with your feet shoulder width apart, with your left foot in front of your right foot. Your right heel should be slightly raised with your left foot flat on the floor and toes pointing ahead.

Bend your knees a little and balance your weight comfortably and evenly.
Place your elbows close to your body with your left fist held at head height and in a position that corresponds to your left foot.

The right fist should be at head height also and guarding the chin, with both elbows protecting your body and both fists protecting your chin.

This is your defensive and offensive position after throwing punches, so please practice this before going any further.  When moving forward in this boxing stance the left foot moves forward first and then the right follows.

When moving back, the right moves back and then the left follows.  When moving sideward to the right, the right foot moves first followed by the left.  When moving sideward to the left, the left foot moves first followed by the right.

Practice this moving forward, back and sideward in the boxer’s stance until it is done smoothly and quickly. Remember to keep your guard up and elbows tucked in to your sides.

Keep your head at eye level with your upper body leaning forward slightly.   In boxing it is important that punches are thrown quickly and then bought back quickly to assume a defensive posture.
             
Punching

A left jab has many uses, it can be used for both offensive and
Defensive actions. From the set stance the left arm is pushed quickly and forcefully forward, the weight is shifted to the front foot. The fist moves in a straight line and straight back again for defence.

At the moment of impact the back of the hand and the lower arm are in a straight line. Keep the right fist in the defensive position and elbow tucked into the body during the movement.

The straight right is also known as the punching hand and can be thrown with considerable force. The arm moves straightforward from the chin, the body weight is shifted to the front foot with the ball of the foot of the back leg pushing into the floor for more power.

The back of the hand is straight and pointing up at the moment of impact. The arm is then immediately pulled back for protection after the hit.

The left hook to the head and body is an effective punch for closer range work. From the set stance turn your left shoulder quickly and move your elbow up to shoulder height. The fist moves in a circular motion to the target, with the elbow bent.

Rotate your hip and body whilst pressing your front left down keeping the back of your fist pointing up and in a straight line with the lower arm. The left hook to the body is similar to the above but increases the rotation of the body

The right uppercut is also carried out at close range. Drop the lower part of your punching arm until the lower and upper arm is at right angles to each other. The back of your hand should be pointing away from you, now thrust your arm forward and upward to your target.

Shift your body weight to your front leg and rotate your hip and shoulder on the same side. Remember to keep your left fist guarding your chin during the entire movement. Now practice all your punches until they are done quickly and smoothly.

To develop speed and endurance, try punching straight left and right combinations into the heavy bag. The duration of the exercise period is the same as the rest period i.e. 10 seconds exercise, 10 seconds rest, 20 seconds exercise, 20 seconds rest, and so on. Move up higher as your condition improves.

Damian@FitnHealthy


Saturday 17 October 2015

Raw Foods Diet is Beneficial to Your Health

The benefits advocated from eating such a diet seem endless: lowering cholesterol and triglyceride levels, eliminating cravings, preventing overeating, purging the body of accumulated toxins, balancing hormones, maintaining blood glucose levels and reversing degenerative diseases.

 
Followers of a raw diet cite numerous health benefits, including increased energy levels, improved appearance of skin, improved digestion, weight loss and reduced risk of heart disease, just to name a few. Proponents believe that enzymes are the life force of a food and that every food contains its own perfect mix. These enzymes help us digest foods completely, without relying on our body to produce its own cocktail of digestive enzymes.

There can be some side effects when you are first starting a raw foods diet. Some detoxification effects may be experienced as your body attempts to shed some toxicity. This may include occasional headaches, nausea sensations and mild depression. If these symptoms persist, you should seek the help of somebody who is experienced with detoxification symptoms. 

Following a raw food diet means that you have to carefully plan your meals to make sure you don't fall short of essential nutrients, vitamins and minerals. In some instances it might be appropriate to consider taking dietary supplements, especially when just starting out.  You'll need to invest in some appliances so that you are able to prepare the food, if you don’t already have them available.  A durable juicer, a blender and a large food processor make raw food preparation a breeze. You may also want to look into purchasing large containers to soak sprouts, grains and beans, as well as for storage. A durable juice extractor for your fruits and vegetables 


The smoothest way to begin a raw foods lifestyle is to slowly transition into it. Try starting off by eating approximately 70 to 80 percent raw foods in your diet. Have fruit and salads throughout the day and a cooked vegetable meal with a salad in the evening. This should help make the transition easier on your body and hopefully lessen side effects associated with detoxification. This is an emotional time as well, so you should allow yourself plenty of time to make the switch.  Journaling during the process can help. Before you know it, you’ll be feeling the positive effects of a healthy, detoxifying raw foods diet.  

 Damian@FitnHealthy


Wednesday 14 October 2015

Jillian Michaels Banish Fat Boost Metabolism Cardio Circuit

Jillian Michaels Banish Fat Boost Metabolism Cardio Circuit 3 fires upyour metabolism to help you lose weight fast! 

Jillian Michaels's fierceformula adds strength and ab exercises to dynamic cardio for increasedfat loss. 

Boost your body's calorie-burning power and lose up to 5pounds a week with Banish Fat Boost Metabolism.

Monday 12 October 2015

6 Exercises for a Stronger Core

Your core consists of the muscles that stabilize the spine and hips, and includes all the muscles of the abdomen, back, glutes and upper legs. A strong core helps protect the entire midsection, and enhances both mobility and stability, which, in turn, improves movement efficiency and keeps the muscles functioning in coordination with one another. This, of course, helps improve balance, posture and strength.
A common misconception is that doing exercises while lying supine automatically increases core strength. While these exercises can help improve abdominal strength, the entire core must be challenged to help improve total-body function. A better approach is to use a variety of stances, such as single-leg, supine and prone, to incorporate a wide range of movements. Here are a few of the best exercises to challenge the entire core.

Glute Bridges


While many consider the abdominal muscles to be the most important for increasing stabilization, strong glutes are essential as well. Many injuries and faulty movement patterns are a result of underactive glutes and overactive quads and hip flexors. To combat this, activate and fire those glutes before workouts to make sure they are turned on and ready to work.
Lie supine on the floor with knees bent and both feet flat on the floor. Keep the head relaxed and slowly push through the heels to raise the hips as high as possible. The knees, hips and shoulders should be in one straight line. This exercise activates the glutes and hamstrings, and stretches the hip flexors, which are often overactive and tight. Hold the top position for three seconds and slowly lower. Do eight to 10 reps per side. To progress this exercise, try one leg at a time or place the feet on the round side of a BOSU.

Medicine Ball Single-leg Reach


Disguised as a leg workout, this move is great for the glutes, hips, back and abs. Grab a 5- to 10-pound medicine ball and stand on the right leg. Slowly reach forward while hinging at the hips (not the back). Simultaneously lever the back leg out behind the body. Reach as far as possible—work toward bringing the arms, torso, and left leg horizontal to the floor. As the core gets stronger, increase the weight of the medicine ball. Perform two to three sets of eight to 10 repetitions per leg.

BOSU Plank Variations


Before attempting planks on the BOSU, make sure your client has impeccable plank form and can hold it for at least 30 seconds on the floor before attempting advanced variations. Planks are meant to strengthen the core, so if your client’s form wavers too much (back sinks, arches or bends), have him or her practice a little longer before advancing.
Start with the elbows on the round top of the BOSU. This creates an element of instability that must be controlled throughout the exercise. Perform a plank for 30 seconds. Begin adding small, alternating single-leg lifts, focusing on lifting the leg with the glutes and not shifting the hips at all. Next, try bringing one leg out about 45 degrees to the side, tapping the toe to the ground and returning to plank position. Perform five repetitions on each leg. Finally, try bringing the left knee out to the side, and tapping it to the BOSU just outside the left elbow. Repeat five times per leg. To regress these variations, perform them on the floor or on a flat bench before moving to the BOSU

Medicine Ball Single-leg Woodchop


Grab a 5- to 10-pound medicine ball and stand on the right leg. Raise the medicine ball overhead, slightly over the left shoulder. Swing it down quickly, but with control, to the outside of the right leg. Try to keep the torso upright, with a constant slight bend in the right leg. Slowly bring it back up to starting position and repeat eight to 10 times. To regress this exercise, start on two legs and gradually progress to standing on one leg.

TRX Pike


Place the toes in the foot cradles and lie prone on the floor, ready to plank. Push up into a high plank on the hands, establishing perfect form. Keeping the legs straight, push the hips straight up into the air while simultaneously pulling the TRX toward the hands. Slowly lower back down to finish in plank position. Complete eight reps to start, gradually increasing to 15 reps as core strength improves. To regress this exercise, bend the knees to pull the TRX toward the hands.

Hanging Leg Lowers


Exercises in which the legs are unsupported are a great way to work the deep abdominal muscles and the hip stabilizers. However, these exercises are not recommended for individuals with diagnosed lower-back pain.

If your client is a beginner, start this exercise using a Captain’s Chair. Once the client has developed a good strength base, progress to ab straps or hanging from the hands. Start with the knees bent, and lift them slowly as high possible, pulling the knees to the chest. Instead of focusing exclusively on the upward movement, think about the slow downward movement. Take about five seconds to slowly lower the legs back down to the starting position. This eccentrically works the deep abdominals, providing control and stabilization, while also preventing swinging. Repeat eight to 10 times. To progress this exercise, slightly twist the knees to the left and right to challenge the obliques. Additionally, try keeping the legs straight but only raise them as high as possible while maintaining straight knees. Again, focus on the slow lowering motion.

Source

Thursday 8 October 2015

What Compression Clothing Can and Cannot Do for You


Anyone who is into running would certainly do anything in their power to have the ability to run faster and have the advantage on the track. Anyone who is into basketball would also definitely do anything they could to jump higher and have the advantage inside the court. 

Well, if you are familiar with compression clothing, you probably realize that these are the things manufacturers promise athletes who buy their products. But, the question is, can compression tights really help you jump higher and can compression clothes really help you run faster?

First, let's take a look at the claims of manufacturers regarding their products. If you observe ads about compression clothing today, you will notice phrases like "explosive power," "long-term endurance," and "increased stamina." According to manufacturers of compression gear, wearing compression shirts and tights can deliver graduated pressure on areas of your body where you wear them and improve circulation on that area, resulting to improved muscle performance.

While there is a degree of truth in these claims, wearing compression clothing won't actually make you run faster as soon as you wear them. This can be proven by several studies done to test the efficiency of compression clothing. In a study done in Australia, a dozen volunteers were asked to run on treadmills wearing compression tights. Unsurprisingly, wearing compression tights did little to improve the endurance of the volunteers and neither of the runners were able to run further and at higher speeds.

A similar test was done at a university in India where more than twenty volunteers were divided into three groups. Each of the group was given a different type of compression shorts, but after the test, the researchers didn't find any benefit of wearing compression shorts in terms of the athletes' ability to jump. Again, no direct benefit of wearing compression gear found on this test.
 
One particular test, however, discovered something that the two previous tests did not. This particular study was done by researchers in New Zealand. In the study, cyclists were told to ride 40-kilometer time trials for two days. They did the test twice giving the volunteers a week to rest in between tests. 

The result was encouraging - the riders who wore compression tights went up to 1.2 percent faster on the second-day trials than those who didn't wear them. The conclusion was that wearing compression tights allowed greater recovery. According to the researchers, wearing compression tights helped increase blood flow, resulting to faster recovery and refueling for the muscles of the riders who wore them.

Should you wear compression clothing then because of this encouraging news?

It depends. If you're thinking of buying expensive sets of compression gear for your weekly basketball or running schedule, you would rather stick to low-priced compression gear.

If you're joining the Olympics or some big competition, though, and need the benefit of recovery, then you should definitely go for compression gear. Good luck!