Sunday, 8 February 2015

High Protein Bread!

I use this product daily.  If you want a delicious high protein bread try this. This is a super low carb, high protein, high fat loaf, it is gain-free, sugar-free and has dairy-free options. Delicious served toasted with eggs or avocado (or both) or just use as a sandwich base and fill with your favourite ingredients.

Prep time:
15mins
Cook time: 50mins
Yield: approx 20 slices

Ingredients:

  • 3 scoops Coconut 180Superfood
  • 1 cup ground linseed
  • 1/2 cup pumpkin seeds
  • 1/4 cup sunflower seeds
  • 2 Tbs chia seeds
  • 2 Tbs sesame seeds
  • 1/4 tsp salt
  • 2 tsp baking powder
  • 60g melted butter or coconut oil
  • 4 eggs
  • 1/2 cup natural yoghurt or coconut cream
  • 1 Tbs apple cider vinegar

Instructions:
  1. Preheat oven to 180c and line a loaf tin with baking paper.
  2. Place pumpkin seeds and sunflower seeds in a food processor and process until ground but still with some chunky bits.
  3. In a large bowl mix together 180, ground linseed, chia seeds, sesame seeds, salt, baking powder, pumpkin seeds and sunflower seeds.
  4. In a separate bowl whisk together wet ingredients until well combined.
  5. Pour wet ingredients into dry and mix gently to combine – will make a thick batter (not a bread dough), if it seems too dry add some extra yoghurt or coconut cream.
  6. Transfer to loaf tin and bake for approx 50mins until firm.

Nutritional Information:
Amount per slice – approx 20 slices 
Calories 154.8 Total Carbohydrates  4.9g
Total Fat 12.4g Dietary Fibre 3.2g
Saturated Fat 4.0g Sugars 0.5g
Polyunsaturated Fat 3.4g Protein 7.5g
Monounsaturated Fat 2.9g Sodium 53mg

Net Carbs per slice = 1.7g (Total carbs – indigestible fibre which has no impact on blood sugar).

Friday, 6 February 2015

How much protein per day??

Remember that not all proteins are created equal. For example, vegetable based proteins are known as incomplete proteins as they dont contain all of the amino acids, animal based proteins are known as complete proteins as they contain all of the amino acids. What you absorb is also very important, a chicken breast or piece of steak is 35% bio available, an egg is 65% bio available and whey protein is 90-95% bio available, which makes it the most superior form for our bodies.

Isagenix uses 'Happy cows' which means they have been pasture fed on natural diets with no chemicals used on the grass, there's no hormones, streriods or antibiotics used on them and they are only milked when in season. The milk is then cross membraned, cold extracted which ensures that the vital nutrients are not destroyed, as can happen with isolated protein products.

Below is a good guideline.  Remember the threshold of protein per meal or in one sitting is 35-40 grams. Anything beyond that is a waste.  The key is to trickle protein into your body throughout the day.  The body will break it down and use it throughout the day.  

Once you find out what your goal grams of protein per day are, then factor in your IsaLean or IsaLean Pro shakes, then design your prepared meals with protein, like turkey, chicken, fish or bison, around the remaining protein requirements.

Person, Situation & Goals

1 Kilo = 2.2 pounds

Average healthy sedentary adult (male or female) that does NOT work out or have any related goals. This is just what I consider to be a good minimum daily protein intake for general health/function- 0.5-0.7 grams of protein per kilo of body weight.

Average healthy adult (male or female) that IS doing some form of exercise regularly or IS trying to improve their body (lose fat, build muscle, etc.). This is the minimum I’d recommend in this case- 0.8-1 grams of protein per kilo of body weight.

Average healthy adult FEMALE whose primary goal is building muscle, getting “toned,” maintaining muscle while losing fat, increasing strength or improving performance- 1-1.2 grams of protein per kilo of body weight.

Average healthy adult MALE whose primary goal is building muscle, getting “toned,” maintaining muscle while losing fat, increasing strength or improving performance- 1-1.7 grams of protein per kilo of body weight.

EXAMPLE--- For 1.7 grams of protein per kilo-
You take your weight, divide it by 2.2, then times that by 1.7= grams of protein per day-
200 lbs divided by 2.2 = 90.9 then times that by 1.7 = 154 grams of protein per day

Wednesday, 4 February 2015

Pure protein vs manufactured protein

Which whey protein is right for you? With Isagenix, the answer is easy: New Zealand whey. See our “Which Whey Protein is Right for You?”  by clicking here

If the old saying, “you are what you eat,” is right, you will rethink consuming products from grain-fed cows. A new study shows that cows fed high-grain diets have a higher incidence of metabolic disorders related to the build-up of several toxic and inflammatory compounds as well as changes in amino acid profiles in their digestive fluids compared to cows on low-grain diets. Having these metabolic complications (and the need for antibiotic use) negatively affects the quality of dairy products produced, including the whey protein found in milk.

In the study, cows were fed diets consisting of 0-, 15-, 30-, or 45-percent barley grain. Scientists used a combination of measuring techniques to identify 93 metabolites in digestive fluid samples taken from the cows. What they found was shocking. The cows that were fed the high-grain diets (>30 percent) had significantly increased amounts of toxic and inflammatory compounds in their digestive fluids including:
  • Putrescine—a foul-smelling organic chemical compound that is produced in the breakdown of amino acids in living and dead organisms. It is responsible for the odor produced during flesh decomposition and contributes to “bad breath.” It is toxic in large amounts.
  • Methylamine—organic compound with a strong odor similar to fish that is used to make agricultural chemicals such as herbicides, fungicides, and insecticides.
  • Ethanolamine—a toxic, flammable, corrosive liquid used in the production of detergents, polishes, and pharmaceuticals.
The anatomy of a cow was built to live off a diet of grass and shrubbery. However, due to high market demands, farmers have turned to grains such as corn for feed because of convenience and money. It is a lot more economically sound to confine cows to feedlots and feed them grain, which can be digested faster allowing them to “fatten up” quickly. In the eyes of a businessman, this is advantageous; however, science is showing that high-grain diets promote the development of disease and illness because cows are not built to digest grains.

The several perturbed amino acid profiles in the digestive fluids of cows fed high-grain diets included phenylalanine, ornthithine, lysine, leucine, arginine, valine, and phenylacetylglycine. While microbial protein in the rumen (main digestive organ of cows) is an excellent source of high-quality protein, it is not sufficient enough to meet the requirements for high levels of milk production. If amino acids are disrupted in the rumen, their ability to be absorbed is severely reduced.

Unfortunately, it is not just high-grain diets that are of concern here. Byproduct “feedstuffs” are used as cheap fillers in feed for cows and include poultry feather pellets, animal fat, potato waste, soy cakes, poultry carcass, and meat processing waste.

Dairy cows have been turned into machines with the goal of pumping out large amounts of milk at the expense of their health, and consequently, the quality of dairy products. You can trust that Isagenix is not one to choose convenience over quality. Isagenix uses an undenatured whey protein blend sourced exclusively from grass-fed dairy cows raised on the pristine pastures of New Zealand. The “Cheerful Cow Certified” label on IsaLeanIsaLean Pro, and IsaPro shakes is a reminder of the unbeatable quality you receive from Isagenix.

 Source Rob H / CFL
 

Tuesday, 3 February 2015

Boot Camp-inspired Plank Workout


Military fitness training is, first and foremost, warrior fitness and focuses on four key components. Each of these components is necessary to develop a total, well-trained and prepared warrior:
  • Physical training creates strength and stamina,
  • Emotional and mental training instills desire, follow through and motivation.
  • Technical training brings in knowledge and skill of execution.
Basic combat fitness is functional and begins with pre-exercises that prepare the body. These conditioning drills and exercises can be performed anywhere, require no equipment, can be used with large or small groups, and are adaptable to individual fitness levels.
For your warm-up, begin at the head and move down the body:
  • Turn your head left and right, floor to ceiling, right and left; next, do head circles.
  • Do shoulder rotations to the front and to the back, with arms relaxed to the sides of the body.
  • Make loose fists and rotate wrists forward and backward.
  • Twist the torso to the left and right, allowing the arms to freely swing around the body.
  • Place both hands at the small of the back and gently rotate the hips in each direction.
  • Place both hands on the knees and make gentle knee circles in each direction.
  • Place one foot on point and rotate the ankle, first in one then the other direction; switch feet and repeat.
THE WORKOUT
Perform the following exercises to cadence (six to 10 reps), timed (45 seconds per exercise with 15 seconds of active rest for four rounds; rest one minute between rounds) or at will (complete 100 reps total—20 per exercise at your own pace).
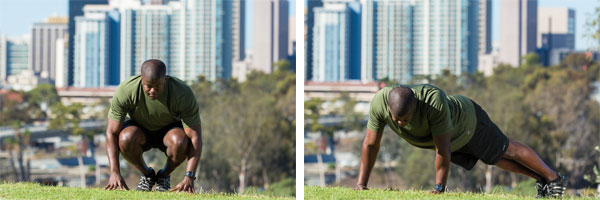
Diagonal Squat Thrust (4-count movement)
diagonal squat thrust
Starting Position: Standing
Squat and place your hands on the ground, shoulder-width apart. Thrust the feet and legs diagonally backward to the left to high plank position. Maintain an engaged core and keep the body rigid from head to heels, with feet at a 45-degree angle to the hands. Jump back in to the squat position, return to full standing (starting position) and repeat, alternating right and left, for six repetitions. To modify, thrust straight back for count 2 or step back each foot to assume plank position.
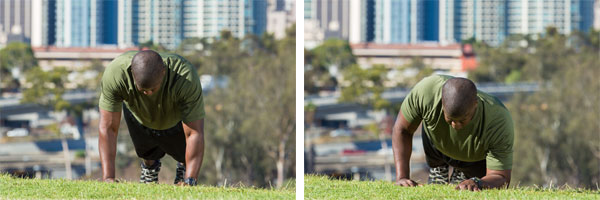
Left and Right Push-up (4-count movement)
left and right push up
Starting Position: High plank, with feet together and thumbs touching
Move your right hand to the right and lower your body low to the ground while keep your core fully engaged. Raise your body (push up) while moving the right hand back to the starting position. Repeat this move on the left side; continue to alternate right and left.
Alternating High and Low Plank (2-count movement)
alternating high and low plank
Starting Position: High plank, with wrists directly below shoulders, core engaged and body rigid
Take the right forearm down to a low plank and then bring the left forearm down to low plank. Press the right palm into the ground and return to high plank and then repeat with the left palm. Repeat high and low plank movements with minimal body shifting (some is necessary).
Low Plank Hip Tap (4-count movement)
low plank hip tap
Starting Position: Low plank with feet together
Maintain a low-plank position and twist the torso to the left, tapping the right side of the hip on floor. Return to low plank and then twist the torso to the right, tapping the left side of hip on floor under body. Return to low plank and repeat. This movement works well with cadence or at will. Try to keep your heels together and keep the upper-body shifting to a minimum.
High Plank Cross-body Knee to Opposite Elbow (4-count movement)
high plank cross-body knee tap
Starting Position: High plank with feet a comfortable-distance apart
Keep the core engaged and a firm high-plank position as you bring the right knee to the left elbow, shifting the body slightly forward. Rotate the right hip toward the floor, with the foot, knee and ankle at a45-degree angle, hovering just above the floor. Return to the starting position and repeat on the opposite side. This exercise is ideally performed at cadence to ensure proper execution and purposeful movement.
Note: When these exercises are performed as a circuit or at cadence, run in place, slow march/step kick or perform side straddle step/power jacks or jumping jacks between each exercise.
Finish your workout with the following conditioning exercises, which are performed while lying supine on a mat.
1. Cross the ankles, interlace the fingers and fully extend the body, inhaling and holding for a count of three; exhale, relax and repeat four times.
2. Extend the right arm out, perpendicular to the body. Bring the right knee across body, using the left hand to hold it in place. Count to 10 and release. Repeat on the other side.
3. Bring the right arm across the chest and hold it with the left hand for eight counts. Release and repeat with the left arm.
4. Bring both knees to the chest and roll slightly side to side to release the low back.
5. Lie completely relaxed, palms up, if desired, eyes closed. Allow the body to completely relax for a full minute.

Source :  Valetta Stewart V.R. Stewart

Monday, 2 February 2015

How to Get Started With Kettlebells

The best athletes in the world all start at the beginning. To be good, great or the best, there are no shortcuts. Regardless of your goal—to be the world’s best or to start training with a new tool as a way to introduce something fresh to your program—the key is to start with the basics. That means learning and mastering the basics skills before focusing on how much, how long or how fast.
 In an ACE-sponsored study, researchers from the University of Wisconsin-La Crosse concluded that, in addition to the predicted strength gains, kettlebell training improved core strength and dynamic balance, and increased aerobic capacity. With such a diverse increase in specific exercise markers, it’s no wonder kettlebell training continues to grow in popularity.
Regardless of where you want to be in three, six or 18 months, using kettlebells can be a great way to help you reach your goals. Like most training tools, using the correct technique is critical. Take the time to perfect your technique before progressing to the more advanced moves. Many of the advanced movements in kettlebells build on the basics swings and catches. As you become more proficient, the basics moves can become part of your warm-up routine to prepare you for the more complex movements. Don’t let the need to use a heavy starting weight get in the way of your technique. If your goal is to use the heaviest kettlebell out there, don’t worry—it’s waiting for you. Perfect your technique first. Remember—practice makes permanent, and perfect practice makes perfection.
This program should be completed after running through a warm-up, paying particular attention to ensuring the glutes, hips, torso and shoulders are warm. Rather than focusing on reps, a different approach is to complete a few reps, stop, rest and repeat. As you become more comfortable, add a few more reps. Set yourself a time range in which you want to work. It is more important to complete the reps while using good form than it is to check the box for a certain number of reps. When starting out, take 20 to 30 seconds to complete a set and then rest for 30 seconds. Spend no more than five minutes on each exercise.
Kettlebell Deadlifts
kettlebell deadlift
This is a great exercise to start warming up the body.
Set up: Stand with the feet shoulder-width apart, toes slightly out. Keep the chest up and the back straight. Bend at the hip and slightly at the knees to lower and grip a kettlebell with both hands.
Follow up: While keeping the weight on your heels, drive the hips open to a standing position. Brace the core and squeeze the glutes.
Kettlebell Two-arm Swing
kettlebell two-arm swing
This exercise is a foundational movement. Once you master this exercise, you can proficiently move to other movements such as the single-arm swing, snatches and cleans.
Set up: Start with a kettlebell on the floor, centered in front of your feet. Assume a deadlift position. Grasp the kettlebell and extend and hike/pull the kettlebell up and back through your legs. As the kettlebell reaches the end of its arc, use an explosive sharp movement and extend your knees and hips.
Follow up: Contract the glutes as you extend the hips, and keep the biceps close to the rib cage. The kettlebell should travel up to approximately mid chest height.
Kettle Single-arm Swing
kettlebell single-arm swing
This movement starts to challenge the core because you not only need to control the kettlebell as it swings through its arc, but the rotation as well.
Set up: Start with a kettlebell on the floor, centered in front of your feet. Assume a deadlift position. Grasp the kettlebell with one hand and extend and hike/pull the kettlebell up and back through your legs. As the kettlebell reaches the end of its arc, use an explosive sharp movement and extend your knees and hips. The kettlebell should travel up to approximately mid chest height. (Tip: Turn the thumb of the hand holding the kettlebell toward the glutes as you swing back and then twist (supinate the forearm) toward the front as you swing the kettlebell forwards.) Complete the desired number of repetitions and then switch sides.
Follow up: Keep the grip arm straight and strong through the arc.
Goblet Squat
goblet squat
This exercise is just one of a few different ways to perform a squat using kettlebells.
Set up: Hold a kettlebell with both hands at chest height. Stand with the feet shoulder-width apart, toes slightly out; keep the chest up and back straight.
Follow up: Bend at the hips and knees and push the hips back. Keep the elbows forward as you sit back down into a squat. Keep the weight on the heels as you drive the hips back up to a standing position.
Lunge
Kettlebell lunge
This exercise can be also performed with a kettlebell in both hands or with a single kettlebell extended over the head.
Set up: Stand comfortably and hold a kettlebell in the right hand. Step forward into a lunge with the left foot.
Follow up: While keeping the chest lifted and the shoulders pressed back, push through the forward leg back to the standing position. Complete the desired number of repetitions on one leg and then switch sides.
 
Source : Anthony Wall, MS / ACE 
 

Saturday, 31 January 2015

8 Mistakes Costing You Muscle Tone

The goal of training hard is to build more muscle, which will ultimately help you to burn more fat and lose more weight. However, you may be training as hard as you can but not seeing the results you are hoping for. If this is the case, you could be making one of the mistakes below. These errors will not only slow your progress, but they can cause you to actually LOSE muscle tone!  

 28muscletone.jpg


  1. Training Specific Body Parts
    If you've got your routine broken down into too many days -- each day focusing on a specific muscle -- you'll cause your muscle growth to stagnate and possibly even stop. You want your large muscle groups to work together, as that's how you gain muscle fast.
  2. Overtraining
    We've all pushed our bodies beyond our limits and then paid the price. Doing too many sets and reps is NOT the key to muscle gain, but it will give you swollen muscles (thanks to the "pump") that are more likely to be injured. You're not going to see proper growth, so it's better to stick with fewer sets of fewer reps with A LOT more weight.
  3. Training Only Vanity Muscles
    Your arms, shoulders, and chest may be the muscles you want to LOOK good, but you can't only train those bad boys. Did you know that up to 70 percent of your body's total musculature is in your back and legs? Don't neglect these two important muscle groups!
  4. Not Stretching
    This may sound silly, but it's the truth. Stretching not only prevents injuries, but it increases your muscle's range of motion and speeds up recovery. Stretching makes space for the muscle fibers you are working to expand, allowing your body to increase muscle mass and tone.
  5. Not Resting Enough
    Your body repairs your muscle fibers during the night, so rest is a key to muscle mass growth. If you don't sleep enough, you reduce the gains your muscles can make. Not only that, but your body is unable to produce enough of the mass-building hormones that would be the key to serious gains.
  6. Doing the Same Workout
    If you follow the same routine for weeks and months at a time, your body gets accustomed to the movements. Those who fail to add more weight, do more reps, or switch up the movements will never see serious muscle growth, and may even end up suffering from burnout.
Don't make these mistakes! Train like a pro and pack on those muscles the safe, effective way.

Source Andy Peloquin / Fitday

Friday, 30 January 2015

How to Stay Motivated When You Don't See Results

The discouragement of failing to witness noticeable results from countless hours of rigorous workout activity might cause you to rethink whether the daily exercise grind is actually worth it. The feel-good concept of working out to improve your overall health and well-being may be satisfactory on the surface, but copious amounts of pain without any gain can cripple your motivation. It's important to remember why you decided to alter your lifestyle to begin with, though, even if you don't see quick results.

13motivate.jpgKeep Calm

There's no doubt that it takes several weeks for your results to pop in the mirror. Some people are able to gain noticeable results faster than others, but that shouldn't deter you from exercising at least three or four times per week. It's important to keep your ultimate goal in mind and remember that you're not going to suddenly become sculpted overnight, or over the course of a month, for that matter.

Challenge Yourself


It's not a simple feat to overcome discouragement, but it is possible to internalize those harsh feelings and transform a negative, can't-do attitude. If you're feeling unsatisfied with the hard work you've committed to, challenge yourself by increasing the intensity of each workout. You can accomplish this by decreasing rest time in between sets, which has been scientifically tested to improve your endurance and increase your body's natural ability to burn fat. For high-intensity workout purposes, rest for just 30 to 45 seconds in between sets.

Visualize Success


Even though it might seem cliché and somewhat silly, visualizing your goals can help keep you motivated. Regardless of whether your goal is to burn off enough flab to flaunt washboard abs at the beach, or slim down to squeeze into your high school prom dress, visualizing your moment can help you achieve what might currently seem impossible. Do what you can to fend off brief moments of discouragement by remembering why you became an avid workout enthusiast to begin with.

Ignore Negativity

The process of visualization should help you conquer negative thoughts that creep into your mind, but it's also important to tune-out family members and friends who have a tendency to induce negativity or invoke poor decisions. Even though it might be tempting to skip the gym for an extended happy hour with your friends after a rough day at the office, you need to remain resilient and think of the potential consequences. A couple of drinks have the potential to increase your food cravings, which can lead to poor dietary decisions and stall your progress.

Don't Give Up!

As simple as it might seem, giving up on your goal won't fuel your passion or diminish your discouragement. If maintaining a trimmed down figure was easy to do, obesity wouldn't be at the root of many health concerns in the United States. You have the opportunity to not only change your lifestyle by exercising regularly, but also achieve high-quality health. Anything that is difficult to accomplish is worth doing, no matter how discouraging it might be. Even if you don't see results today, remember that each workout pushes you one day closer to reaching your moment of visualization.

Source John Shea / Fit Day