Wednesday, 14 January 2015

20-Minute Calorie-Burning HIIT Workout

HIIT workout

With the holiday season in full swing and the hustle to get end-of-the-year projects complete, it’s easy to stray from our regular exercise habits. Who has time for exercise when we are shopping for presents, cooking for family, running errands, traveling and attending parties? You. You have time for exercise. If your regular routine of going to the gym is getting trumped by this busy time of the year, try a high-intensity interval training (HIIT) workout that offers both fitness and calorie-burning benefits. Plus, you’ll work up a good stress-reducing sweat in a short amount of time.
High-intensity interval training features alternating bouts of all-out high-intensity exercise effort and short rest periods for a specific number of sets. These short, intense bursts of activity give you an incredible aerobic, anaerobic, strength and power workout all rolled into one. During a HIIT workout, your body metabolizes fat for fuel and after your workout your body will tap into fat stores for the energy. This makes HIIT one of the best ways to maximize caloric burn in a short amount of time. All you need is 15 to 30 minutes to reap all of these benefits of a HIIT workout.
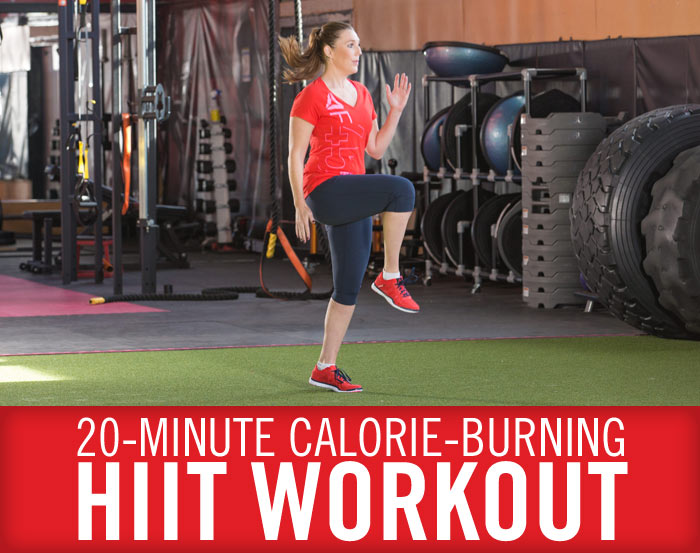
No fitness equipment necessary for this 20-minute HIIT workout, but make sure you have water close by and a timer to keep track of the work/rest exercise intervals.
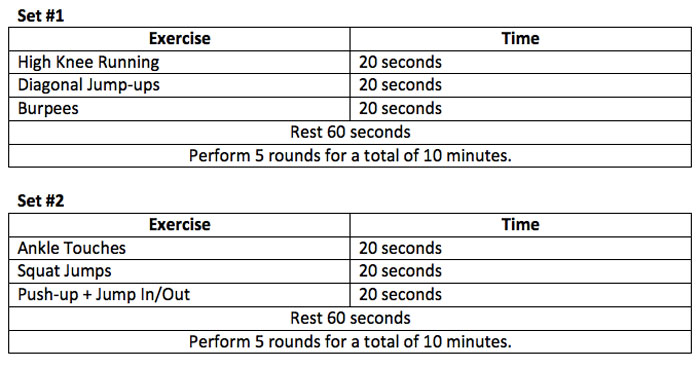
This workout includes two sets of three exercises repeated four times in row. Each exercise in the set is performed for 20 seconds followed by a one-minute rest. When set #1 is complete, move on to set #2.
HIIT workout
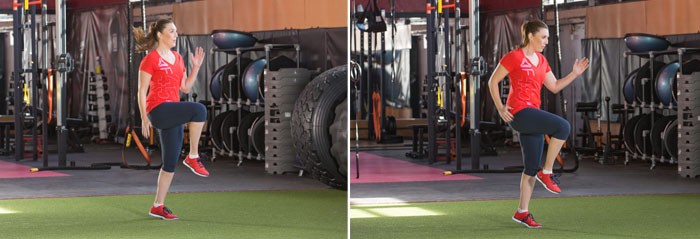
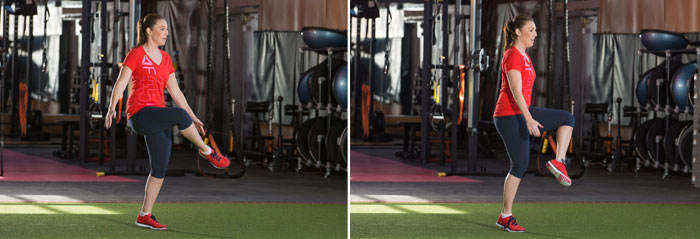
High Knee Running: Run in place, bringing your knees up toward your chest and pumping the arms as quickly as you can.
High knee running
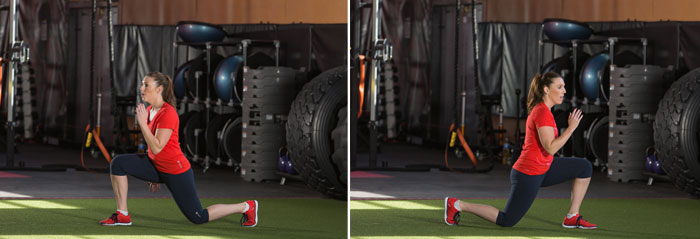
Diagonal Jump-ups: Begin in lunge position, with your right foot forward and your body turned toward the upper-right-hand corner. Push through both feet, jump up and land in a lunge position with the left foot forward and your torso facing the upper-left-hand corner.
diagonal jump ups
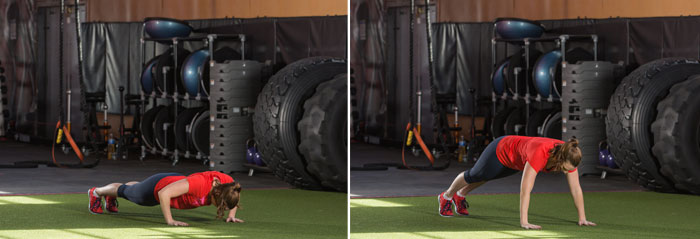
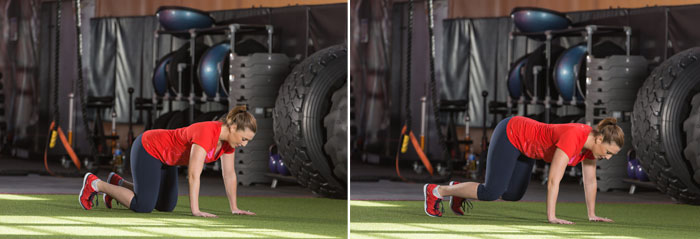
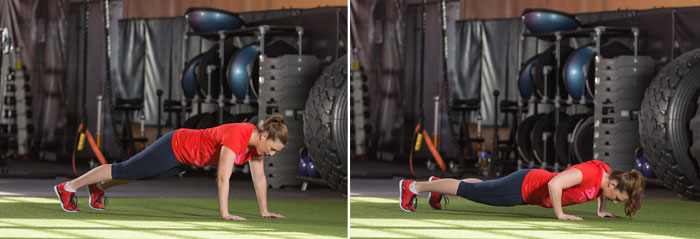
Burpees: Squat and place both hands down on the floor. Jump or walk back to high-plank position and perform one push up. Jump or walk your feet back to the squat position and immediately jump up with arms overhead.
burpee
burpee
burpee
Ankle Touches: Run in place, turning your knees slightly outward, bringing the inside of the leg up toward the chest and reaching your hands to touch the inside of your ankles.
ankle touches
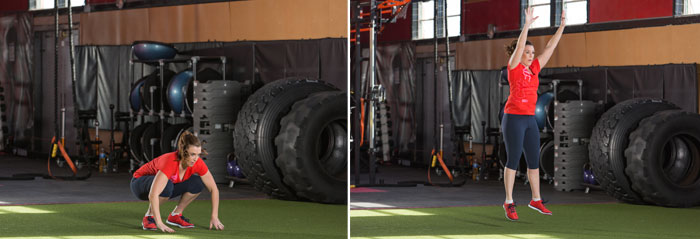
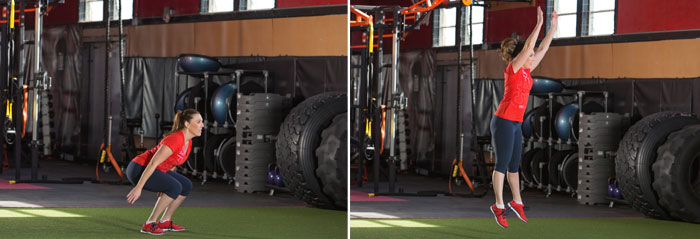
Squat Jumps: Lower down into a squat, swinging your arms back behind you. Immediately jump up, swinging your arms up toward the ceiling.
squat jumps
Push-up + Jump In/Out: Begin in quadruped position, with your hips over the knees and shoulders over the hands. Curl up onto the toes and lift the knees slightly off the floor. Jump or walk the legs back into high plank and perform one push up. Jump or walk the legs back into the elevated quadruped position.
push up
push up

Source : Stephanie Thielen Fitness, LLC./ Ace Fitness 

Tuesday, 13 January 2015

3 Easy Full-Body Exercises, 1 Piece of Equipment

If you are looking for one very efficient piece of exercise, look no further than the kettlebell. Kettlebell workouts are famous for burning fat by increasing lean muscle while building balance and grace. Plus it is an amazing stress-reliever that relieves tension in both the muscles and the mind. The exercises are simple, yet effective.
When used correctly, kettleballs are wonderful conditioning tools. They can be used for various purposes such as:
  • Cardiovascular conditioning
  • Fat loss
  • Strength and stamina
  • Muscular endurance, especially the legs, buttocks and lower back
Choosing the Correctly Sized Kettlebell
When first starting out, choosing the correct size kettlebell to train with is very important. You need to pick a weight that is easy enough to handle but heavy enough to make you use your hips explosively to drive the kettlebell in to its correct position, depending upon the exercise that you are doing.
Most ladies would normally start with either a 5-10 pound kettlebell, while men would normally start with a 15-20 pound kettlebell. The size depends on the condition of the person exercising, so don't be afraid to drop down a size to keep proper form. Initially, more repetitions are better than more weight.
Kettlebell Basic Exercises
Before you can start on a basic routine, you must first master the three basic exercises with the kettlebell. These are:
  1. The Swing
  2. The Clean
  3. The Snatch
1. The Swing
This is a simple exercise, but extremely effective using the whole body. Standing with your feet slightly more than shoulder width apart, hold a kettlebell with knees bent. Grip the kettlebell with both hands and lift to groin height. Ensure that your back is arched and that your head is upright. Keep the weight on your heels, bending at the knees, back straight and head looking up and forwards (as if you are going to sit down in a chair). Swing the kettlebell to the rear backwards, between the legs. The weight should remain on your heels and the shins should be vertical.
kettlebell-swing.jpg
It is essential that you perfect this movement because without it, you will never have the leverage to get your hips into the movement. You should feel the kettlebell pulling you backwards and your hamstrings contracting. Pushing through your feet and legs, quickly snap/thrust the hips forward tightening the glutes and abs (This motion is similar to jumping up vertically.) Do this quick snap of the hips motion while at the same time projecting the kettlebell forwards and away from the body. Keep the arms relatively straight and bring the kettlebell to waist, chest or head height, then allow the kettlebell to freely return to the start position and repeat.
2. The Clean
Hold the kettlebell in one hand. Swing it through the legs, bring it forward, and push up through the legs from the feet. As the kettlebell comes over the top of your hand to hit your forearm, grip the handle tight and also dip at the knees. This will assist you in absorbing the impact of the kettlebell. The kettlebell should lie on the forearm with your elbow tucked into the side. The wrist should be flat, and your palm should be facing inwards towards the body.
kettlebell-clean.jpg
The Swing will test your stamina, grip, and body coordination. The entire exercise can be carried out using one hand, switching at the top or bottom of the drill. It is important to keep core muscles tight to control the kettlebell at all times.
3. The 'One-Arm' Snatch
Swing the kettlebell back through the legs as you push through the feet and legs. Bring it up, snapping at the hips, sucking the floor up with your glutes. At this point, the body should be locked; the power of your drill should now have the kettlebell well on its way up. Remember: as the kettlebell comes over, dip at the knees and grip the handle to slow the kettlebell and avoid the impact on the forearm. The entire body should be locked with total tension that includes a strong core.
kettlebell-snatch.jpg
Kettlebells can make a huge difference in your strength, core, muscle tone and stamina. The exercises are simple but effective. Losing weight is an added bonus! Enjoy!

Source  Sherry L. Granader is a Sports Nutritionist, National Speaker and Spokesperson, Author of 2 healthy cookbooks, Writer, Ghost Writer, Nationally Certified Fitness Instructor and Personal Trainer.

Monday, 12 January 2015

A Beginner’s Guide to Trail Running

“The woods are lovely, dark, and deep,
But I have promises to keep,
And miles to go before I sleep,
And miles to go before I sleep.”
~Robert Frost
This is a post from Matthew Frazier of No Meat Athlete.
Why does the popularity of trail running in the United States surge every time there’s a national crisis or period of epidemic uncertainty?
Simple answer: Running like a wild man or woman through the woods nurtures the soul.
Trail running satisfies a primal need for movement through nature, presumably left over from our days as hunters. When things spin out of control in an age of iPads and Droids, running in the woods is one thing we can count on to be pretty much the same as it’s always been.
That’s your fancy explanation. My real reason for trail running? Getting dirty makes me feel way more badass than I am.
So what does the average road runner have to gain from venturing out into the wilderness?
Two things. First, reduced risk of injury: The soft, ever-varying surface of the trail lessens the likelihood of an overuse injury, strengthens core muscles, and ultimately makes for more comfortable long runs than asphalt. Second, a rush that road running just can’t give you. It should come as no surprise that soaking in the essence of the forest results in a quantifiably-greater endorphin release than does breathing in roadside fumes.
Trail running has done more than make me a stronger, happier runner: It has made me a runner, period. For seven years before finding the courage and initiative to learn a new type of running, I ran strictly on roads. I relished the day-to-day routine of my training. But I refused to call myself a runner until I could truly enjoy the act of running for its own sake.
It took trail running to make me feel like a runner. Don’t wait as long as I did to try it. Here’s what you need to know to hit the trails safely and discover this wildly soothing side of running.


Trail Running Gear

At its best, trail running is a more minimalistic endeavor than road running. While iPods, GPS devices, and heart rate monitors have become musts for many runners, technology tends to take away from experience of trail running. Even a watch is dispensable.
Still, there are certain necessities for trail running, some of which require different considerations from running on roads.
  • Clothing: The same technical apparel that you wear on roads works for trails, but choose something that you don’t mind getting dirty or snagged.
  • Shoes: Road shoes work fine for short runs. If you decide to stick with trail running, however, you’ll eventually want to get a pair of trail shoes. They offer a stronger, protective sole and greater stability than most road shoes. And while the idea of barefooting on trails is appealing, it’s smart to run a trail in standard shoes first to get a feel for how sharp those rocks are.
  • Water bottle: If you’re not big on drinking from streams, you’re going to have to carry your water with you. A favorite among trail runners is the handheld water bottle that straps to the hand and has additional pouches for things like keys, ID, and food. For longer runs, consider a hydration vest. Nathan Sports is a popular brand for both hydration options.
  • Insect repellent: Depending on where you’re running, bug spray may or may not be necessary.
  • Headlamp or flashlight: One of the coolest things about trail running is that you can do it pretty safely at night, without having to worry about cars. But for running at night, a headlamp or flashlight is absolutely necessary. The LED versions are both lightweight and bright.
And don’t forget a towel and a change of clothes, socks, and shoes for afterward. If you’re doing it right, you’ll be wet and dirty by the end of the run.

7 Steps to Your First Trail Run

1. Find a trail.
By far the best way to start trail running is to find a local group of trail junkies and run with them. They’ll know the best trails in your area and help you get started. I met my trail-running group through my town’s running club; you can search for running clubs near you at Run the Planet’s club directory.
If you can’t find a group, the American Trail Running Association’s website offers a free directory of U.S. and international trails.
Be sure to distinguish between non-technical and technical trails. Non-technical trails are paved, gravel, or dirt roads that are generally easy to negotiate. Technical trails are narrow, dirt or rocky paths offering every variety of challenge that most people associate with trail running.
2. Slow down and take short, quick strides.
You can expect to run about 20 percent slower on trails for a given level of exertion than you would on roads. You’ll find steeper hills, more side-to-side movement, and lots of obstacles to deal with. Trail running is most fun when you forget about pace and do what feels good.
Shorten your stride so that your weight is over your feet most of the time; this allows you to react quickly and maintain balance. You’ll find that trail running works your core and stabilizer muscles more than road running, so it may help to focus on keeping your core engaged.
3. Don’t be afraid to walk the hills.
The surest way to identify a road runner on the trails is to look for the guy who runs past everybody on the uphills, only to be passed again on the downhills. Trail runners know that it’s usually more efficient to walk up the steep hills and conserve energy to make up time on the way down.
4. Scan the ground five to ten feet in front of you as you run.
When you’re running trails, you need to pay extra attention to where you step. But you certainly don’t want to be staring straight down at your feet the whole time.
Continuously scan the ground a few yards ahead of you while you’re running. As you notice an approaching obstacle, shift your attention to your feet to do whatever is necessary to clear the obstacle. And don’t be lazy—pick up your feet just a little higher than you think is necessary to avoid a root or rock. Too many falls happen due to simple complacency.
5. Keep a distance of ten feet from other runners.
If you’re going to pay attention the ground in front of you, it helps if you can actually see it. If that’s not enough reason to keep your distance, trail runners are required to change speeds all the time, rarely with warning. Nobody likes getting rear-ended.
6. Watch out for slippery roots and rocks.
If you can step over a fallen tree, root, or large rock, rather than on it, do it. Lots of them are more slippery than they look. And when crossing streams, it’s often safer to walk directly through the water than to try to tiptoe across wet rocks. (You’ll avoid being called names, too.) It’s trail running; you’re supposed to get muddy and wet!
7. Be safe. It’s not called “the wild” for nothing.
You know, the common-sense stuff. Whenever possible, run with a friend. Bring a map if you’re running a new trail for the first time. Have a first aid kit in the car, and carry extra food with you for emergencies. Bring along a cell phone or pepper spray if you’re running alone.
And know the area you’re running—how to deal with the wildlife, when and where hunting takes place, when the sun goes down, and anything else that might pose a danger.


Trail Running Resources

You have everything you need. Don’t wait another day. Happy trails.
Matt Frazier’s running breakthrough came when he realized he could run faster and farther with a vegetarian diet. On his blog, No Meat Athlete, he shares clean-fuel recipes and running insights gained as he trains for his first 50-mile ultramarathon.
 

The Science Behind Adaptogens

 Stress has real physical consequences that can weigh on your health. That's where Adaptogens come in. These are plants that produce special substances originally intended to help them to adapt to and overcome stressors in their own environments. In humans, Adaptogens work by normalizing the body’s functions and taking them daily improves mental and physical performance while reducing fatigue.
 When coping with stress and temporary bouts of fatigue, most Americans reach for that extra cup of coffee or energy shot to get through the day.  Others resort to alcohol, high-calorie snacks, cigarettes, or TV and the couch for an escape. But these habits are counter-productive; they can bring on disrupted sleep, withdrawal symptoms, or weight gain that eventually worsens mental and physical performance.
There may be a better way: adaptogens.
Swedish Herbal Institute researchers Alexander Panossian and Georg Wikman examined randomized, clinical trials on extensively studied adaptogens including rhodiola (Rhodiola rosea), schizandra berry (Schisandra chinensis), and eleuthero root (Eleutherococcus senticosus). They found that these and other adaptogens not only reduce stress and fatigue, but also improve attention and focus.
According to their recently published scientific review on adaptogens published in Current Clinical Pharmacology (1), the reason these herbs are effective may be because they stimulate biochemical pathways that help mediate the harmful effects of stress on the body. Among the findings from studies the authors included in their review were the following:
  • Rhodiola improved levels of emotional stability, self-esteem, and attention while also reducing fatigue and insomnia.
  • Eleuthero root reduced feelings of fatigue and increased resistance to low-oxygen settings, such as in deep-sea diving or high altitudes.
  • Schizandra increased work accuracy and feelings of general well-being, and decreased feelings of sleepiness and exhaustion.
From the Greek word “adapto” meaning “to adjust,” the term adaptogen is applied to any botanical that enhances resistance to stress without the side effects of conventional stimulants. Caffeine, according to the researchers, works by “tricking” the brain to make it more alert, but depletes its energy and resources. On the other hand, adaptogens increase the work capacity of the body or brain by being “stress-protective” or “restorative”.
Stress Vaccines
One of the main questions Panossian and Wilkman sought to answer was how adaptogens work. In their paper, they propose that adaptogens may help the body adapt to stress by inducing a mild stress response in the body. Acting like a “stress vaccine” adaptogens then inoculate against future sources of  stress.
In a sense, adaptogens mimic stress, creating an adaptive response in the nervous, cardiovascular, endocrine, immune and gastrointestinal systems. The authors suggest that through the regulation of stress with adaptogenic herbs, consumers may enjoy “enhanced mental and physical performance, and, possibly, increased longevity.”
Writing in a second review published in Pharmaceuticals in 2010 (2), the same authors wrote that these herbs normalize homeostasis (balance in the body) through several mechanisms akin to mild stress hormones. For example, active components of rhodiola, schisandra and eleuthero are structurally similar to catecholamines—primary regulators of stress—and other components resembling corticosteroids that help to inactivate a stress response.  Fortunately, what adaptogens won’t do is impair mental function or cause addiction.
Ionix® Supreme: Adaptogen-rich Stress Tonic
Ionix Supreme


Ionix Supreme, deemed “nature’s answer to stress”, is an adaptogen-rich drink designed with potent amounts of rhodiola, shisandra and eleuthero—as discussed by Panossian and Wilkman above—along with other beneficial herbs including:
  • Wolfberry (Lycium barbarum) acts as an adaptogen and an antioxidant for the maintenance of good health and increased mental and physical performance (3-5).
  • Ashwagandha (Withania somnifera) operates as an antioxidant for maintaining good health as well as stimulates liver detoxification (6). It may also support the brain (7) and immune function (8) while increasing the body’s resistance to stress (9).
  • Bacopa (Bacopa monnieri) acts as an antioxidant in the maintenance of brain health (10) and has been found to help maintain normal memory and cognitive function (11, 12).
With these herbal ingredients acting synergistically, drinking a shot or two of Ionix Supreme daily offers consumers an advantageous way of obtaining the protection adaptogens provide against stress. The drink can also help improve focus, attention or athletic performance.
Several recent studies also suggest that better management of psychological stress and minimizing its effects may also support more graceful aging. For example, a recent study published in August’s issue of Nature discovered that mice chronically infused with adrenaline, a hormone released by the body in reaction to stress, resulted in injured DNA (13). This study may help to explain why those individuals subjected to chronic psychological stress have shorter telomeres (14), the  protective caps on chromosomes whose length is considered a biomarker of aging.
Researchers are already studying several ways of combating the ill effects of stress on cells and their telomeres, including the role of exercise. What role will adaptogens have? Adaptogens in a supplement such as Ionix Supreme could be the key to beating stress, supporting healthier aging, and increasing longevity.


Saturday, 10 January 2015

How Athletes Can Build a Stronger Immune System


Whether training for a race or competitive sport, one of the worst challenges that athletes can face is sickness or injury. But athletes come with the added risk of a compromised immune system because of frequent and extreme trainings.
A strong immune system depends on a healthy, balanced diet rich in nutrients, but it’s not always easy to achieve. For athletes, who are often looking for ways of pushing themselves to the limits, a little extra support is needed. This is where Isagenix can help—with four steps using convenient nutrient-dense products that provide various ingredients that nourish the immune system.
Step 1: Push protein whey up
Protein may not be the first nutrient people think of in regards to the immune system, but it’s the most critical. Like other systems in the body, the immune system depends on adequate intake of protein and amino acids for optimal functioning.
Whey protein, in particular—a foundation for several of Isagenix protein options—can better help the body maintain optimal protein status because of its rich content of essential amino acids. Whey protein also helps in other ways, as in supporting muscle maintenance and growth, as well as in stimulating the immune system directly to encourage an optimal response (1-3).
Step 2: Think zinc, echinacea and colostrum
Extreme bouts of training are when the immune system is at highest risk. Fortunately, studies have found that there are a few ingredients that can target the immune system in key ways to give it a boost in nourishment.
  • Athletes should consider zinc their best friend for staying healthy. The mineral has a critical role in proper function and development of immune cells, such as T-cells. Any deficiency of zinc comes with unnecessary risk of a compromised immune system (4, 5).
  • Echinacea, a flowering plant whose roots and leaves have been used for centuries by Native Americans for their medicinal qualities, is also shown in randomized controlled studies to have beneficial effects on the immune system (6).
  • Colostrum, the first form of milk produced by a cow after giving birth, contains a range of immune-protecting substances. These include immunoglobulins, proline-rich polypeptides, and lactoferrin that can help protect the immune systems of athletes after long trainings (7, 8).
All these ingredients are available in the form of a spray like Isamune® Plus with Zinc. The product makes for a convenient way to bolster defense daily, before and after exercise.
Step 3: Get the sunshine vitamin all year round
For athletes who often train outside in the sunshine, obtaining enough vitamin D is not a problem normally. But during winter months, levels can drop significantly. The decline can mean problems since the body depends on the hormone-like vitamin for proper immune system response (9, 10).
Getting adequate amounts of vitamin D from diet can be a challenge since so little foods contain enough, but any low status is easily corrected through supplementation. A convenient way to get a daily dose of 2000 IU is available with Ageless Essentials™ Daily Pack and it comes along with another vitamin closely associated with immune status, vitamin C.
Step 4: Sleep it off with melatonin
Perhaps one of the most influential lifestyle habits to support an athlete’s immune system is getting adequate sleep every night. Research has shown that even just one week of insufficient sleep alters the activity of some 700 genes including genes involved in the immune system response (11).
When getting proper shut-eye is a problem, choosing a good supplement like Isagenix Sleep Support and Renewal Spray is the solution. It provides melatonin and other calming compounds such as tart cherry and valerian root in a unique peppermint spray formula that’s fast acting and convenient.
Keeping the immune system strong should be a daily pursuit and one made easier with the nourishment provided in products like those of Isagenix.

References
  1. Dawson BM, Axford S. Nutrition as a part of healthy aging and reducing cardiovascular risk: improving functionality in later life using quality protein, with optimized timing and distribution. Semin Thromb Hemost 2014;40(06):695-703.
  2. Freeman SL, Fisher L, et al. Dairy proteins and the response to pneumovax in senior citizens: a randomized, double-blind, placebo-controlled pilot study. Ann N Y Acad Sci 2010;1190:97-103.
  3. Badr G, Ebaid H, Mohany M, et al. Modulation of immune cell proliferation and chemotaxis towards CC chemokine ligand (CCL)-21 and CXC chemokine ligand (CXCL)-12 in undenatured whey protein-treated mice. J Nutr Biochem 2012;23(12):1640-6.
  4. Hemila H. Zinc lozenges may shorten the duration of colds: a systematic review. Open Respir Med J 2011(5):51-58.
  5. Prasad AS, Beck FWJ, Bao B, et al. Zinc supplementation decreases incidence of infections in the elderly: effect of zinc on generation of cytokines and oxidative stress. Am J Clin Nutr 2007;85(3):837-44.
  6. Kim HR, Oh SK, Lim W, et al. Immune enhancing effects of echinacea purpurea root extract by reducing regulatory T cell number and function. Nat Prod Commun 2014;9(4):511-4.
  7. Shing CM, et al. Effects of bovine colostrum supplementation on immune variables in highly trained cyclists. J Appl Physiol 2007;102: 1113-1122.
  8. Crooks CV, et al. The effect of bovine colostrum supplementation on salivary igA in distance runners. Inter J Sport Nutr and Exercise Metabolism 2006;16:47-64.
  9. Aranow C. Vitamin d and the immune system. J Investig Med. 2011;59(6):881–886.
  10. Walllace, TC, McBurney M, Fulgoni VL. Multivitamin/mineral supplement contribution to micronutrient intakes in the United States, 2007-2010. J Am Coll Nutr 2014;33(2):94-102.
  11. Möller-Levet CS, Archer SN, Bucca G, et al. Effects of insufficient sleep on circadian rhythmicity and expression amplitude of the human blood transcriptome. PNAS 2013 Feb 25

Friday, 9 January 2015

Two Underrated Exercises You Should Be Doing

There’s a constant focus on what is new, flashy and trendy. And, to a certain extent, that’s fine. But in pursuing the new, the cutting-edge and the fresh, we can sometimes overlook the basics. As the summer schedule winds down and we transition to the slightly more stable fall, you may find your clients have a renewed focus on fitness. Here are a couple of old-school movements to train some fundamental movements well.
Bicycle Crunch
I remember doing these in gym class in elementary and middle school. All we did was lie on our backs and jerk our shoulders rapidly from side-to-side while kicking—more like flailing—the legs in and out, all at a pace that was way too fast. There wasn’t much ab work going on and we didn’t get tired until we did them for a long time.
Here’s the modern, updated version of the Bicycle Crunch from my book, Abs Revealed.

 There’s a constant focus on what is new, flashy and trendy. And, to a certain extent, that’s fine. But in pursuing the new, the cutting-edge and the fresh, we can sometimes overlook the basics. As the summer schedule winds down and we transition to the slightly more stable fall, you may find your clients have a renewed focus on fitness. Here are a couple of old-school movements to train some fundamental movements well. Bicycle Crunch I remember doing these in gym class in elementary and middle school. All we did was lie on our backs and jerk our shoulders rapidly from side-to-side while kicking—more like flailing—the legs in and out, all at a pace that was way too fast. There wasn’t much ab work going on and we didn’t get tired until we did them for a long time. Here’s the modern, updated version of the Bicycle Crunch from my book, Abs Revealed. With this modern, updated version, you move more slowly and perform spinal flexion with rotation. And, no, your spine will not explode if you do crunches. The anti-crunch dogma is overblown, to say the least. Crunches are far from the most amazing exercise ever invented, but they have their place. (For more info on this topic, see the ACE articles When Pigs Crunch and Get Off the Pendulum.) Adding these to your routine will target all of the abdominal muscles effectively so, unlike the old-school version of this exercise, you don’t need a ton of reps to get tired. Glute Bridge Keep reading, gentlemen. The glutes are perhaps one of the most important muscles in the body to train. All of my clients get glute work—female and male, young and old. The glutes are sometimes described as the brain of the lower body because they control everything that happens in your legs. Here are the basics of how to do a Glute Bridge from the ACE Exercise Library: Glute Bridge I’m taking you beyond the basics to make sure the glutes are the muscles actually doing the work on this exercise. Over the years, I’ve had many people perform a glute bridge and inform me that they feel it in their hamstrings, low back and sometimes even the quads—everywhere but the glutes. If the glutes cannot create the desired movement, other muscles will jump in and take over to create what is expected. In this case, I’ve found this systematic, thoughtful 4-step approach to performing the exercise to be very effective. Once this is mastered and your client begins to “feel” it in the glutes, the more fluid, standard technique can be used effectively. Steps: Posterior pelvic tilt (A helpful cue I have used is “Move your belly button toward your chin and your butt toward your heels.”) Lift butt off the floor Lift low back off the floor Lift middle back off the floor At the top, position the hips slightly higher than the line connecting the shoulders and knees. This provides more glute action because it adds hip hyperextension. To return, just reverse the steps, 4-3-2-1. Quick cues are “Tilt – Butt lift – Low back lift – Mid back lift.” Another factor here can be the reciprocal inhibition caused by tight hip flexors. The solution is to perform static stretching for the hip flexors immediately before performing the glute bridge. Here’s the most effective way to stretch the hip flexors:
 

  Some have stated, incorrectly, that static stretching should not be done before strength training because it temporarily weakens muscles. Once again, extreme viewpoints are wrong. In this case, some weakening of an overactive muscle group is precisely what we want as it allows more neural drive to the glutes (rather than neural inhibition if we do not address potential hip-flexor hypertonicity prior to glute strengthening). Wrap-Up New ideas are great, but what has come before can often be effective if we know how to effectively use them and how to do the basics well. Fitness need not be dazzling to be effective. Effective exercises make the results dazzling. With this modern, updated version, you move more slowly and perform spinal flexion with rotation. And, no, your spine will not explode if you do crunches. The anti-crunch dogma is overblown, to say the least. Crunches are far from the most amazing exercise ever invented, but they have their place. 
Adding these to your routine will target all of the abdominal muscles effectively so, unlike the old-school version of this exercise, you don’t need a ton of reps to get tired.
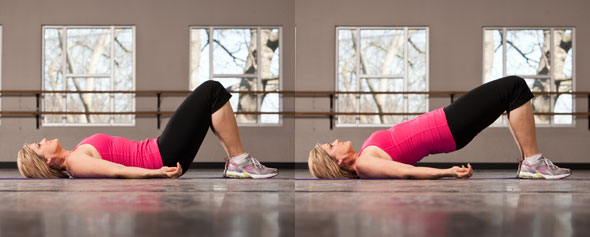
Glute Bridge

Keep reading, gentlemen. The glutes are perhaps one of the most important muscles in the body to train. All of my clients get glute work—female and male, young and old. The glutes are sometimes described as the brain of the lower body because they control everything that happens in your legs. Here are the basics of how to do a Glute Bridge from the ACE Exercise Library
Glute Bridge
I’m taking you beyond the basics to make sure the glutes are the muscles actually doing the work on this exercise.
Over the years, I’ve had many people perform a glute bridge and inform me that they feel it in their hamstrings, low back and sometimes even the quads—everywhere but the glutes. If the glutes cannot create the desired movement, other muscles will jump in and take over to create what is expected.
In this case, I’ve found this systematic, thoughtful 4-step approach to performing the exercise to be very effective. Once this is mastered and your client begins to “feel” it in the glutes, the more fluid, standard technique can be used effectively.
Steps:
  1. Posterior pelvic tilt (A helpful cue I have used is “Move your belly button toward your chin and your butt toward your heels.”)
  2. Lift butt off the floor
  3. Lift low back off the floor
  4. Lift middle back off the floor
At the top, position the hips slightly higher than the line connecting the shoulders and knees. This provides more glute action because it adds hip hyperextension. To return, just reverse the steps, 4-3-2-1. Quick cues are “Tilt – Butt lift – Low back lift – Mid back lift.”
Another factor here can be the reciprocal inhibition caused by tight hip flexors. The solution is to perform static stretching for the hip flexors immediately before performing the glute bridge. Here’s the most effective way to stretch the hip flexors: http://www.youtube.com/watch?v=zqH8Rmeu1fs
Some have stated, incorrectly, that static stretching should not be done before strength training because it temporarily weakens muscles. Once again, extreme viewpoints are wrong. In this case, some weakening of an overactive muscle group is precisely what we want as it allows more neural drive to the glutes (rather than neural inhibition if we do not address potential hip-flexor hypertonicity prior to glute strengthening).

Wrap-Up
New ideas are great, but what has come before can often be effective if we know how to effectively use them and how to do the basics well. Fitness need not be dazzling to be effective. Effective exercises make the results dazzling.

Source Jonathan Ross Jonathan’s “800 pounds of parents” inspired his fitness career as a two-time Personal Trainer of the Year Award-Winner (ACE and IDEA)


Thursday, 8 January 2015

Indoor Cycling: The Breakdown on Bike Set-Up

If you are looking for a cardio workout that offers a big calorie payoff with minimal impact on your hips, knees and ankles, indoor cycling is a great option that delivers on both fronts. With a little bit of know-how you can ensure that an indoor cycling class is the most challenging workout of your week—and also the most enjoyable. Below are some tips to make sure you are never “spinning your wheels.” If you are a new rider, these bike fit tips will help set you up for success, and if you are getting back on the bike after some time away, here is a refresher to help maximize your time in—and out—of the saddle.
Bike Fit
If you’ve ever tried to go for a run in shoes that are too big or too small, you can appreciate the importance of having equipment that fits. While you can still do the activity with an improper fit, it’s not comfortable, efficient or enjoyable, and over time can lead to injury. The same is true with your indoor cycling bike. Fortunately, it’s easy to get a safe and comfortable Quick Fit* in just four simple steps that will see you through your first few classes.

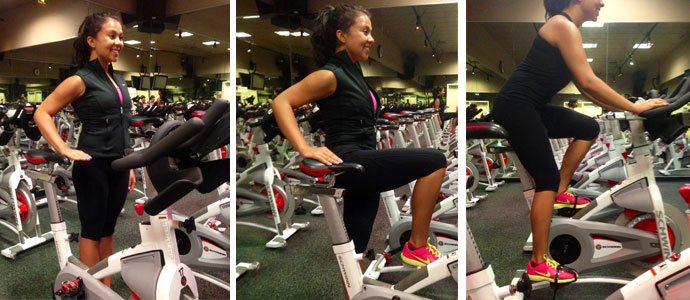
Step One: Saddle Height
Bike saddle height
The purpose of this adjustment is to put you in a comfortable and powerful riding position, where your leg is lengthened as much as possible when the pedal is at the floor, but you are comfortable in the saddle and feel you can easily reach this bottom-most position. Stand on the floor to one side of the bike, next to the saddle and facing the handlebars. Locate the top of your pelvis by feeling with your fingers for your hip bone or lift your thigh until it is level with the floor and notice where the crease of your hip folds (it will be easiest to use the hip/leg closest to the bike). Adjust the saddle up or down until it is approximately level with this place.

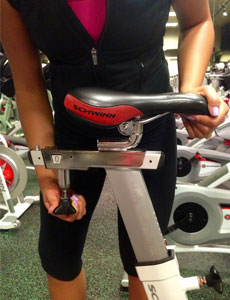
Step Two: Saddle Forward/Backward
Saddle Forward/Back
This saddle adjustment is designed to allow you to align your knee in “neutral” over the pedal, much like when you are correctly performing a squat or a lunge and your knee tracks over your foot, but not beyond your toes. The center of this adjustment fits the average rider, and on some brands of indoor cycling bikes this will mean an accurate fit for more than 80 percent of exercisers. It’s a great place to begin when you are setting up your bike without the help of an instructor. Simply loosen the adjustment that moves the saddle forward and backward and notice how far it moves in both directions. Position the saddle in the middle of this space.

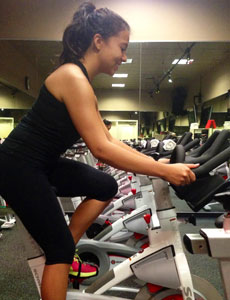
Step Three: Handle Bars
Bike Handle Bars
Adjust the handlebars up or down and, depending on the brand of indoor cycling bike, forward and backward, so that you can reach them comfortably while keeping a tall back, an open chest, relaxed shoulders and a small bend in your elbows. On most bikes there are several places to put your hands on the handlebars. Rest your hands on the spot that feels most comfortable to you, while keeping your fingers relaxed (no gripping!) and your wrists long from elbow to fingertips. You should expect that your favorite place for your hands will vary depending on whether you are seated or standing up.

Step Four: Foot Placement & Test Drive
Bike foot placement
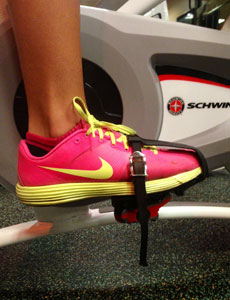
Get on the bike and place your foot in the tennis-shoe cage. Position the ball of your foot in the center of the pedal, which will help you maximize each pedal stroke with the most amount of power. Now tighten up the strap. Take a few pedal strokes both in and out of the saddle to test how your new bike adjustments feel. Change anything that isn’t quite right now before living with it for an entire workout and tighten down all the adjustment knobs before beginning your workout. When you are seated, remember to sit toward the back of the saddle where the most cushioning is and point your tailbone more toward the wall behind rather than toward the floor beneath you. This will make for a lighter feeling in your seat and allow you to keep your upper-body posture tall and tension free as described above.


Source Julz Arney Julz Arney embodies all-out energy and motivation! As an ACE-certified Group Fitness Instructor with 22 years in the fitness business