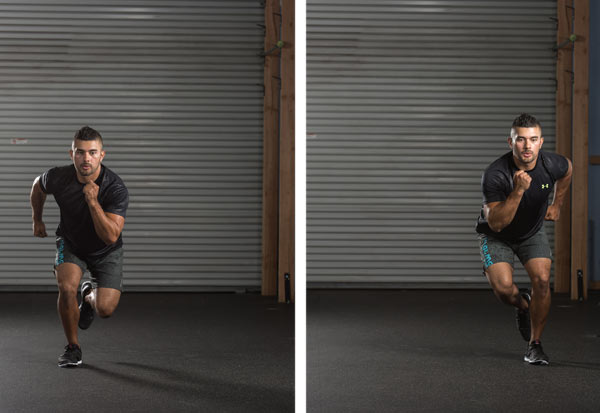
An increasingly well-known exercise program recently, CrossFit has
changed into a favored choice from a variety of runners as well as
newcomers in order to physical exercise. Luckily, there is no need for
some fitness center member's program to perform the course --most of the
CrossFit tools that you need can be purchased and also employed in the
home.
Before engaging in the actual specifics regarding what you need to
obtain, this is how this system is organised: all official routines are
usually published about the primary site as well as stick to any
rotation associated with three days of workout routines the other day of
rest. Regarding each of the productive days, there will be a good work
out with the Day time (WOD) of which targets specific objectives. The
actual three-day cycles generally adhere to a theme regarding some kind,
for instance generating staying power, focusing on improving power, and
so forth.
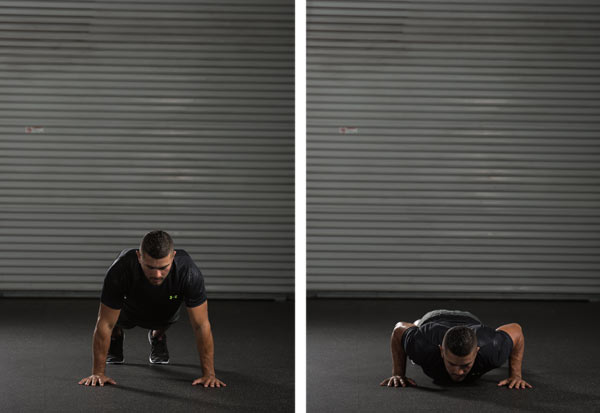
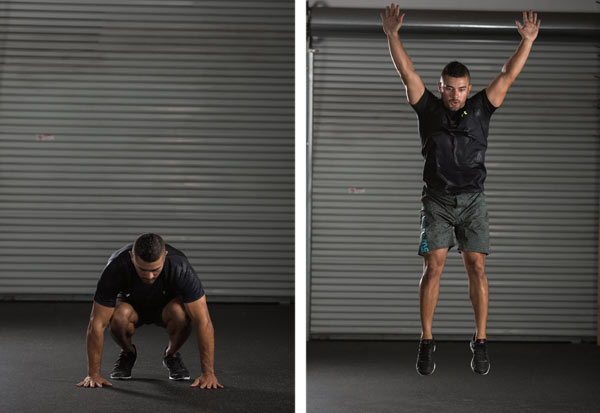
The particular workouts include a multitude of exercises, and some of
them demand particular equipment to do appropriately. At the same time,
there exists a primary set of CrossFit equipment which covers nearly all
workouts, as well as the additional workout routines out there might be
proved helpful about using substitutions.
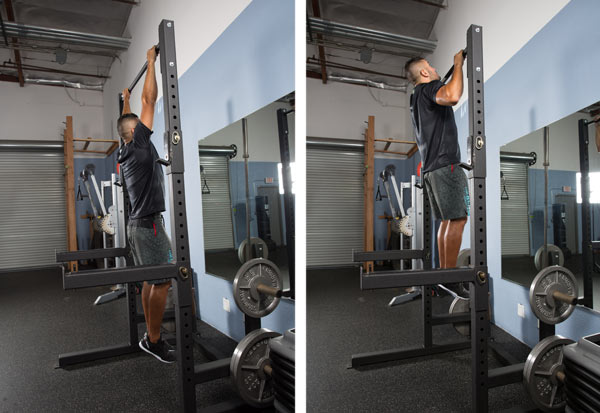
The initial required machine is known as a pull-up bar regarding some
sort. Pull-ups are a great upper body work out which protect numerous
muscles, and therefore are featured conspicuously in CrossFit to the
point exactly where you need a bar to get the anticipated benefits of
the program.
As the greatest setup is a free-standing pull-up bar, there are numerous
of doorway-mounted models designed for home use. These bars function by
having them hooked around the structure near the top of a entrance, and
so are attached with a little metal piece in which slides in back of
the frame. I had employed one such bar in each bathing room and bed room
structures in my house and other areas any time travelling, and have
acquired been in a position to locate a great destination for a attach
the actual bar. These are generally rated to deal with around 3 hundred
pounds, and really should work for many people.
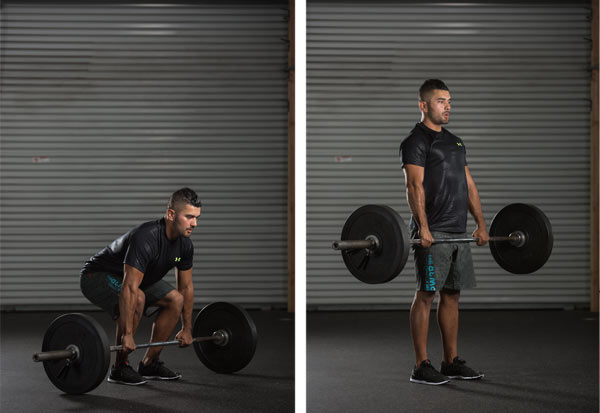
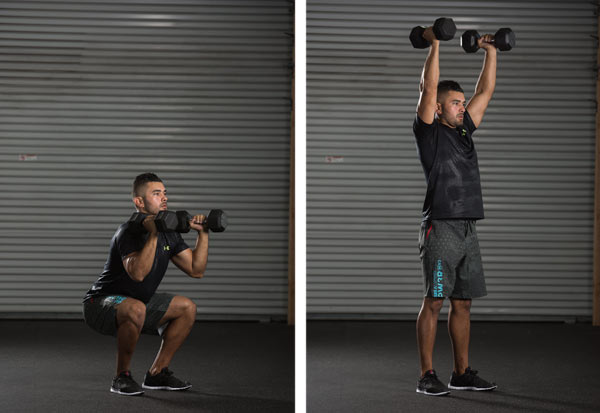
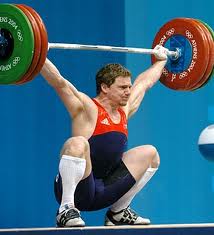
The next need is an Olympic bar and also no less than a few pounds.
Olympic training exercises for instance squats and also dead lifts would
be the best strength training methods available, and CrossFit regularly
series these into the WODs. Bypassing these would certainly remove high
of the actual weight training emphasis with the program.
In the first place, a lot of people will not likely have to have very
much bar weight. Acquiring a typical Olympic bar assessed at 45 pounds
is enough to be able to at least begin training the proper technique for
the lifts. For many WODs, CrossFit utilizes high-repetition sets of
lifts utilizing among ninety five to 135 lbs of weight, therefore
adequate weight to cover that is a lot until an individual becomes
strong enough to be able to deadlift greater amounts of weight.
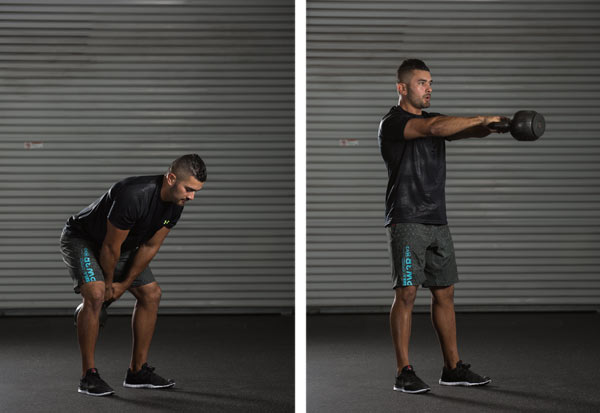
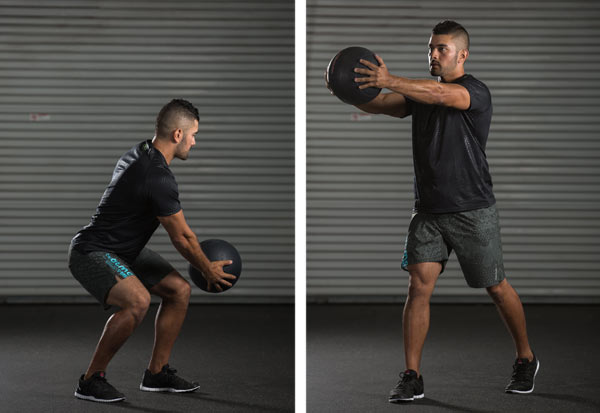
The final bit of crucial equipment is some type of dumbbell pairing.
Even though CrossFit favors utilizing Olympic bars, you will find days
where you are directed to use dumbbells as an alternative for any
diverse experience to the exercise. Also, hand weights may be replaced
regarding kettle bell swings, which are utilized frequently enough that
having a way to do the swings needs to be attained.
A great variable dumbbell set is the most cost as well as area efficient
selection, and also scales effortlessly as you can purchase more weight
with time. For a novice, you should have enough weight to use
forty-five pounds inside every hand, and up to seventy lbs on one
dumbbell for substituting kettle bell swings.
Those 3 pieces--a pull-up bar, an Olympic bar, along with a dumbbell
set--take care of the requirements regarding CrossFit equipment. Beyond
that, there are many other options to obtain additional usage out from
the plan, such as gymnastic rings, kettle bells, weighted medicine
balls, and others. Once you have covered those basics, nonetheless, you
happen to be totally free to get started using the program and obtain
the particular recommended products over time.
High Intensity Interval Training, otherwise known as HIIT, is a
category of cardio exercise that is primarily worked out to melt the
excess fat as well as calories off from your body. However, HIIT
exercises are not just worked out to burn calories and lose weight. They
are also considered beneficial to improve aerobic and anaerobic
endurance, strength building, and enhance BMR (Basal Metabolic Rate). In
fact, HIIT training programs are regarded as effective for anyone who
wants to lose their weight by burning off unwanted calories and increase
the metabolic rate. Further, this type of exercise is also
indispensable for athletes who want to participate in sport activities
whose intensity differs persistently, such as basketball, soccer,
boxing, and wrestling. But HIIT workouts could give you the expected
results only if it performed in a proper way. Discussed below are some
important tips that help for the appropriate performance of HIIT
workouts.
Since HIIT is not recommended for beginners and people with heart
diseases, it is important to consult with a registered medical
practitioner and make sure that you are fit to perform HIIT workouts.
For best results, it would be even better if you can seek the assistance
of a professional physical trainer to help you choose and devise the
most effective HIIT workout regimen. Further, when you begin the HIIT
program, make sure that you do not overstrain or injure yourself, as
these workouts are intensely demanding. Hence, prior to starting any
HIIT fitness program, it is important to check that you will be able to
work-out for at least 30 minutes without any problem or strain.
Once when you begin the HIIT exercises, it is vital to warm up as
well as cool down for at least five minutes, after every HIIT workout
session. This, in turn, will minimize the chances of injuries. Further,
to help for speedy burning of fats, ensure that you workout as hard as
you can in between the HIIT routine intervals. The success of a good
HIIT routine depends on proper timing. As such, curtail your work
intervals or elongate the recovery intervals on the basis of your heart
rate during recovery intervals. Above all, if you feel any kind of
difficulties in the form of pain or breathing problems, it is advisable
to stop the exercise and calm down instantly.
For anyone who is planning to buy a spinning bike, it certainly is a
good idea to learn precisely what you ought to be looking for when it
comes to optimum features well ahead of time. Naturally, the spin bike
you finally choose will probably be what you subsequently make use of
for quite some time. Listed here are the major details to consider any
time making your spin cycle purchase:
Bare minimum forty lb flywheel weight: The flywheel is the most
crucial component of a spin cycle that contributes towards the normal
cycling feel of road cycling. For that reason, you want to be really
aware of what to look for. Opt for products that have a flywheel weight
exceeding forty pounds. A flywheel near this weight can provide a far
more natural riding experience as close as possible to the feeling of
riding a bike outside.
Perimeter-weighted flywheel: A further part which substantially aids a
road riding feel is a flywheel containing perimeter weighting. A large
number of spinning bikes do have perimeter weighting and that is due to
the fact of the far more organic cycling experience. This essentially
tends to make the ride feel far more enjoyable, primarily for
inexperienced riders.
Handlebars: The best-case circumstance is to invest in a cycle that
allows for not simply vertical movements of the handle bars, but
additionally back and forwards variations. Having the ability to move
the bars vertical will be particularly handy to help accomplish ideal
cycling posture.
Adjustable seat: Again, try to spend money on a spinning bike that
permits for up and down adjusting and also horizontal adjustment to suit
virtually all physique figures.
Belt driven vs chain driven: This refers to the belt or chain that
attaches the pedals to the flywheel. Now there definitely is no exact
solution this choice. Generally speaking, belt driven spinning bikes are
less noisy than chain driven options. However, there are significantly
more chain driven spin bikes available for purchase and most of these do
tend to facilitate a heavier flywheel, which we already mentioned the
advantages of above.
Speedometer: You want to look for a spin bike that has a sepeedometer
or console that displays the bare minimums in terms of feedback to you
as the rider. For example, duration of the ride, distance travelled and
then perhaps rpm and calories burned. It's incredibly tricky to achieve
an optimum workout any time you aren't equipped to at least keep track
of your pace and distance, which a speedometer can track for you. You
can pick these up fairly cheaply, however if you have to pay a little
more for a bike that has a speedometer, it'd be a rewarding expense.
In the event that the bike you purchase does not have a speedometer,
it pays to exercise caution when shopping around. Be mindful if your
spinning bike that contains a rear flywheel, the length of cord that
connects the flywheel sensor / probe to the speedometer screen will want
to be fairly long and will sometimes not reach the necessary distance.
Unique point of difference: The last thing to consider is to
distinguish if the cycle has a distinctive aspect that distinguishes it
from other manufacturers or products. Bikes will quite often be really
similarly matched and it can be the little exceptional components that
separate closely-matched bikes.
Up until about 40 years ago, most athletes were told to avoid resistance training because the misperception was that strength training would actually reduce
their athletic performance. Of course, we now know that a proper
strength and conditioning program is essential for athletes who want to
reduce their risk of injury and enhance their performance.
Athletic performance is based on a number of skills that can be developed through a sports conditioning
program. This particular program focuses on improving both muscular
strength and power using a technique called post-activation potentiation
(PAP), also commonly referred to as complex training.
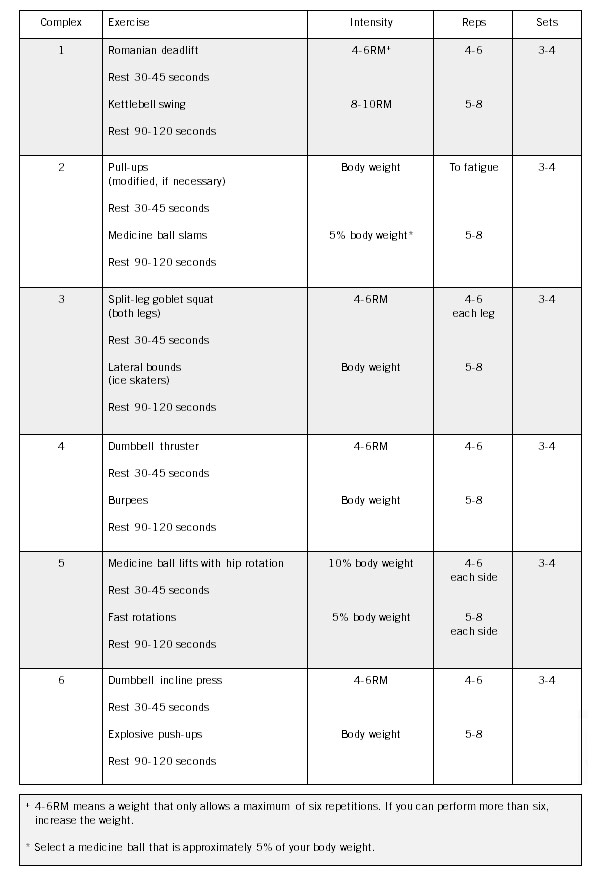
Complex training combines strength exercises from the load phase of the ACE Integrated Fitness Training® (ACE IFT®) Model
and power exercises from the performance phase to improve both muscle
force production (strength) and the rate of force production (power). A
complex training set involves performing two exercises back to back,
with a brief rest period in between. The first exercise is a strength
exercise using a heavy weight for four to six repetitions (ideally
fatiguing by the final rep). The second exercise is a power exercise
focusing on explosive movement for five to eight repetitions. There
should be a 30- to 45-second rest interval between the strength and
power exercises and a 90- to 120-second minute rest interval after both
exercises.
It is important to perform a number of mobility exercises
for a proper dynamic warm-up before attempting a high-intensity
training program. There are two ways to do a complex workout: Complete
all complex sets of one exercise before moving on to the next, or
combine the exercises into a circuit. Circuit training allows you to
reduce the rest time between complex sets, which increases the challenge
of the workout.
Recently, I attempted something I had never
done before in a Crossfit Workout, 30 Muscle ups for time (20 min time
cap). In the process, I did a "wee" bit of skin shredding on my wrists
and palm of my hands. As I reflected on the experience I realized that
it was actually a cool learning situation for me, and not just in a
physical way.
What do you know, a Crossfit workout providing a life
lesson!!
Now some of you may think, "Big deal, I can do that in
about 3 minutes or less!" I applaud you... that is incredible! Others
may be thinking
"What the heck is a muscle up and why in the world were
you doing it??"
But the basic idea is that you start from a
hanging position on the rings and pull or propel your body up and over
the rings until you are in a deep dip position. From there, you simply
drive out of the dip until your arms are completely locked out and your
body is straight up and down. That is one rep.
Crossfit WOD = 30 muscle ups for time, 20 minute cap.
Onto the lessons..... ( For Crossfit, Life, Business and BEYOND)
1. Be Open:You
know, I never did this before but it was the assigned workout for the
day. So going into it I thought, "Hey, I am just going to go for it, and
get as many as I can". I focused on doing an efficient and effective
MOVEMENT to get my reps done. Lesson: Accept the challenge laid out
before you and just keep going...
2. Work Purposefully:
My next strategy was to take adequate recovery time in between reps so
that I could not waste any energy doing an incomplete movement. I don't
mean to say I waited to do it PERFECTLY, but I did keep moving to a
steady rhythm of rest and work. I figured I could do 2 a minute and
would have plenty of time to get that done. Lesson: Do Work. Even if it
is slow, it sure beats sitting still just thinking about working and
will always result in some sort of progress!
3. Coaching Advice;
While all my mental mechanisms were humming along, my body was becoming
a bit more fatigued. Certainly that contributed to missing a few. But
my coach was right there, reminding me of the things I need to execute
to stay the course. During my recovery and reflection time, I allowed
his advice to settle in my brain so that I could accomplish the next
task. Lesson: Coaches are all around us, sometimes we even learn from
kids! Receive that coaching and receive the benefits.
4. Expect Challenges:
At rep #21, I experienced my first real challenge. The skin on the
inside of my left palm, about the size of a silver dollar, decided to
tear away. (Think water blister bursting and skin ripped off) This made
it very difficult to continue because it was open and raw. Time was
still ticking, I had 6 minutes left to finish, so I quickly covered the
wound in tape, and jumped back up. Rep #22, #23 done, but it was at the
cost of palm #2 (read Another Rip). At this point, I had every excuse
and good reason to quit. You know, I didn't even consider giving up, I
was too close and truly believed I could do it. Lesson: Challenges are
part of the process for just about everything. Adjust and press on!
Finishing short isn't Failure-
Because of my rips; I used up precious time and now had to speed my
pace. I got 1, then another, then another until I was finished with 29
reps and a minute to go. I got into position on the rings, and failed
maybe 5 times in that last minute. Then, even with the opportunity to
try for the 30th after time had expired, I was NOT able to finish the
task. The tape used to cover my wounds would not allow me to secure my
grip to get that 1 measly rep. Lesson: Not all the shots you take will
end up in the scoring. Did I need to throw away all the work, mental
focus and reps that I did accomplish because I didn't get the 30th one?
It would not be wise to do so... nor was I even tempted to respond that
way. In 20 minutes, I had done something that I had never even come
close to doing in my life. IT WAS A GREAT "FAILURE" and I was ecstatic
about it. Take some shots and be okay with giving your all even if you
land short.
Success comes with a price.
Most of the time in order to have what you say you want to have, you've
got to give up something else. Maybe it's giving up TV to make phone
calls that make your business grow, or chocolate chip cookies to get to
your goal weight and to become a better Crossfit or any kind of Athlete.
Lesson: This day, in pursuit of my goal, I gave up some skin. Not too
big of a price But you know, it will grow back and not cause me a bit
more pain. But I will forever get to carry with me the accomplishment of
a challenging goal. Totally worth the price!
Whether you are in
pursuit of Crossfit/Athletic Success, rising to new levels in your
business or evolving as a human, you may have to endure some "shredded
hands" on your path to success. But no one every said it was going to be
easy and smooth. There are lessons to be learned that apply to life in a
variety of situations and its important to receive them to grow. So
reach up, take a hold of the rings, use your skills, strength, and
experience to propel you up to the top!
No matter who you are or what your situation, life is filled with
common stressors that can make it difficult to relax. The herbs on this
list have a long history of use for the relief of overactive nerves. If
you find that you could use some extra help in coping with stress,
these herbs might be right for you.
1. Lavender:This
herb is great for managing stress, and can be used in many forms.
Lavender flowers can be steeped in hot water to produce a soothing tea,
or it can be consumed as an essential oil. Lavender is a central herb in
aromatherapy, as merely smelling lavender flowers or oil produces a
calming effect. Lavender contains the compound linolool which has
demonstrated anxiolytic properties and has also been shown to have a
positve effect on sleep quality.
2. Chamomile: This
herb has a long history of use to relieve anxiety and improve sleep
quality. Chamomile is most commonly consumed by steeping in hot water to
produce a slightly-sweet relaxing tea. Chamomile has been the subject
of scientific research regarding its anxiolytic properties, which seem
to be caused by a combination of different compounds. Chamomile has a
number of other health-promoting properties which I will likely discuss
in a future article. Be warned that chamomile may not be the best herb for relieving stress during the daytime, as it tends to induce drowsiness.
3. Kava-Kava: Also
known simply as kava, the root of this plant has long been used by
Pacific Islanders to relieve anxiety, and has even been used as a sort
of "social lubricant" in a role similar to that occupied by alcohol in
other cultures. Unlike alcohol though, kava has a reputation for
inducing calm without disrupting mental clarity. Ground kava root is
traditionally prepared via cold water extraction methods, though it can
also be steeped in hot water or consumed raw. Kava contains a number of
compounds known as kavalactones which seem to be responsible for its
anxiolytic and sedative properties. Be warned that the
use of kava can cause sedation that might be less than desirable during
activities which require alertness (e.g. driving or operating heavy
machinery). Be warned also that there is mixed evidence regarding the potential for liver toxicity attributed to kava.
Note: This
article is not intended to constitute medical advice. Those with
anxiety disorders might find it nearly impossible to cope even with the
aid of the herbs listed above. If you find that your stress or anxiety
is becoming unmanageable, do yourself a favor and contact a doctor to
find out about available treatment options.
This article was written by Jacob Wonn, a young man with a passionate interest in herbal science.
This is a great question; unfortunately, it's not a simple answer - so bear with me!
First and foremost, if you're an Olympic
lifter, by all means, wear Olympic lifting shoes. It's how you compete
and specificity is important. And, as we know, competing at the
highest level of athletics always suggests an element of assuming a
greater risk to achieve a greater reward - at least as compared to
"simply" training.
If, however, you're an athlete in a
different sport - or just a general fitness enthusiast - I don't think
they're necessary. And, they may even be problematic if long-term
improvements to your movement quality and health are goals of yours.
I'll explain - but first, we need to understand the two primary reasons
folks wear them.
First, there is the firmness factor.
O-lifting shoes have a very solid heel without "give;" this makes them a
better platform against which to produce force, as compared to normal
sneakers. This firmness isn't exclusive to O-lifting shoes; you'll also
find it in some minimalist shoes, Chuck Taylors, or no shoes at all.
Most powerlifters know this, and it's why they generally lift in "firm"
footwear that allows better heel contact with the floor.
This leads us
to point #2...
There is a prominent heel-lift in these
shoes. I've seen heel lifts ranging from everything from a 0.5 to 1.25
inches. In the sneaker world, however, everything is generally related
in terms of heel-toe drop, or % grade. For a long time, the standard
running shoe was a 12mm heel-toe drop from 24mm (heel) to 12mm (toe),
which creates a 8% grade. The tricky part about interpreting what this
means in the context of Olympic lifting shoes is that I can't say that
I've ever seen anyone list the height of the toe, so we don't really
know the grade. The 0.5 inch lifts are surely pretty moderate, as 0.5
inches equates to 12.7mm, whereas the 1.25 inch ones would be 31.75mm,
which is actually in excess of what you see with the much maligned Nike
Shox (25mm).
This obviously leads to the question, why
isn't a firm shoe alone sufficient? What's the rationale for the massive
heel lift? Effectively, it's a crutch that helps lifters with mobility
or stability deficits reach squat depth easier.
To squat deep, you need to be proficient on a number of fronts, the foremost of which are:
1. You must have sufficient dorsiflexion range of motion (knee over toe ankle mobility).
2. You have to have sufficient hip internal rotation (can be limited by muscular, capsular, alignment, or bony issues).
3. You have to have sufficient hip flexion
(can be limited by muscular, capsular, alignment, or bony issues; this
typically isn't much of a problem).
4. You have to have adequate knee flexion
(this is rarely an issue; you'd need to have brutally short quads to
have an issue here).
5. You need to have adequate core control -
specifically anterior core control - to be able to appropriately
position the pelvis and lumbar spine. This is especially true if we're
talking about an overhead squat, as it's harder to resist extension with
the arms overhead.
If you lack ankle mobility, you either turn
the feet out, go up on your toes, or rely on the crutch that a heel
lift provides. By elevating the heel, rather than going from neutral to dorsiflexion, you are going from plantarflexed to neutral.
Effectively, it brings you a few yards behind the starting line so that
you don't false start, if that makes sense (if it doesn't, don't worry;
I'll have more on this in the video below).
If you lack hip internal rotation, you turn the toes out so that you're internally rotating from an externally rotated position to neutral, as opposed to going from neutral to an internally rotated position.
I think that we all agree that these
positional changes allow you to make up for a lack of mobility - but
that doesn't mean they're necessary a good thing, as you're effectively
loading an aberrant movement pattern. As Gray Cook has taught us, if you
continue to pile fitness (strength) on top of dysfunction, bad things
happen.
As you may have noticed, I've left out
proficiency #5 from above: you have to have adequate anterior core
control. And, it's because I've saved the best for last; this is a HUGE
issue.
I'm going to let the cat out of the bag and
say that I think we've "over-diagnosed" ankle mobility restrictions.
Most people automatically assume that if they have a poor squat pattern,
it's because they have an ankle mobility problem. I'd estimate that in
90% of cases of people who think their ankle mobility stinks based on a
bad squat pattern, they actually test pretty well when you look
specifically at the joint, as opposed to relying solely on a gross
movement pattern. Why? There is a tremendous interaction between
mobility and stability. In this video, I elaborate:
As further proof of the fact that different
athletes will demonstrate their patterns of insufficient control of
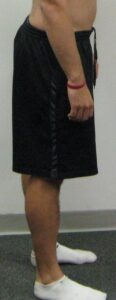
extension differently, check out these four posture pictures of athletes
who had poor squat patterns. In the first, you'll find a pretty
"classic" extension posture that's distributed over multiple joints.
Note the anterior pelvic tilt and lordosis, plus the relatively neutral
knee and ankle positions.
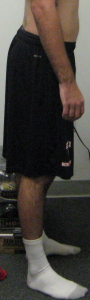
In the second, note the plantarflexed
ankles; this athlete has shifted his "extension compensation" further
down. Do you think he'll have much of a squat pattern with that resting
presentation? He might have perfectly good ankle mobility, but he's
completely unable to shut off his plantarflexors (calves); that's where
he's "finding" his stability.
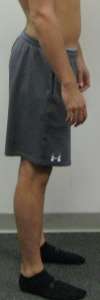
In this third example, the athlete has
dumped forward at the pelvis and lumbar spine to create what could be
considered a swayback posture - even though his ankles actually look
pretty neutral.
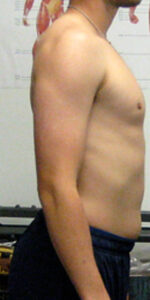
Finally, we'll look more full-body for our
fourth example. Obviously, this athlete is in a heavily extended pattern
through the pelvis and lumbar spine, but note also the positioning of
the arms; his lats are so "on" that he carries his elbow considerably
behind his humeral head, and the scapula dives into anterior tilt.
There's a forward head posture, and while you can't appreciate it well
from this angle, this athlete also had a ton of "tone" in his scalenes,
sternocleidomastoid, and subclavius. He found his stability further up
the chain.
Every single one of these out-of-whack
presentations is a way for the athletes to shift their faulty movement
patterns around to "get by." Athletes are tremendous compensators - but
they all do it differently. I think we can all agree that these are
issues that should be addressed, right? Well, they were - and the
athletes felt a lot better from the training interventions.
How does this relate back to Olympic lifting shoes, though? Well, every single one of these athletes could demonstrate a perfect
squat pattern if I put them in a pair of shoes with this dramatic a
heel lift. It's like giving the most uncoordinated kid in the
neighborhood training wheels...for good. At some point, you've got to
lose the training wheels and learn to ride the bike. And, at some point
you need to stop covering up your poor movement patterns and work to
address them - rather than just loading them - if you want to stay
healthy.
To me, squatting with a pronounced heel
lift is really no different than squatting through a "butt-wink;" they
are both compensations to allow a lifter to maintain the position of the
center of mass within the base of support in the face of a gross
extension pattern. Both fundamentally alter the ideal squat pattern,
though. Conversely, if you use goblet squat or TRX overhead squats to
train the pattern with a subtle counterbalance, though, you're keeping
the movement intact, but reducing the challenge to the lifter.
In folks who have really poor squat
patterns, I'd much rather see them work to improve the squat pattern for
a bit, as opposed to considerable loading of the classic back squat.
While they're working on improving the pattern (through these exercises
and other breathing and core stabilization drills), they can train the
heck out of the lower body with deadlift variations, single-leg drills,
barbell supine bridges/hip thrusts, sled pushing/dragging, and a host of
other exercises. Once their squat pattern has improved, progressing to
a front squat is a great first step, with the back squat coming a bit later on.
With all that said, before I get any hate
emails, let me be abundantly clear: if you move well (i.e., have a good
squat pattern to below parallel in bare feet), then by all means, feel
free to use Olympic lifting shoes for your squatting and Olympic
lifting, if it tickles your fancy. After all, it's only 5-10% of your
training volume, most likely. Just make sure to a) only wear them for
these exercises, b) maintain the underlying "heel-less" squat pattern,
and c) pick the shoes with the smaller heel lift (0.5" instead of
1.25"). You might also consider wearing more minimalist footwear for the
rest of your training sessions to "cancel" the O-lifting shoes out.
And, again, if you're a competitive Olympic lifter, please feel free to
rock whatever you want - and crush big weights doing so.
If, however, you're an athlete in another
sport who uses squatting and Olympic lifting as part of your training, I
don't think it's a useful addition. And, it's certainly not an
appropriate initiative if you are just someone who is looking for a way
to work around your poor mobility. Ignoring a fundamental movement flaw -
and certainly loading it - will always come back to bite you in the
butt.