Tuesday, 10 February 2015

What is CrossFit?

Forging elite fitness

CrossFit begins with a belief in fitness. The aim of CrossFit is to forge a broad, general and inclusive fitness. We have sought to build a program that will best prepare trainees for any physical contingency — not only for the unknown, but for the unknowable. After looking at all sport and physical tasks collectively, we asked what physical skills and adaptations would most universally lend themselves to performance advantage. Capacity culled from the intersection of all sports demands would quite logically lend itself well to all sport. In sum, our specialty is not specializing.
 
 CrossFit is many things. Primarily, it’s a fitness regimen developed by Coach Greg Glassman over several decades. He was the first person in history to define fitness in a meaningful, measurable way (increased work capacity across broad time and modal domains). CrossFit itself is defined as that which optimizes fitness (constantly varied functional movements performed at relatively high intensity). CrossFit is also the community that spontaneously arises when people do these workouts together. In fact, the communal aspect of CrossFit is a key component of why it’s so effective.

Today, CrossFit, the company, provides accredited training seminars throughout the world. We publish several websites providing extensive free content, including workouts, training and support for becoming fit, as well as a growing Journal of extended instruction. We have a worldwide network of more than 11,000 affiliated gyms and more than 100,000 accredited CrossFit Level 1 trainers. And, we have created the Sport of Fitness, known as the CrossFit Games, where we crown the Fittest Man and Woman on Earth.

In 2003, we started a “new” blog that would spur a revolution in the fitness industry. The contents were simple: the date, a picture, the Workout of the Day (WOD), and usually some provocative nugget of information. Check out our first full month of posts back in May 2003.

Anyone with an Internet connection and the willingness, curiosity and bravery to try it, could. From this simple blog and a single gym in Santa Cruz, Calif., there sprung an immense community of fitness enthusiasts who have learned the movements, tested the theory and accumulated a huge amount of data supporting Glassman’s equation:

CVFM @ HI + Communal Environment = Health

A regimen of constantly varied (CV), functional movements (FM) performed at high intensity (@HI) in a communal environment leads to health and fitness.

Publications


Today, CrossFit publishes several websites, including:
CrossFit.com —This is the original blog and main hub for everything CrossFit. Come here for the free Workout of the Day. The WOD (as written) is designed to exceed the limits of the world’s fittest people, but can be scaled to meet anyone’s current fitness.
Journal.CrossFit.com —The CrossFit Journal provides the highest quality instruction, stories and videos. This is the place to learn more about CrossFit in theory and in practice. With years of articles and videos on coaching, equipment, functional movements, exercise physiology, affiliation and much more, the CrossFit Journal is the essential guide to all of CrossFit. Get started by browsing the content by category or date published.
Games.CrossFit.com —Can’t get enough of the CrossFit Games? Check here for stats, archived coverage, athlete stories, interviews and much more. 

Education

CrossFit is not easy and it’s not simple. To be fit and physically competent to handle all of the challenges in life is no small endeavor. As you work to become a fitter and healthier person, you will need to learn about:
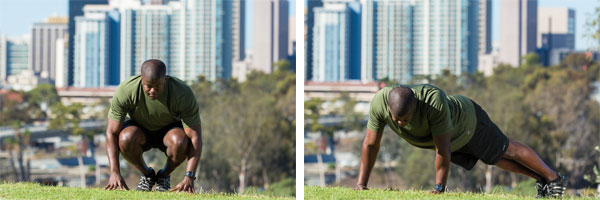
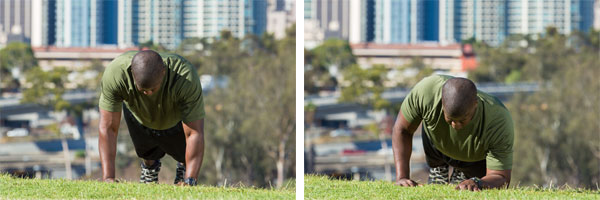
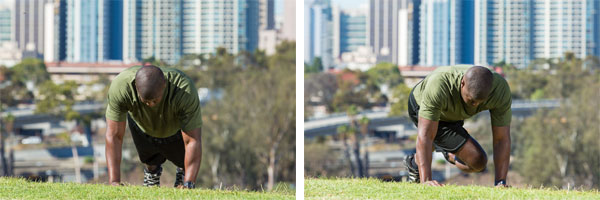
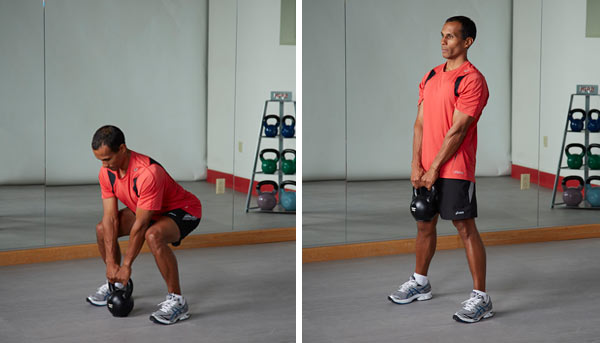
  • Movement - How to move safely and effectively.
  • Fitness - What it means to be fit. Its definition, the supporting theories, and how to go about attaining it in real life.
  • Nutrition - Eat meat & vegetables, nuts & seeds, some fruit, little starch, and no sugar. Keep intake to levels that will support exercise, but not body fat.

Education is a big part of CrossFit. When you start, you are not expected to have the knowledge you need.

CrossFit is an education about movement, fitness, nutrition and community. All of these things require responsibility, common sense, and work to educate oneself using all the tools available in the community.
Source : Crossfit.com
 

Monday, 9 February 2015

Interval Training: Stop with the Tabatas and do some Gibalas!


   Sprinting would obviously have been a necessary requirement for Paleolithic hunter-gatherers, both for the procurement of food and to avoid becoming food! Those who want to argue against that statement with the “persistence hunting” position, I will address that in a future post. Regardless, let’s fast forward to modern day and address a topic pertinent to my initial statement. To say that “Tabatas” have become an extremely popular interval training protocol in the fitness industry would be an understatement. When I wrote a position paper1 back in 2008 on the benefits of sprint interval training, the research conducted by Izumi Tabata et al. was obviously referenced as it added to the body of evidence that supports the benefits of high-intensity intermittent (interval) training (HIIT). However, the interpretation of this protocol in the fitness industry has often been misunderstood, and even when done correctly, I would argue that, for most individuals, it is not the most effective approach to interval training. After all, the protocol tested was simply one that was first introduced by a head coach of the Japanese National Speed Skating Team, Kouichi Irisawa; a protocol one would assume worked well for certain athletes based upon the duration of their events. Further, most good coaches use training methods that are often experimentations that change with time, as more successful protocols take shape. Along these same lines, I believe most people could improve their investment of time by not using the Tabata protocol for their interval training; but rather, use a different approach.
For the uninformed, in 1996, Tabata et al. published the findings of a study comparing moderate-intensity endurance training (MIET – 70% VO2 max for 60 minutes, 5 days per week) with HIIT (170% VO2 max for 20 seconds x 7-8 with 10 seconds recovery, 5 days per week) on a cycle ergometer.2 The study found that HIIT improved maximal oxygen uptake slightly more than MIET; but, also improved the anaerobic capacity by 28% while the MIET had no effect on the anaerobic capacity. So, essentially, a “two for one” in terms of improving metabolic capacities for the HIIT protocol.
While the results of the study were important for the comparison of MIET to HIIT, other interval training protocols have demonstrated similar and; in some cases, even greater benefits with a decreased investment of time.3, 4, 5, 6 These latter studies support what I have witnessed clinically over nearly 20 years, which is, that intensity, not duration, is the key ingredient for beneficial physiological change. The intensity of the HIIT protocol examined in the Tabata study was 170% VO2 max, which, while correctly being labeled supramaximal (above 100% VO2 max) and certainly “high-intensity,” is nowhere near a maximal sprint effort given that humans are capable of intensities around 250%. The power output sustained for a maximal effort for the duration of the exercise time of the Tabata HIIT protocol (140 seconds to 160 seconds), is very different to the power output sustained for a maximal effort for an “all-out” sprint lasting, say, 30 seconds. If 170% VO2 max was all one had to escape a predator in primitive times (or today for that matter), it is pretty much a guarantee that you are going to be out of the gene pool in short order! 100% VO2 max represents the power output attained when one reaches maximal oxygen consumption during a graded exercise stress test. Any human starting out at that equivalent intensity would not find it anywhere near a maximal effort for a short “all-out” sprint.
When sprinting “all-out,” most individuals are going to start slowing down within seconds; but, could probably still hold a decent percentage of their maximum power output for anywhere between 20-60 seconds, depending on their level of conditioning, and, in particular, their ability to handle the lactic acid production associated with supramaximal exercise. Considering the short duration of supramaximal activity, it generates a relatively large volume of excess post-exercise oxygen consumption (EPOC), partly due to the lactic acid production. Research has shown a significantly larger EPOC is generated for a 45 second “all-out” sprint compared to a 30 second “all-out” sprint, and a significantly larger EPOC is generated for a 60 second “all-out” sprint compared to a 45 second “all-out” sprint.7 However, a 90-second “all-out” sprint did not generate a larger EPOC than a 60 second “all-out” sprint. The reason for this is that lactic acid production typically reaches its peak at around 60 seconds of supramaximal exercise, which, in turn, inhibits muscular contraction and thereby decreases the production of further large quantities of lactic acid.  Anyone can easily experience this for him or herself. There simply is not a human on the planet that can maintain close to maximal power output without a precipitous drop-off at around 60 seconds. If you find otherwise, immediately contact your country’s Olympic Committee as I can assure you that you will be in high demand! So, 60 seconds is essentially a maximal and optimal duration to engage in supramaximal activity. Perhaps selective pressure with respect to our ancestral survival played a part in this physiological reality.
Now, back to the Tabata protocol. There are two ways in which individuals in the fitness community are misinterpreting this methodology. First, and perhaps somewhat ridiculously, are those individuals and classes that label their work-outs as “Tabatas” because they simply exercise for 20 seconds (at relatively low intensities), rest for 10 seconds, and then repeat the same for seven to eight intervals, and then, in some cases, even repeat again for an hour long workout. Anyone engaging in this approach is as far away from supramaximal interval training as one can get. The second misinterpretation comes from those that are completing the seven to eight 20 second intervals as “all-out” efforts.  With this approach, based upon the previous discussion about 60 seconds being an maximal duration for “all-out” exercise, any intervals past the first three 20 second sprints are essentially a waste of time. The only way someone can complete seven to eight 20-second intervals with only a 10-second recovery is to back down from an “all-out” sprint, to an intensity similar to that tested in the Tabata study. Doing this certainly has its merits for athletic endeavors that last for 140 seconds to 160 seconds; however, for the average individual and most athletes, I would argue that the protocol researched by the group headed by Martin Gibala from the Department of Kinesiology at McMaster University in Hamilton, Ontario, Canada, is a much more effective approach to interval training.
This protocol, as first described by Burgomaster et al.,3 involves completing “all-out” 30-second sprints (also on a cycle ergometer) with a 4 minute recovery between exercise bouts. The number of sprints increased from 4 during the first two sessions, to 5 in the third and fourth sessions, and 6 in the last two sessions. The total time commitment was 17–26 minutes per session, involving only 2–3 minutes of sprint exercise. Exercise sessions were completed every two to three days such that 16 minutes of exercise was completed in a two-week time period.  The results of this protocol showed a doubling of the participants’ endurance capacity! So these benefits occurred over a two-week period using just 16 minutes of sprinting. Further studies using this same protocol have been shown to substantially improve insulin action in young sedentary subjects, a much-needed outcome in this world full of metabolic syndrome.4 This demonstrates that quality not quantity causes physiological change for the better and, in many cases, the Tabata protocol in the fitness industry has become a methodology that has moved away from quality toward quantity. Further research has now shown that intense bouts as short as 6-20 seconds can have a tremendous benefit on physiological health, emphasizing, again, that intensity, not duration, is the key element to beneficial change.5,6 I have also found clinically, that these very short bouts of intense activity are better adhered to while still providing tremendous improvements in health and performance.
Moreover, I found a common objection to this methodology is that unfit and elderly individuals should not engage in this type of supramaximal activity due to the inherent dangers of engaging in such intense activity. With extensive experience in this field, I have never had a situation where an unfit individual or an elderly individual has had a problem with engaging in this kind of supramaximal activity. In fact, I would argue that it is beneficial to engage in this type of exercise in a controlled environment; rather than leave it to the reality of life where external pressures may demand an effort above which one is physiologically not trained to handle.  Interestingly, an increased QT dispersion (QTd) – a marker of myocardial electrical instability that predicts ventricular arrhythmias and sudden cardiac death – has been shown to be decreased with short-term supramaximal exercise.8 This supports the notion that short-term supramaximal exercise is an appropriate approach for anyone to improving one’s physiological health.
In closing, unless you have an athletic event lasting between 140 seconds to 160 seconds, skip the Tabatas and engage in Gibalas or some other shorter interval training protocol that produces better results with a smaller investment of time.  And don’t overdo the quantity of “all-out” sprints – eight to twelve minutes per week is sufficient to reap the benefits without the risks associated with overtraining.

Source Dr. Mark J. Smith

Sunday, 8 February 2015

High Protein Bread!

I use this product daily.  If you want a delicious high protein bread try this. This is a super low carb, high protein, high fat loaf, it is gain-free, sugar-free and has dairy-free options. Delicious served toasted with eggs or avocado (or both) or just use as a sandwich base and fill with your favourite ingredients.

Prep time:
15mins
Cook time: 50mins
Yield: approx 20 slices

Ingredients:

  • 3 scoops Coconut 180Superfood
  • 1 cup ground linseed
  • 1/2 cup pumpkin seeds
  • 1/4 cup sunflower seeds
  • 2 Tbs chia seeds
  • 2 Tbs sesame seeds
  • 1/4 tsp salt
  • 2 tsp baking powder
  • 60g melted butter or coconut oil
  • 4 eggs
  • 1/2 cup natural yoghurt or coconut cream
  • 1 Tbs apple cider vinegar

Instructions:
  1. Preheat oven to 180c and line a loaf tin with baking paper.
  2. Place pumpkin seeds and sunflower seeds in a food processor and process until ground but still with some chunky bits.
  3. In a large bowl mix together 180, ground linseed, chia seeds, sesame seeds, salt, baking powder, pumpkin seeds and sunflower seeds.
  4. In a separate bowl whisk together wet ingredients until well combined.
  5. Pour wet ingredients into dry and mix gently to combine – will make a thick batter (not a bread dough), if it seems too dry add some extra yoghurt or coconut cream.
  6. Transfer to loaf tin and bake for approx 50mins until firm.

Nutritional Information:
Amount per slice – approx 20 slices 
Calories 154.8 Total Carbohydrates  4.9g
Total Fat 12.4g Dietary Fibre 3.2g
Saturated Fat 4.0g Sugars 0.5g
Polyunsaturated Fat 3.4g Protein 7.5g
Monounsaturated Fat 2.9g Sodium 53mg

Net Carbs per slice = 1.7g (Total carbs – indigestible fibre which has no impact on blood sugar).

Friday, 6 February 2015

How much protein per day??

Remember that not all proteins are created equal. For example, vegetable based proteins are known as incomplete proteins as they dont contain all of the amino acids, animal based proteins are known as complete proteins as they contain all of the amino acids. What you absorb is also very important, a chicken breast or piece of steak is 35% bio available, an egg is 65% bio available and whey protein is 90-95% bio available, which makes it the most superior form for our bodies.

Isagenix uses 'Happy cows' which means they have been pasture fed on natural diets with no chemicals used on the grass, there's no hormones, streriods or antibiotics used on them and they are only milked when in season. The milk is then cross membraned, cold extracted which ensures that the vital nutrients are not destroyed, as can happen with isolated protein products.

Below is a good guideline.  Remember the threshold of protein per meal or in one sitting is 35-40 grams. Anything beyond that is a waste.  The key is to trickle protein into your body throughout the day.  The body will break it down and use it throughout the day.  

Once you find out what your goal grams of protein per day are, then factor in your IsaLean or IsaLean Pro shakes, then design your prepared meals with protein, like turkey, chicken, fish or bison, around the remaining protein requirements.

Person, Situation & Goals

1 Kilo = 2.2 pounds

Average healthy sedentary adult (male or female) that does NOT work out or have any related goals. This is just what I consider to be a good minimum daily protein intake for general health/function- 0.5-0.7 grams of protein per kilo of body weight.

Average healthy adult (male or female) that IS doing some form of exercise regularly or IS trying to improve their body (lose fat, build muscle, etc.). This is the minimum I’d recommend in this case- 0.8-1 grams of protein per kilo of body weight.

Average healthy adult FEMALE whose primary goal is building muscle, getting “toned,” maintaining muscle while losing fat, increasing strength or improving performance- 1-1.2 grams of protein per kilo of body weight.

Average healthy adult MALE whose primary goal is building muscle, getting “toned,” maintaining muscle while losing fat, increasing strength or improving performance- 1-1.7 grams of protein per kilo of body weight.

EXAMPLE--- For 1.7 grams of protein per kilo-
You take your weight, divide it by 2.2, then times that by 1.7= grams of protein per day-
200 lbs divided by 2.2 = 90.9 then times that by 1.7 = 154 grams of protein per day

Wednesday, 4 February 2015

Pure protein vs manufactured protein

Which whey protein is right for you? With Isagenix, the answer is easy: New Zealand whey. See our “Which Whey Protein is Right for You?”  by clicking here

If the old saying, “you are what you eat,” is right, you will rethink consuming products from grain-fed cows. A new study shows that cows fed high-grain diets have a higher incidence of metabolic disorders related to the build-up of several toxic and inflammatory compounds as well as changes in amino acid profiles in their digestive fluids compared to cows on low-grain diets. Having these metabolic complications (and the need for antibiotic use) negatively affects the quality of dairy products produced, including the whey protein found in milk.

In the study, cows were fed diets consisting of 0-, 15-, 30-, or 45-percent barley grain. Scientists used a combination of measuring techniques to identify 93 metabolites in digestive fluid samples taken from the cows. What they found was shocking. The cows that were fed the high-grain diets (>30 percent) had significantly increased amounts of toxic and inflammatory compounds in their digestive fluids including:
  • Putrescine—a foul-smelling organic chemical compound that is produced in the breakdown of amino acids in living and dead organisms. It is responsible for the odor produced during flesh decomposition and contributes to “bad breath.” It is toxic in large amounts.
  • Methylamine—organic compound with a strong odor similar to fish that is used to make agricultural chemicals such as herbicides, fungicides, and insecticides.
  • Ethanolamine—a toxic, flammable, corrosive liquid used in the production of detergents, polishes, and pharmaceuticals.
The anatomy of a cow was built to live off a diet of grass and shrubbery. However, due to high market demands, farmers have turned to grains such as corn for feed because of convenience and money. It is a lot more economically sound to confine cows to feedlots and feed them grain, which can be digested faster allowing them to “fatten up” quickly. In the eyes of a businessman, this is advantageous; however, science is showing that high-grain diets promote the development of disease and illness because cows are not built to digest grains.

The several perturbed amino acid profiles in the digestive fluids of cows fed high-grain diets included phenylalanine, ornthithine, lysine, leucine, arginine, valine, and phenylacetylglycine. While microbial protein in the rumen (main digestive organ of cows) is an excellent source of high-quality protein, it is not sufficient enough to meet the requirements for high levels of milk production. If amino acids are disrupted in the rumen, their ability to be absorbed is severely reduced.

Unfortunately, it is not just high-grain diets that are of concern here. Byproduct “feedstuffs” are used as cheap fillers in feed for cows and include poultry feather pellets, animal fat, potato waste, soy cakes, poultry carcass, and meat processing waste.

Dairy cows have been turned into machines with the goal of pumping out large amounts of milk at the expense of their health, and consequently, the quality of dairy products. You can trust that Isagenix is not one to choose convenience over quality. Isagenix uses an undenatured whey protein blend sourced exclusively from grass-fed dairy cows raised on the pristine pastures of New Zealand. The “Cheerful Cow Certified” label on IsaLeanIsaLean Pro, and IsaPro shakes is a reminder of the unbeatable quality you receive from Isagenix.

 Source Rob H / CFL
 

Tuesday, 3 February 2015

Boot Camp-inspired Plank Workout


Military fitness training is, first and foremost, warrior fitness and focuses on four key components. Each of these components is necessary to develop a total, well-trained and prepared warrior:
  • Physical training creates strength and stamina,
  • Emotional and mental training instills desire, follow through and motivation.
  • Technical training brings in knowledge and skill of execution.
Basic combat fitness is functional and begins with pre-exercises that prepare the body. These conditioning drills and exercises can be performed anywhere, require no equipment, can be used with large or small groups, and are adaptable to individual fitness levels.
For your warm-up, begin at the head and move down the body:
  • Turn your head left and right, floor to ceiling, right and left; next, do head circles.
  • Do shoulder rotations to the front and to the back, with arms relaxed to the sides of the body.
  • Make loose fists and rotate wrists forward and backward.
  • Twist the torso to the left and right, allowing the arms to freely swing around the body.
  • Place both hands at the small of the back and gently rotate the hips in each direction.
  • Place both hands on the knees and make gentle knee circles in each direction.
  • Place one foot on point and rotate the ankle, first in one then the other direction; switch feet and repeat.
THE WORKOUT
Perform the following exercises to cadence (six to 10 reps), timed (45 seconds per exercise with 15 seconds of active rest for four rounds; rest one minute between rounds) or at will (complete 100 reps total—20 per exercise at your own pace).
Diagonal Squat Thrust (4-count movement)
diagonal squat thrust
Starting Position: Standing
Squat and place your hands on the ground, shoulder-width apart. Thrust the feet and legs diagonally backward to the left to high plank position. Maintain an engaged core and keep the body rigid from head to heels, with feet at a 45-degree angle to the hands. Jump back in to the squat position, return to full standing (starting position) and repeat, alternating right and left, for six repetitions. To modify, thrust straight back for count 2 or step back each foot to assume plank position.
Left and Right Push-up (4-count movement)
left and right push up
Starting Position: High plank, with feet together and thumbs touching
Move your right hand to the right and lower your body low to the ground while keep your core fully engaged. Raise your body (push up) while moving the right hand back to the starting position. Repeat this move on the left side; continue to alternate right and left.
Alternating High and Low Plank (2-count movement)
alternating high and low plank
Starting Position: High plank, with wrists directly below shoulders, core engaged and body rigid
Take the right forearm down to a low plank and then bring the left forearm down to low plank. Press the right palm into the ground and return to high plank and then repeat with the left palm. Repeat high and low plank movements with minimal body shifting (some is necessary).
Low Plank Hip Tap (4-count movement)
low plank hip tap
Starting Position: Low plank with feet together
Maintain a low-plank position and twist the torso to the left, tapping the right side of the hip on floor. Return to low plank and then twist the torso to the right, tapping the left side of hip on floor under body. Return to low plank and repeat. This movement works well with cadence or at will. Try to keep your heels together and keep the upper-body shifting to a minimum.
High Plank Cross-body Knee to Opposite Elbow (4-count movement)
high plank cross-body knee tap
Starting Position: High plank with feet a comfortable-distance apart
Keep the core engaged and a firm high-plank position as you bring the right knee to the left elbow, shifting the body slightly forward. Rotate the right hip toward the floor, with the foot, knee and ankle at a45-degree angle, hovering just above the floor. Return to the starting position and repeat on the opposite side. This exercise is ideally performed at cadence to ensure proper execution and purposeful movement.
Note: When these exercises are performed as a circuit or at cadence, run in place, slow march/step kick or perform side straddle step/power jacks or jumping jacks between each exercise.
Finish your workout with the following conditioning exercises, which are performed while lying supine on a mat.
1. Cross the ankles, interlace the fingers and fully extend the body, inhaling and holding for a count of three; exhale, relax and repeat four times.
2. Extend the right arm out, perpendicular to the body. Bring the right knee across body, using the left hand to hold it in place. Count to 10 and release. Repeat on the other side.
3. Bring the right arm across the chest and hold it with the left hand for eight counts. Release and repeat with the left arm.
4. Bring both knees to the chest and roll slightly side to side to release the low back.
5. Lie completely relaxed, palms up, if desired, eyes closed. Allow the body to completely relax for a full minute.

Source :  Valetta Stewart V.R. Stewart

Monday, 2 February 2015

How to Get Started With Kettlebells

The best athletes in the world all start at the beginning. To be good, great or the best, there are no shortcuts. Regardless of your goal—to be the world’s best or to start training with a new tool as a way to introduce something fresh to your program—the key is to start with the basics. That means learning and mastering the basics skills before focusing on how much, how long or how fast.
 In an ACE-sponsored study, researchers from the University of Wisconsin-La Crosse concluded that, in addition to the predicted strength gains, kettlebell training improved core strength and dynamic balance, and increased aerobic capacity. With such a diverse increase in specific exercise markers, it’s no wonder kettlebell training continues to grow in popularity.
Regardless of where you want to be in three, six or 18 months, using kettlebells can be a great way to help you reach your goals. Like most training tools, using the correct technique is critical. Take the time to perfect your technique before progressing to the more advanced moves. Many of the advanced movements in kettlebells build on the basics swings and catches. As you become more proficient, the basics moves can become part of your warm-up routine to prepare you for the more complex movements. Don’t let the need to use a heavy starting weight get in the way of your technique. If your goal is to use the heaviest kettlebell out there, don’t worry—it’s waiting for you. Perfect your technique first. Remember—practice makes permanent, and perfect practice makes perfection.
This program should be completed after running through a warm-up, paying particular attention to ensuring the glutes, hips, torso and shoulders are warm. Rather than focusing on reps, a different approach is to complete a few reps, stop, rest and repeat. As you become more comfortable, add a few more reps. Set yourself a time range in which you want to work. It is more important to complete the reps while using good form than it is to check the box for a certain number of reps. When starting out, take 20 to 30 seconds to complete a set and then rest for 30 seconds. Spend no more than five minutes on each exercise.
Kettlebell Deadlifts
kettlebell deadlift
This is a great exercise to start warming up the body.
Set up: Stand with the feet shoulder-width apart, toes slightly out. Keep the chest up and the back straight. Bend at the hip and slightly at the knees to lower and grip a kettlebell with both hands.
Follow up: While keeping the weight on your heels, drive the hips open to a standing position. Brace the core and squeeze the glutes.
Kettlebell Two-arm Swing
kettlebell two-arm swing
This exercise is a foundational movement. Once you master this exercise, you can proficiently move to other movements such as the single-arm swing, snatches and cleans.
Set up: Start with a kettlebell on the floor, centered in front of your feet. Assume a deadlift position. Grasp the kettlebell and extend and hike/pull the kettlebell up and back through your legs. As the kettlebell reaches the end of its arc, use an explosive sharp movement and extend your knees and hips.
Follow up: Contract the glutes as you extend the hips, and keep the biceps close to the rib cage. The kettlebell should travel up to approximately mid chest height.
Kettle Single-arm Swing
kettlebell single-arm swing
This movement starts to challenge the core because you not only need to control the kettlebell as it swings through its arc, but the rotation as well.
Set up: Start with a kettlebell on the floor, centered in front of your feet. Assume a deadlift position. Grasp the kettlebell with one hand and extend and hike/pull the kettlebell up and back through your legs. As the kettlebell reaches the end of its arc, use an explosive sharp movement and extend your knees and hips. The kettlebell should travel up to approximately mid chest height. (Tip: Turn the thumb of the hand holding the kettlebell toward the glutes as you swing back and then twist (supinate the forearm) toward the front as you swing the kettlebell forwards.) Complete the desired number of repetitions and then switch sides.
Follow up: Keep the grip arm straight and strong through the arc.
Goblet Squat
goblet squat
This exercise is just one of a few different ways to perform a squat using kettlebells.
Set up: Hold a kettlebell with both hands at chest height. Stand with the feet shoulder-width apart, toes slightly out; keep the chest up and back straight.
Follow up: Bend at the hips and knees and push the hips back. Keep the elbows forward as you sit back down into a squat. Keep the weight on the heels as you drive the hips back up to a standing position.
Lunge
Kettlebell lunge
This exercise can be also performed with a kettlebell in both hands or with a single kettlebell extended over the head.
Set up: Stand comfortably and hold a kettlebell in the right hand. Step forward into a lunge with the left foot.
Follow up: While keeping the chest lifted and the shoulders pressed back, push through the forward leg back to the standing position. Complete the desired number of repetitions on one leg and then switch sides.
 
Source : Anthony Wall, MS / ACE